Did you notice an error message “Unfortunately, Settings has Stopped” after performing a factory reset on Android? Or come across unfortunately com.android.settings has stopped after factory reset? If yes, then I must say that you should work on it to solve the error ASAP.
Let me tell you, Unfortunately, Settings has Stopped error can be the signal of any serious issue or any minor firmware problem. Hence, if you don’t fix this error soon, it can cause a major issue on your phone.
Although, if you really want to solve this bug as quickly as possible, just go through this post. Here, you will learn the best approaches to Fix “Unfortunately, Settings has Stopped” After Factory Reset Android.
So, what are you waiting for ……..Hurry up!
Table of contents:
Part 1- How Do I Fix Unfortunately Settings Has Stopped Working On Android Automatically?
If you want to fix “Unfortunately, settings has stopped” after factory reset Android issue, you can use the most recommended Android Repair Tool. This tool doesn’t require any technical skills & is very friendly to its users.
Apart from that, it has the capability to fix “unfortunately accessibility has stopped” or “settings keeps stopping Samsung” issues easily including other kinds of errors. Some other errors it can fix like vertical lines on Android, Pandora keeps crashing, WhatsApp has stopped, Gboard not working, Spotify keeps crashing, etc. It will make your phone as normal as before. This tool is easy to use and works on all Android phones in any situation.
So, just download & install Android Repair Software, and then try its easy steps to troubleshoot “unfortunately settings has stopped Xiaomi” or other brands.
Free Download Android Repair Tool

 (* Free version only scans and allows to preview recoverable stuff)
Follow The Steps To Fix Setting has stopped after factory reset Android
Part 2: How To Fix Android Settings Has Stopped Manually?
To resolve the error, Unfortunately, Settings has Stopped, just follow the simple manual methods. All the methods are tested and have proven effective.
Let’s get started:
Method #1: Re-Start The Android Device
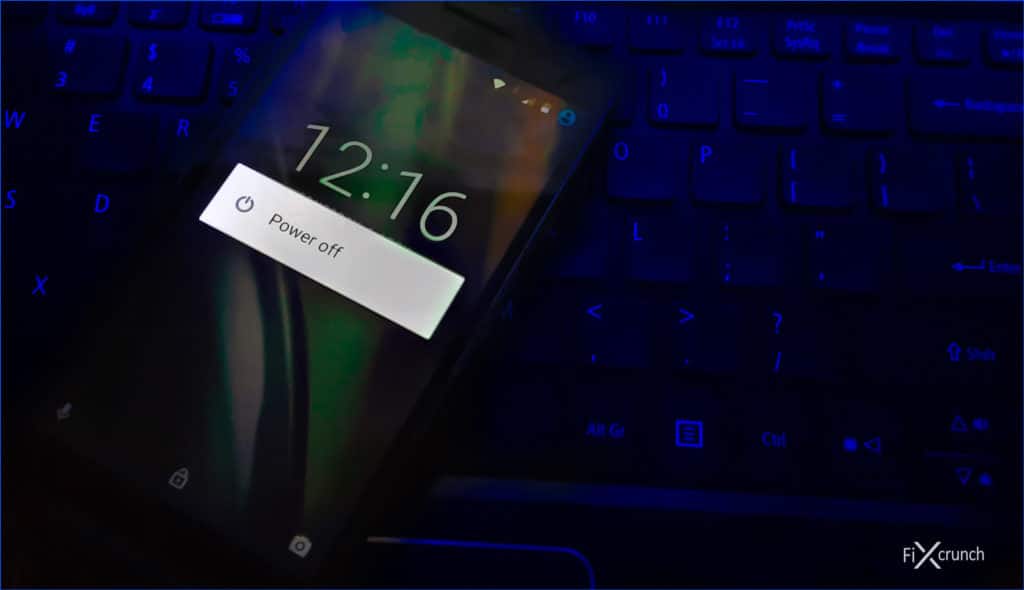
Sometimes, many of the minor bugs can be solved by simply rebooting any Android device. So, let’s try out this way to resolve Unfortunately, Settings has Stopped error:
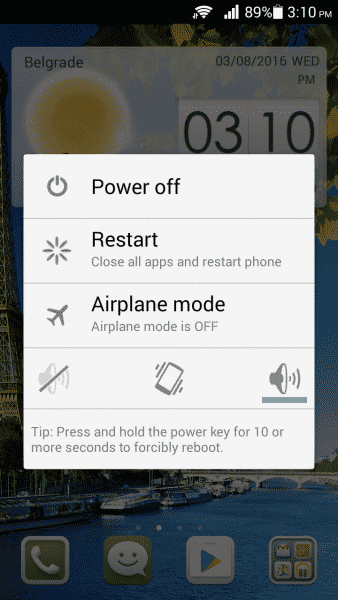
- At first, press & hold the “Power” key until the pop-up box will appear.
- Make a click on restart opt & hit Ok to move ahead
After applying the given steps, go to your setting app on Android to check whether the issue is fixed or not.
If doing so couldn’t able to fix this bug, try out the next way.
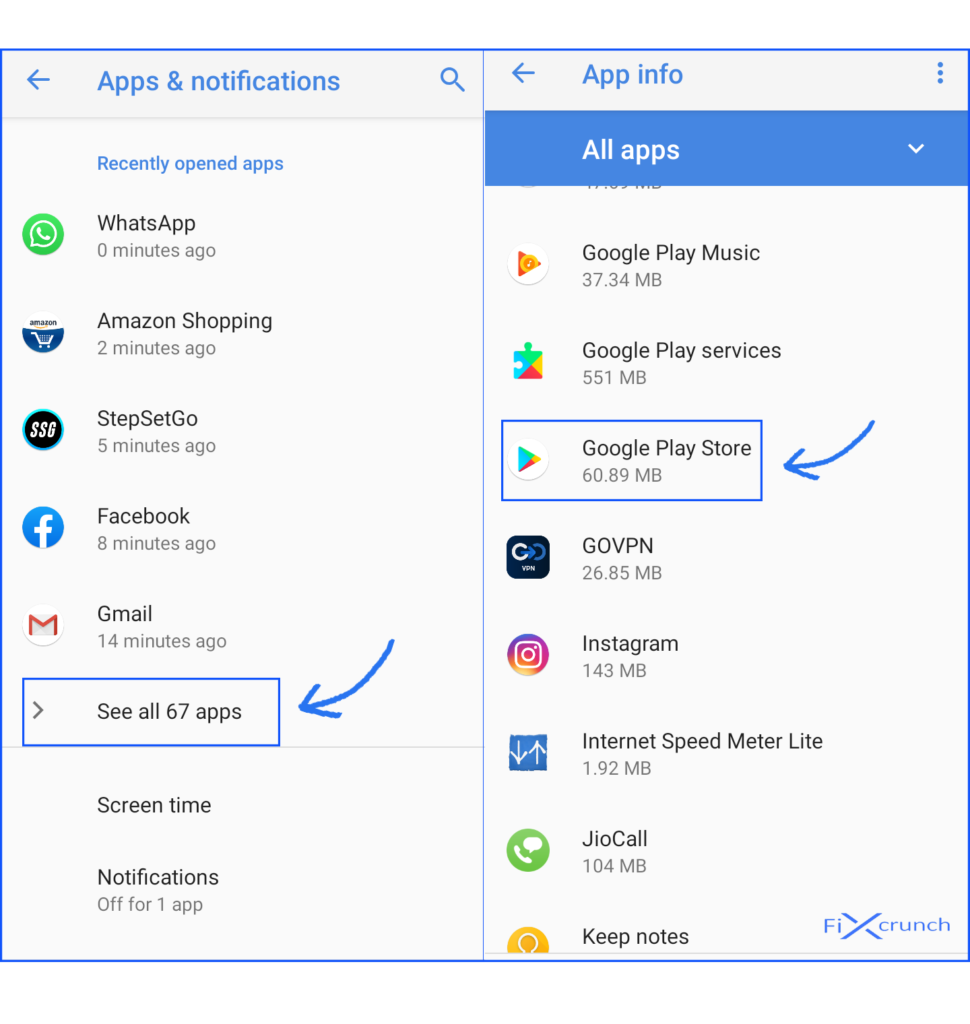
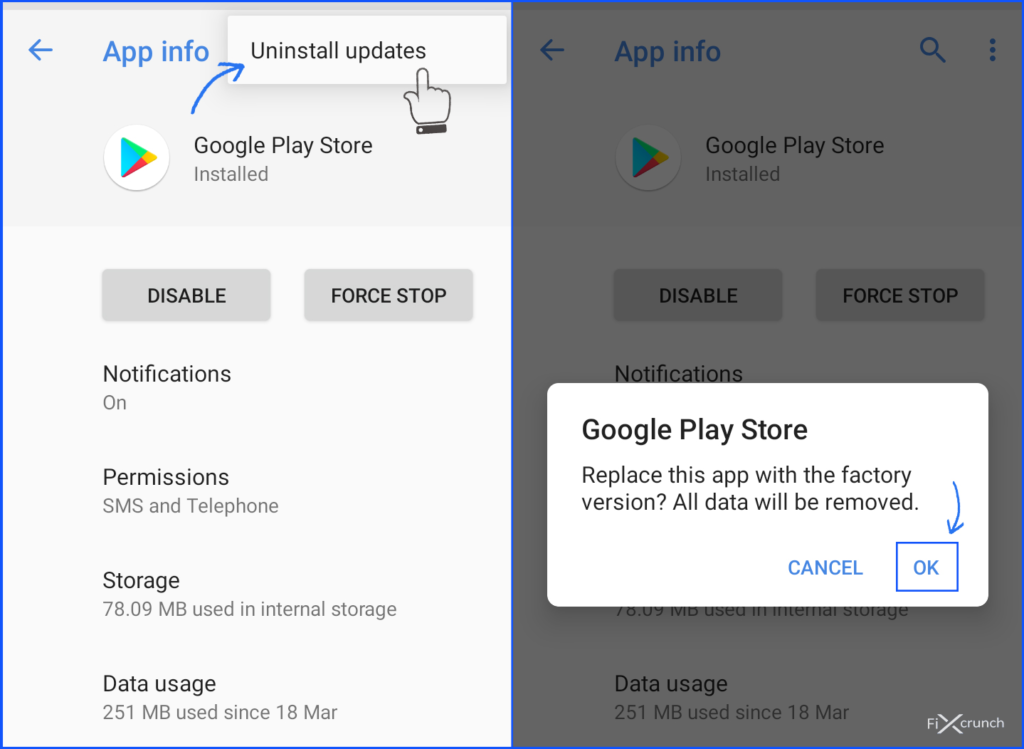
Method #2: Uninstall The Recent Google Update
Uninstalling the updates of the Google Play Store has also worked well to fix “Unfortunately Settings has stopped” error. So, you are suggested to make use of this solution. Now, follow the guided steps:
- From your Android device go to the “Settings” app & simply click on “Application manager”
- Now from there, you have to select “Google Play Store”
- Lastly, hit on “Uninstall Updates” & reboot the phone in order to check if the issue is fixed.

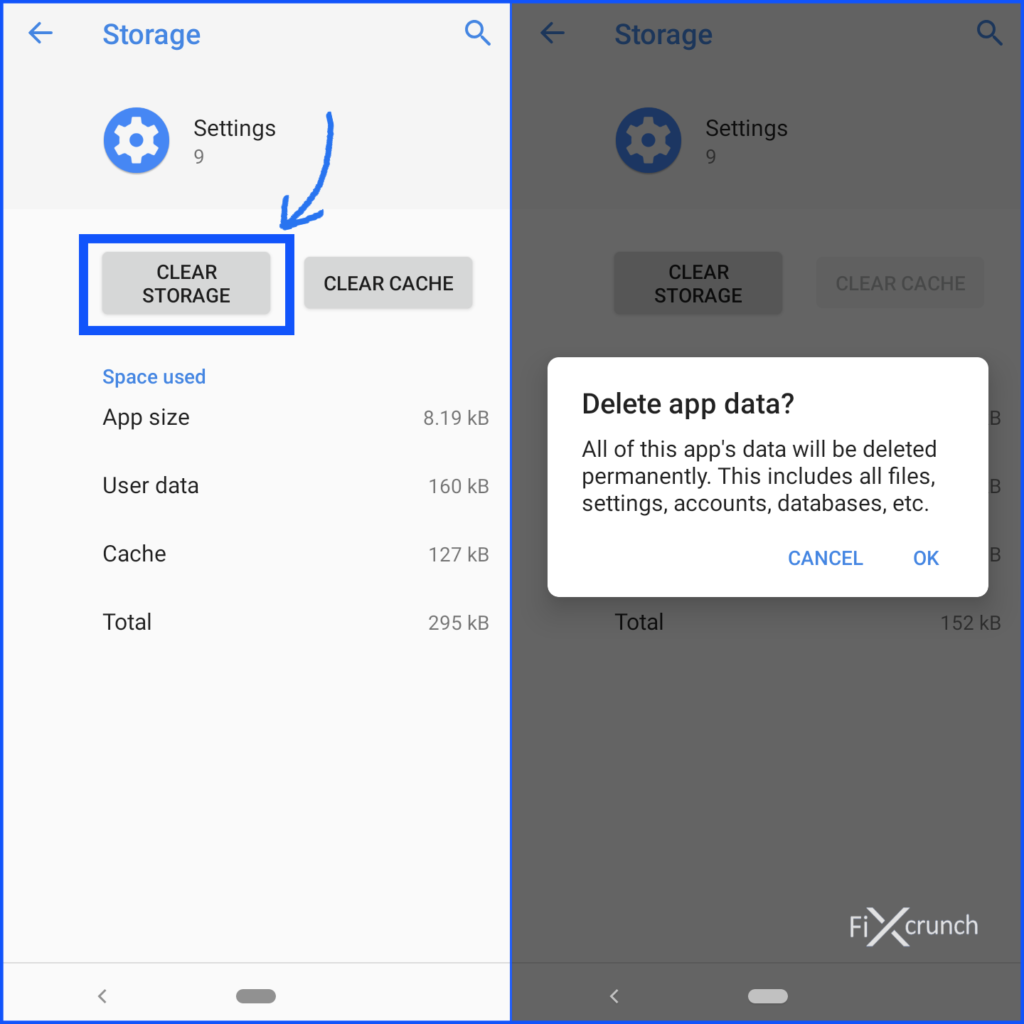
Method #3: Clear The Cache From Your Phone
There is a possibility that the cache files existing on the device may be responsible for the occurrence of this error. So, you can check it by clearing the cache from your Android phone. See how:
- Open your setting app and then go to the storage
- Here, you’ll get the option to clear the cache files, just make tap on clear cache.
Now, you will see that all the cache files have been deleted from your Android device.
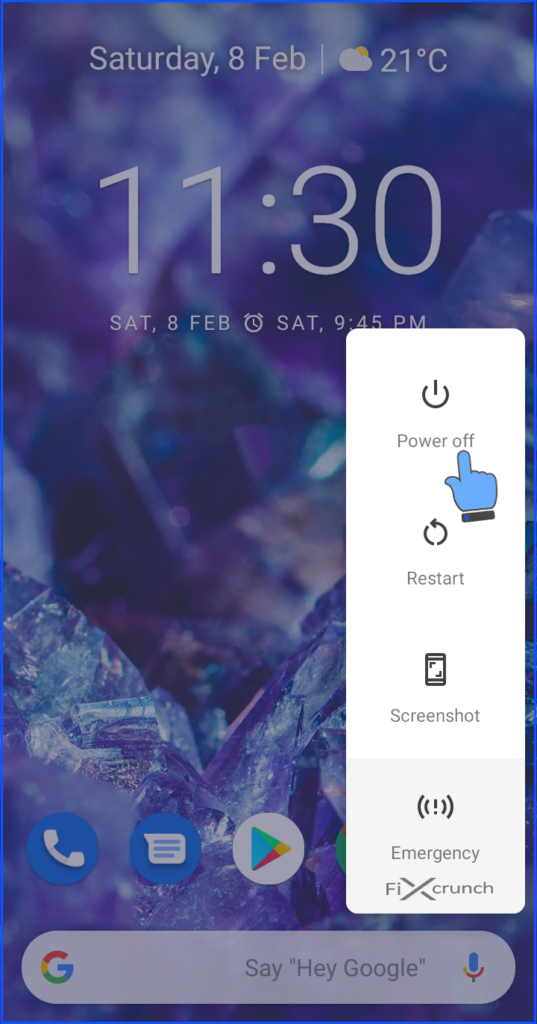
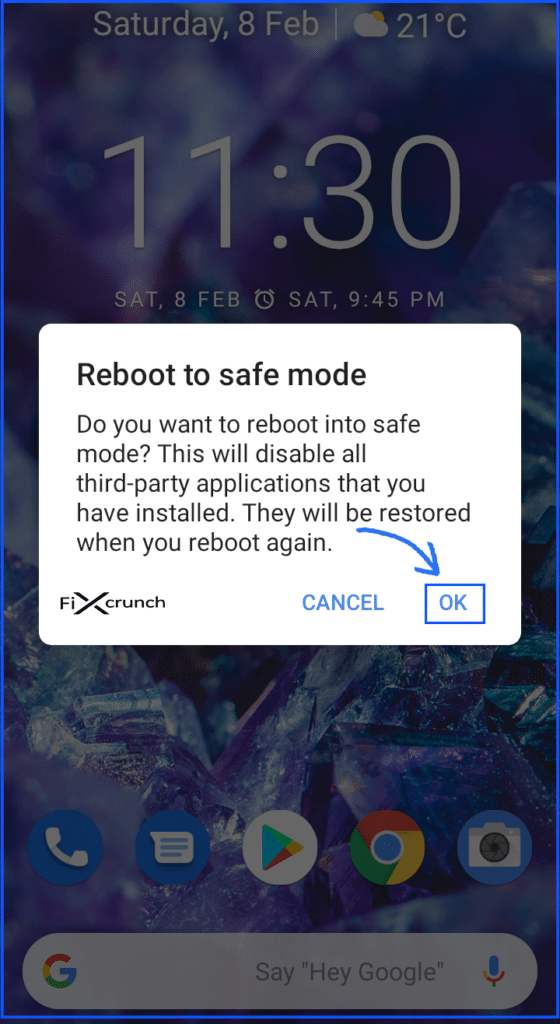
Method #4: Boot Your Android Phone Into Safe Mode
Several times, it happens that third-party apps are responsible for the occurrence of this kind of error. So firstly, you need to uninstall the third-party apps. Here are the steps you have to follow to repair “settings has stopped Mi Note 5” problem:
- Press & hold the Power key, as the pop-up will appear simply press & hold the option Power off
- Here you’ll be asked that do you want to restart your phone in Safe mode
- Now, click on OK

Method #5: Reset All Settings (if it is possible)
This solution may help you to get rid of Fix “Unfortunately, Settings has Stopped” After Factory Reset Android which the other solutions unable to do.
Let’s see the steps now:
- From the Home screen, touch & swipe up / down to see all the applications.
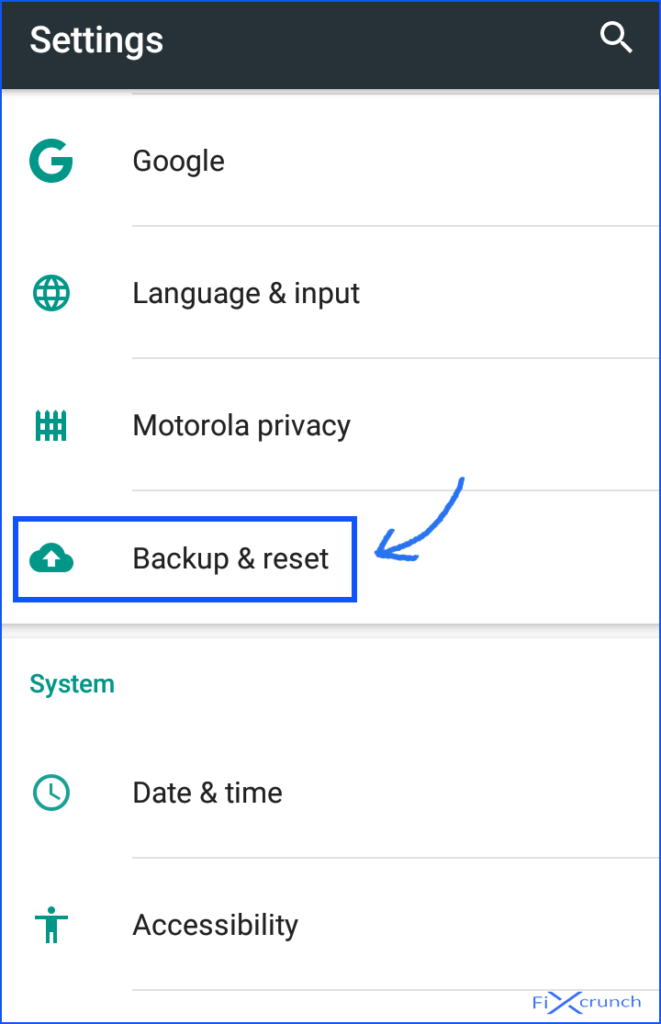
- From the Home screen, go to Settings and then Backup & Reset
- Tap on Reset settings to confirm it.
- Enter your password/pin or pattern if it’s applicable
- At last, click on Reset settings.
Method #6: Wipe The Cache Partition
If you are getting annoyed with the error “Unfortunately Settings has stopped” then just simply switch off the Android phone & open it in recovery mode. Now, from there wipe out the cache partition by following the below steps:
- Turn off your device & at the same time press and hold the combination keys together
- After some time, you’ll see the Recovery screen
- As you’ll see in the Recovery menu, make use of the Volume button in order to navigate & Wipe cache partition option
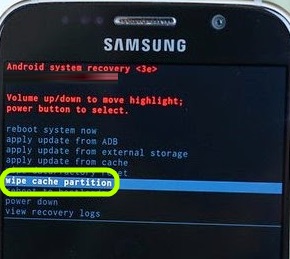
- Now, select that by using Power
- After executing the above steps simply select the restart option
Method #7: Clearing The Cache Data Of Settings
You can also try to solve the bug by clearing your cache files from the setting app. And doing so will also help your phone to work properly. Start following the given steps:
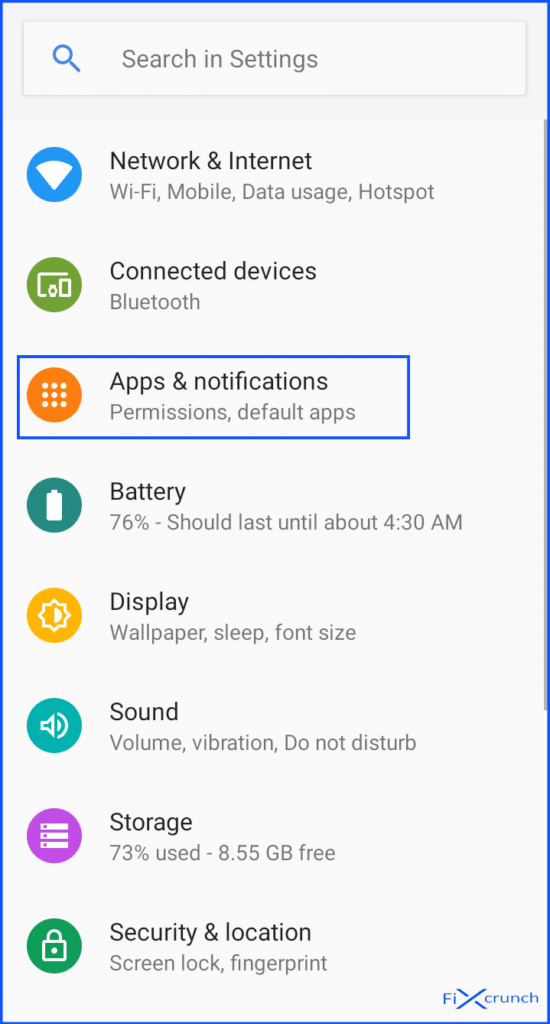
- Open your settings app and then choose “Apps & notifications” (options may be different on different devices)
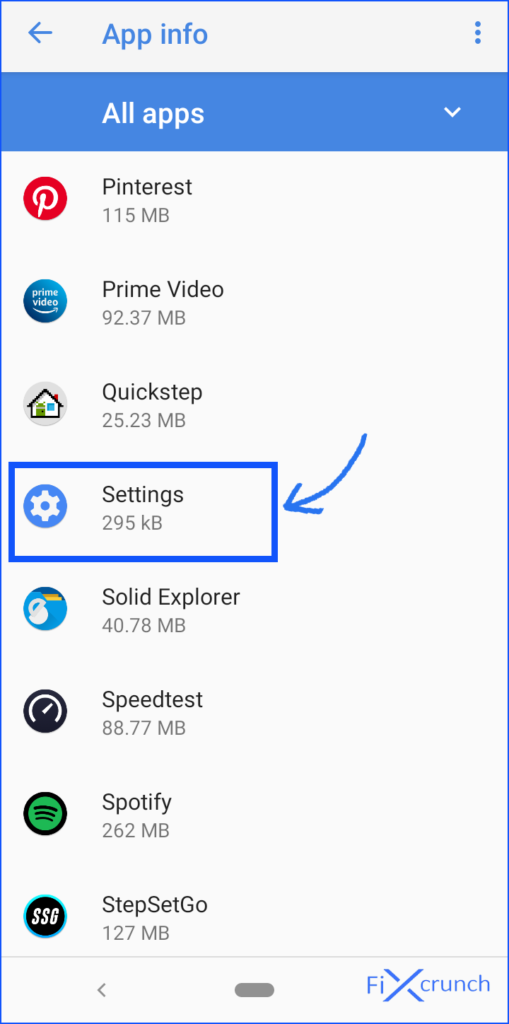
- From the app list, find the “Setting” & open it
- Here, choose “Storage” which is followed by “Clear Cache”.

Note: In other phones, the “Clear Cache” option may be found after clicking on “Force Stop”.
Method #8: Clean RAM Of Your Phone
Clearing your device’s RAM may help you to resolve the “Unfortunately, Settings has stopped” error. Try out the below-given steps:
- Navigate to your device’s RAM Manager.
- Clear the RAM of your phone by clicking on Clear RAM/ something similar to that.
- Now, run your Settings app without any error

Method #9: Clear cache data from your phone
Another option you can also try to solve this error that is – clearing the cache memory from your phone. Doing so will permit your device to store the fresh cache files & helps your applications to access properly. For this, you need to follow the very simple steps:
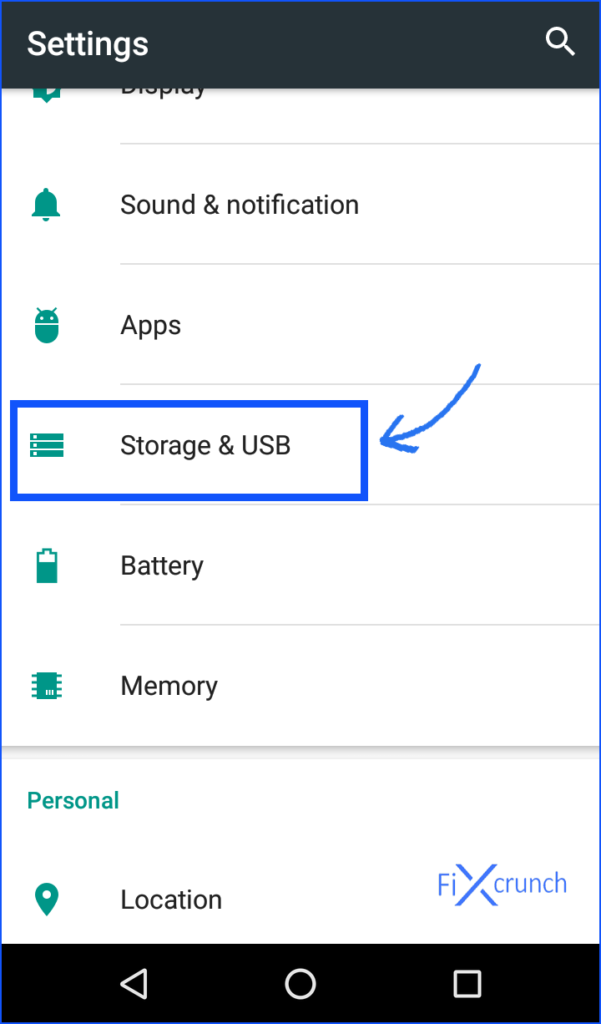
- Open your settings
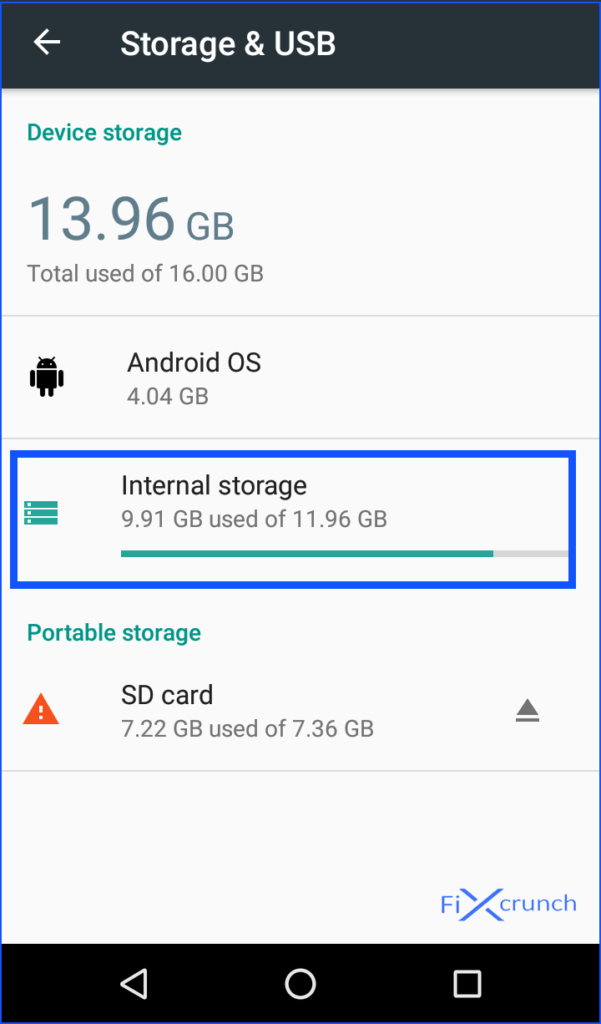
- Find the “Storage & USB” & just open it.
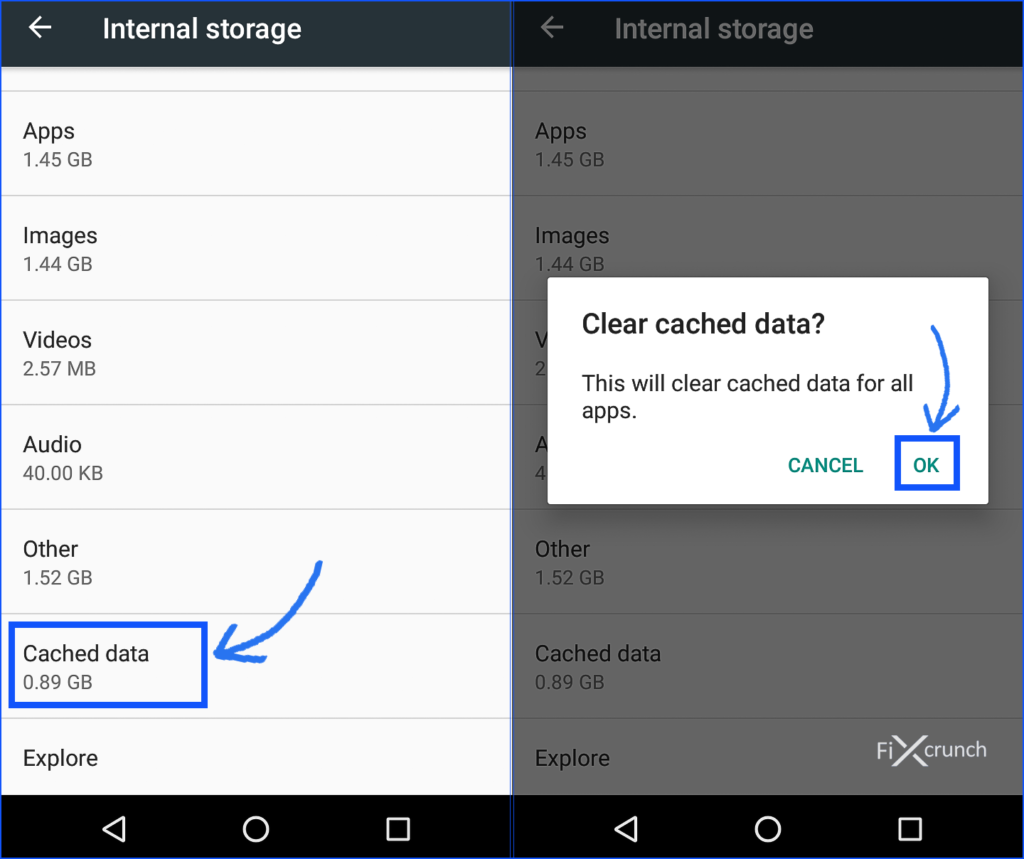
- Within that, you’ll get the “Internal Storage” simply click on it
- Here, the Internal storage will be opened & locate the “Cached Data”.

- Lastly, you have to click on it in order to remove the existing cache data
Method #10: Try To Uninstall The Last Installed Apps
Did you recently install any more apps or are you noticing this error after the installation of those apps?
If yes, then I’m sure those apps must be the culprit for getting this error. So, in such a situation you need to uninstall that recently installed app immediately.
Now, you can check whether the error is solved or not. If not, then simply proceed toward the next solution.
Method #11: Sync Your Account Via Gallery App
Most of the users gave the best review about this solution thus, you can fix this error by applying the below steps:
- Open your Gallery app and press on the Menu option
- Select Settings & then simply choose your Account
- At this time, you will have to sync the app that was creating a problem
- If you want can remove an account too
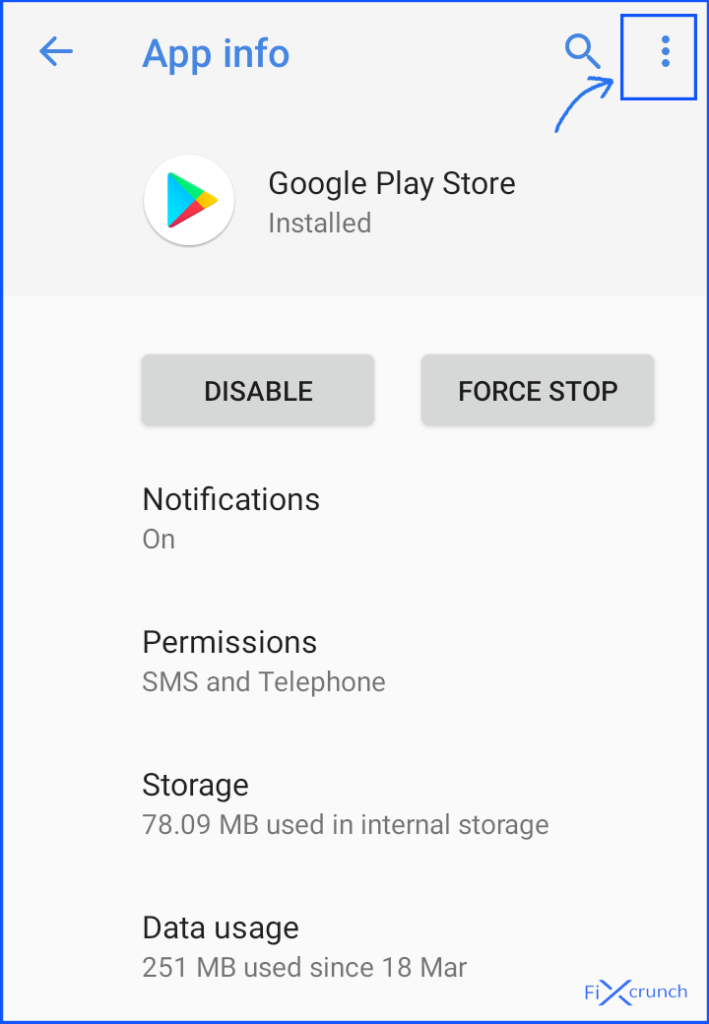
Method #12: Uninstall & Reinstall the Google Play Store Updates
There is a high chance that the recent version of the Google play store may have some compatibility issues. So in such circumstances, you should Uninstall Google Play Store updates.
Now, just follow the below-mentioned steps:
- Open your Setting app and go to the app Setting.
- After that go to all apps and then look for the Google Play Store & simply Uninstall the Updates
- Now, Reboot your phone & see if the error may be fixed.
If then also the error isn’t fixed:
- Go to the Google Play Store and then click on three horizontal lines
- Again, click on Settings
- In this step, you have to scroll down & make click on the Build version
- Here, you’ll see the message, just the message carefully and hit the ok option
- Finally, the Google play store has been updated completely.
Method #13: Update Your Android Operating System
You can also try this method to fix “Unfortunately, Settings has Stopped” by updating your device’s OS to its latest version. This may help you to resolve this issue. If this error has resulted due to some outdating related bugs. Start following the steps as directed:
- Navigate to your Setting app and then go to the system
- Again from that go to the system update option & click on the check for updates option
Method #14: Update The Google Play Services
Such kind of error also occurs if your device runs outdated, hence in this case you need to update your Google play services. Check out the given steps:
- Go to the Settings app and click on the ‘Apps & notifications’ option
- Now, select the App info from that
- Scroll down the app list & select ‘Google Play services’
- Click on the Advance option to expand the drop-down option
- Scroll toward the Store section & tap on App
After performing the above steps, you will directly reach the page of Google Play Services on the Play Store. However, if you will see the Update button on that page, simply tap it in order to update Google Play services.
But, if you find Disable or Deactivate option on a page, which will indicate that the Google Play services have been updated on your phone.
Method #15: For the Custom ROM users
If you’re using custom ROM such as -, SlimROM, CyanogenMod, etc & facing the above-mentioned error then you need to know whether the problem is occurring due to the compatibility issue/ROM hasn’t been installed accurately. Therefore, it’s better for you to reflash the OS along with the compatible Google Applications package.
Time To Conclude
In the last section of this article, I hope that among all the suggested methods, one solution will definitely help you to solve this bug. Hence, I have tried my best to provide you with every possible solution to fix “Unfortunately, Settings has Stopped” After Factory Reset Android issue.
In the future, if you ever come across this kind of situation, just go through this blog & try out the given methods one after another.
You can further reach us through our social sites like Facebook and Twitter

Sophia Louis is a professional blogger and SEO expert. Loves to write blogs & articles related to Android & iOS Phones. She is the founder of Android-iOS-data-recovery and always looks forward to solve issues related to Android & iOS devices
If your Android phone is displaying the error Unfortunately, Settings has stopped, you probably can’t use certain services and features.
Fortunately, this should be easy to fix providing you know what to look for. This guide walks you through several troubleshooting steps you can try.
What is the “Unfortunately, Settings Has Stopped” Error?
Well, as the name suggests, this is an Android settings app-related problem where the app just stops working or crashes when you launch it.
The app crashes occasionally but in some cases, users completely lose access to the Settings app. Whenever the app gets launched, it crashes instantly.
So, you need to fix this problem before it’s too late. Otherwise, it may lead to even bigger issues like Android not booting properly, firmware crashes, crashing apps, and more.
Troubleshooting the “Unfortunately, Settings Has Stopped” Error on Android
Here are all the tips that will help you get rid of the Unfortunately, Settings has stopped Error.
- Android Reboot
- Force Stop Settings App
- Close Unused Applications
- Clear Settings App Cache
- Clear Google Play Services Cache
- Update Google Play Services
- Update Android OS
- Factory Reset
1. Android Reboot
The easiest fix for, unfortunately, Settings has stopped on Android is to restart the device. It is simple, but effective nonetheless.

So, just hold the Power button and wait for the Power Menu to appear. Then, just tap on the Restart button.
2. Force Stop Settings App
If restarting the device didn’t work, then you should restart the Settings app to resolve the issue.
Now, if you want to restart the app, you need to close it properly, first. So, just force close the Settings application and after that, you can launch it again. Here are the steps.
- Launch the Settings app and tap on Apps.
- Search and locate the Settings app and tap on it.
- On the following page, tap on the Force Stop button below.

After force-stopping the settings app, you can restart the Android device. After the device starts again, launch the Settings app again.
3. Close Unused Applications
One of the biggest reasons for the Settings app crash is the unavailability of sufficient RAM. A certain amount of RAM is necessary for applications to function properly.
So, if you have too many apps open on your mobile, there might not be enough RAM left for the Settings app.
In this situation, you need to check how many apps are open in the background and close them all if possible.
Doing this will free up enough RAM to launch and operate the Settings app properly, effectively stopping the crash.
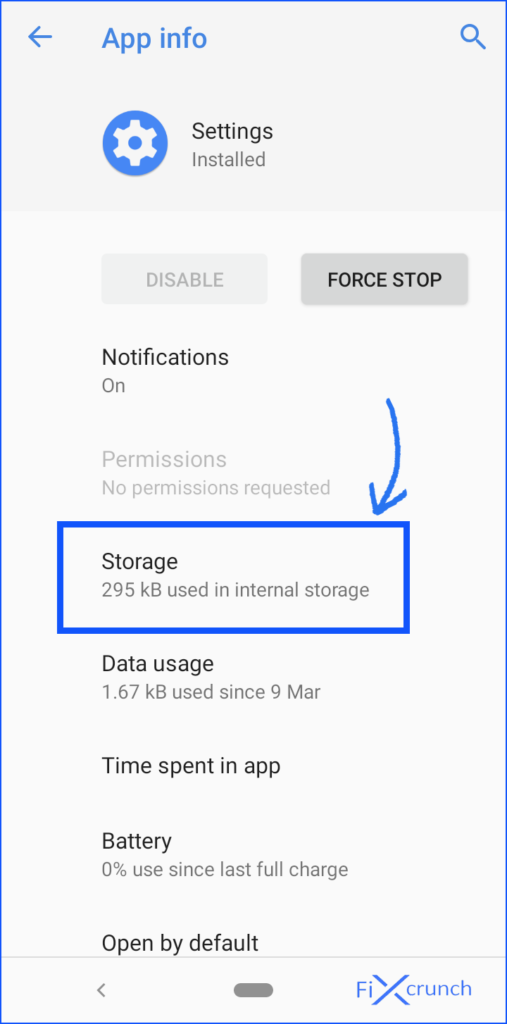
4. Clear Settings App Cache
Another big reason for getting, unfortunately, Settings has stopped on Android is cache files. Similar to other applications, Settings also creates cache files whenever it is launched.
If you have neglected to clear the cache files from time to time, too many cache files may have piled up and caused the crash.
We also suspect the possibility of some of the cache files being corrupted, which can also cause similar problems. Whatever the case is, clearing the Settings app cache files will resolve it.
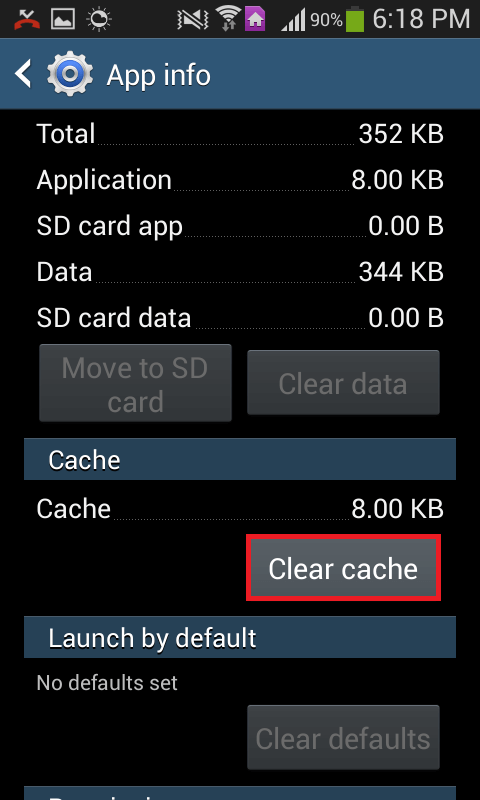
- Launch the Settings app and tap on Apps.
- Search and locate the Settings app and tap on it.
- On the following page, select the Storage option.
- Tap on the Clear Cache option.

If the crash was caused due to the presence of the cache files, removing them should fix the issue.
5. Clear Google Play Services Cache
If the Settings app is still crashing on your Android mobile, clear the Google Play Services cache file.
The Google Play Services is an integral part of the Android system. If it is not performing optimally, in this case, due to piled-up or corrupted cache files. Removing them will fix the Play Services along with the settings app.

Simply, navigate to the Settings and locate the Google Play Services, and tap on the Clear Cache button.
6. Update Google Play Services
If clearing the cache files for the Google Play Services didn’t work, you can update the app if the app hasn’t been updated in a while.
An outdated Google Play Services is buggy and known to cause several problems like when Google Play Services keeps stopping. So, updating the app may resolve the problem.
- Launch the Settings app and tap on Apps.
- Search and locate the Google Play Services and tap on it.
- On the App Info page, scroll down and tap on the App Details in Store option.
Now, if you see the Update option on Google Play, tap on it to update the app.

If you see the uninstall button, then you are using the latest version of the Google Play Services. In that case, tap on the Uninstall button to remove the service from your mobile. Then, reboot the device and install it again from the Google Play Store.
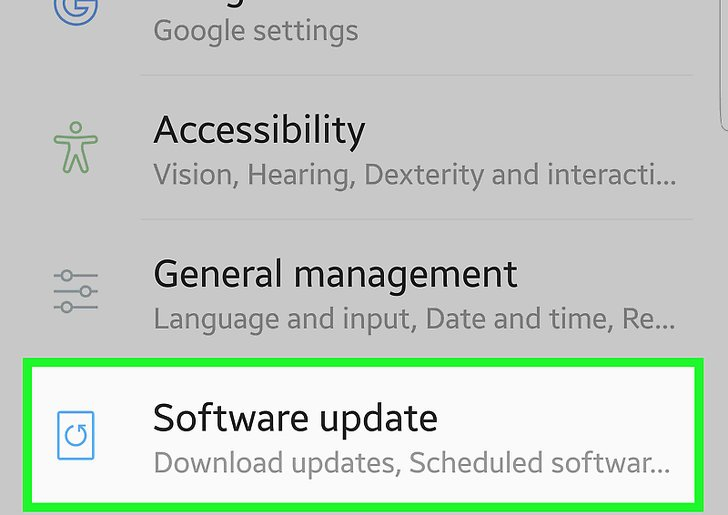
7. Update Android OS
An outdated operating system is full of glitches and it also creates a lot of issues as a result. So, when you are getting, Unfortunately, Settings has stopped on your mobile, you need to update the Android OS if none of the previous methods have worked.

Simply, tap on the Download and Install option under Software Update. Android will start to locate the latest update, if there’s an update available, an Install option will be prompted. Tap on it.
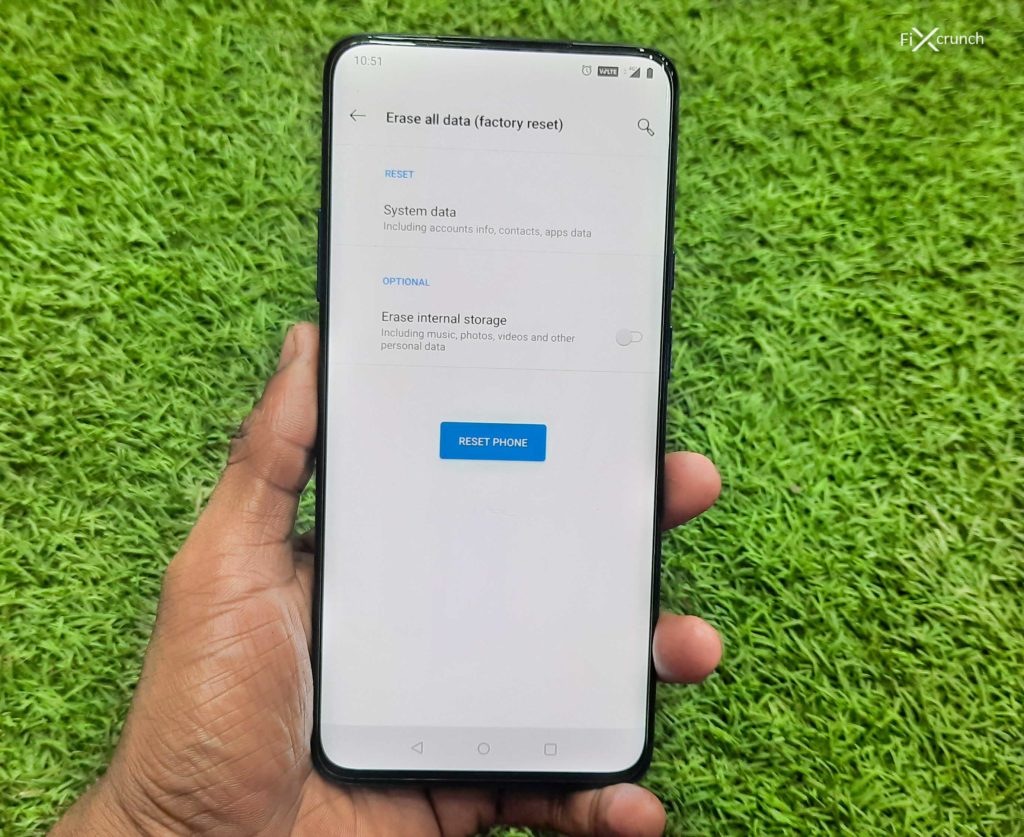
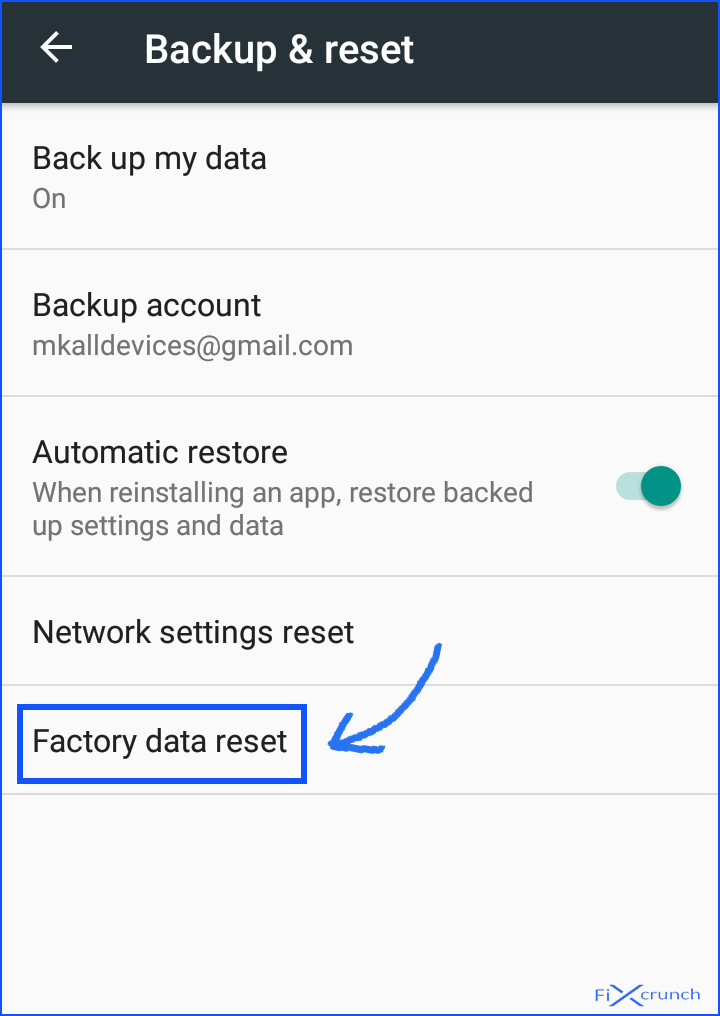
8. Factory Reset
The final and the most effective solution for this issue is Factory Data Reset. Still, this method is no one’s first recommendation as it comes with a hassle.
Performing a factory reset means, all the files from your device will be erased along with all the custom settings. So make sure to back up your Android phone before moving forward with this step.
But if you haven’t solved the issue yet, you have no other option but to reset the device. So, we recommend backing up important files.

Now, you can do the regular factory reset method. It involves tapping on the Reset option under General Management. Under reset, you will find the Factory Data Reset option.
But you can also reset the device from the Android Recovery Mode. If the Settings app is crashing as soon as you are launching it, you will have no other options.
You need to connect your smartphone to your computer or laptop via a USB cable. After that, hold the Power Button and the Volume Up button to enter Recovery Mode.

In the Recovery Mode, use the volume buttons to navigate. Select the Factory Data Reset option and then hit the Power button to execute.
Wrapping It Up
It’s frustrating when your Android phone is displaying the Unfortunately, Settings has stopped error message.
Hopefully, the troubleshooting tips in this guide were useful in helping you get rid of this annoying message.
Let us know if this helped fix this problem. If you found success doing something else, leave me a comment down below!
К сожалению, ошибка settings-has-Stopp считается одной из самых распространенных и раздражающих ошибок операционной системы Android. Ошибка есть только на смартфонах Android, и все может случиться, пока открыта панель настроек.
Если мы посмотрим вокруг, то обнаружим, что использование операционной системы Android увеличивается день ото дня. Фактически, большинство из нас полностью зависит от нашего Android-устройства. С помощью нашего Android-смартфона мы делаем много вещей, включая звонки, отправку сообщений, посещение Интернета, игры и многое другое.
Поскольку Android основан на Linux и его полностью открытый исходный код, мы можем ожидать некоторых ошибок на платформе. Разработчики очень стараются избавить операционную систему от ошибок, но некоторые ошибки все же остаются.
Если вы являетесь пользователем Android, вы могли столкнуться со следующей ошибкой: «К сожалению, настройка остановлена». Это одна из самых распространенных и необычно раздражающих ошибок, от которых страдает операционная система Android. В этой статье мы обсудим все об этой ошибке на Android.
Что за ошибка: «К сожалению, настройка остановлена»?
Как упоминалось ранее, к сожалению, «Настройки остановлены» — это одна из самых распространенных и раздражающих ошибок, от которых страдает операционная система Android. Ошибка есть только на смартфонах Android, и все может случиться, пока открыта панель настроек.
Ну, в разных случаях я также обнаруживал, что при использовании приложений возникает ошибка «К сожалению, настройки остановлены». Иногда ошибка возникает также из-за установки нового обновления прошивки. Однако сейчас это очень распространенная проблема, но она создала беспорядок, когда было выпущено обновление KitKat.
Ошибка не всегда связана с обновлением программного обеспечения, иногда неисправные приложения также приводят к ошибке. Однако, поскольку это очень распространенная проблема, простой перезапуск может решить проблему. Однако, если вы часто получаете сообщение об ошибке, вам нужно сделать еще кое-что.
Как решить настройки, к сожалению, остановила ошибку?
В большинстве случаев перезагрузка смартфона может исправить ошибку «К сожалению, настройки остановлены» для вашего устройства Android. Однако, если вы часто получаете код ошибки даже после перезагрузки, вот несколько лучших методов, которые помогут решить проблему.
Метод 1. Перезагрузите устройство.
Как мы уже обсуждали выше, в большинстве случаев мы видим, что простой перезапуск может решить проблему «К сожалению, настройки остановлены» на вашем смартфоне Android. Итак, вам просто нужно перезагрузить устройство.
Нажмите и удерживайте кнопку питания вашего устройства.
Появится всплывающее окно, где нужно нажать Restart
Теперь подождите, пока ваш телефон перезагрузится.
После перезагрузки просто используйте смартфон в обычном режиме, вы больше не будете получать сообщение «К сожалению, настройки остановлены». Если после перезапуска вы все еще получаете ошибку, следуйте приведенным ниже методам.
Метод 2: очистите оперативную память телефона
Иногда видно, что нехватка оперативной памяти также вызывает ошибку «К сожалению, настройки остановлены» на Android. Однако очистка оперативной памяти телефона — простой процесс, и вы можете использовать его без сторонних приложений. Обычно смартфоны теперь поставляются с приложением для управления оперативной памятью по умолчанию, которое помогает удалить оперативную память одним щелчком мыши.
Сначала найдите встроенный диспетчер оперативной памяти устройства. На Samsung диспетчер оперативной памяти находится в Smart Manager. В диспетчере RAM вы увидите, сколько оперативной памяти использует ваше устройство прямо сейчас.
Теперь просто нажмите «Очистить ОЗУ», чтобы освободить ОЗУ.
Вот и все, готово! Теперь начните использовать смартфон как обычно и посмотрите, исправлена ли проблема с настройками, к сожалению, устранена или нет. Если проблема не исчезла, воспользуйтесь следующим методом.
Метод XNUMX: очистить кеш настроек
Поврежденные файлы кеша играют важную роль в каждой ошибке, возникающей на вашем смартфоне Android. Точно так же, если приложение «Настройки» сохранило поврежденный кеш, это может быть причиной этой ошибки. Все, что вам нужно, это выполнить несколько простых шагов, перечисленных ниже, чтобы очистить кеш приложения «Настройки» на Android.
Шаг 1. Прежде всего, перейдите в «Настройки»> «Приложения» или «Диспетчер приложений».
Шаг 2. Теперь вы увидите список приложений, уже установленных на вашем устройстве.
Шаг 3. Найдите приложение «Настройки» и нажмите на него.
Шаг 4. Теперь нажмите «Force Stop». Затем нажмите Очистить кеш и перезагрузите Android-устройство.
После перезагрузки используйте свой смартфон Android в обычном режиме, чтобы проверить, сохраняется ли ошибка. Если вышеуказанный метод, к сожалению, не помогает устранить проблему, проблема с настройками остановлена, следуйте следующему методу.
Метод XNUMX: очистите кеш устройства
В предыдущем методе мы очистили кеш приложения «Настройки» на Android. Однако в этом методе нам необходимо очистить кеш всех приложений, установленных на вашем устройстве. Телефон может некоторое время вести себя необычно после очистки кеша, но через несколько минут использования он стабилизируется.
Шаг 1. Зайдите в Настройки на вашем Android-устройстве.
Шаг 2. Теперь на панели настроек найдите параметр «Хранилище» и нажмите на него.
Шаг 3. В разделе «Хранилище» вам нужно найти и нажать на опцию «Кэшировано».
Шаг 4. Теперь вы получите «копию кешированных данных». Просто нажмите ОК, чтобы очистить файл кеша.
Вот и все, готово! Это сотрет все кэшированные данные с вашего Android-смартфона. Теперь просто перезапустите свое Android-устройство и используйте его. Вы больше не будете получать сообщение «К сожалению, проблема с настройками остановлена».
Метод XNUMX: удалить недавно установленные приложения
Как мы обсуждали выше в статье, иногда обновление Android или приложения отключает настройки с ошибкой «К сожалению, настройка остановлена» на Android. Итак, если вы чувствуете, что получаете сообщение об ошибке после установки любого стороннего приложения, вам необходимо удалить это стороннее приложение.
Однако, если вы считаете, что с установленными приложениями все в порядке, вы можете попробовать загрузиться в безопасном режиме. В безопасном режиме отключаются все сторонние приложения, установленные на вашем смартфоне Android. Таким образом, если ошибка вызвана приложением, вы не получите сообщение об ошибке «К сожалению, настройка остановлена» в безопасном режиме.
Если вы получаете сообщение об ошибке даже в безопасном режиме, значит, с приложениями проблем нет. Итак, пропустите этот метод и следуйте следующему.
Метод 6: сброс к заводским настройкам
Ну, другой и последний вариант — сбросить настройки смартфона Android до заводских настроек. Обычно возможно, что вышеупомянутые методы устранили проблему «К сожалению, настройки остановлены» на вашем смартфоне Android.
Однако, если все вышеперечисленные методы не помогут исправить ошибку, последний вариант — сбросить настройки устройства Android. Однако при сбросе данных удаляются все приложения и файлы, установленные на вашем устройстве Android. Поэтому не забудьте создать соответствующий файл резервной копии ваших данных, прежде чем выполнять сброс настроек до заводских.
Сбросить настройки вашего Android-смартфона очень просто, вам просто нужно выполнить несколько простых шагов, упомянутых ниже. Итак, вот как сбросить настройки вашего Android-смартфона.
Шаг 1. Прежде всего, откройте «Настройки» на своем Android-смартфоне.
Шаг 2. Теперь в разделе «Настройки» вам нужно найти и нажать «Резервное копирование и сброс».
Шаг 3. Теперь на следующем шаге вам нужно нажать на Factory Data Reset.
Шаг 4. Наконец, нажмите кнопку «Сбросить телефон».
Это сотрет все файлы, хранящиеся во внутренней памяти вашего Android-устройства. Поэтому обязательно сделайте резервную копию, прежде чем выполнять метод сброса до заводских настроек. После сброса ваше устройство будет работать нормально, и вы больше не будете получать ошибку «К сожалению, настройка остановлена».
Итак, в этой статье мы обсудили каждый шаг по исправлению ошибки К сожалению, настройки остановились на вашем Android-смартфоне. Мы перечислили 6 методов, которые определенно работают при правильном применении. Итак, если статья помогла вам исправить ошибку на вашем Android-устройстве, обязательно поделитесь ею со своими друзьями.
Итак, что вы думаете об ошибке «К сожалению, настройки остановлены»? Поделитесь своим мнением в поле для комментариев ниже.
The use of smartphones has become a part of our lives. We use these samples of state of the art technology for many purposes. But we all know that they are not perfect machines. Due to this, we all have to deal with a lot of problems sometimes. One of the most common problems that almost everyone has faced is “Unfortunately Settings Has Stopped”.
But why are you worried so much. We have already got you covered with yourself tested and experimentally proved working solutions. In this article, we will talk about the Error message “Unfortunately Settings has stopped“, It’s causes and solution.
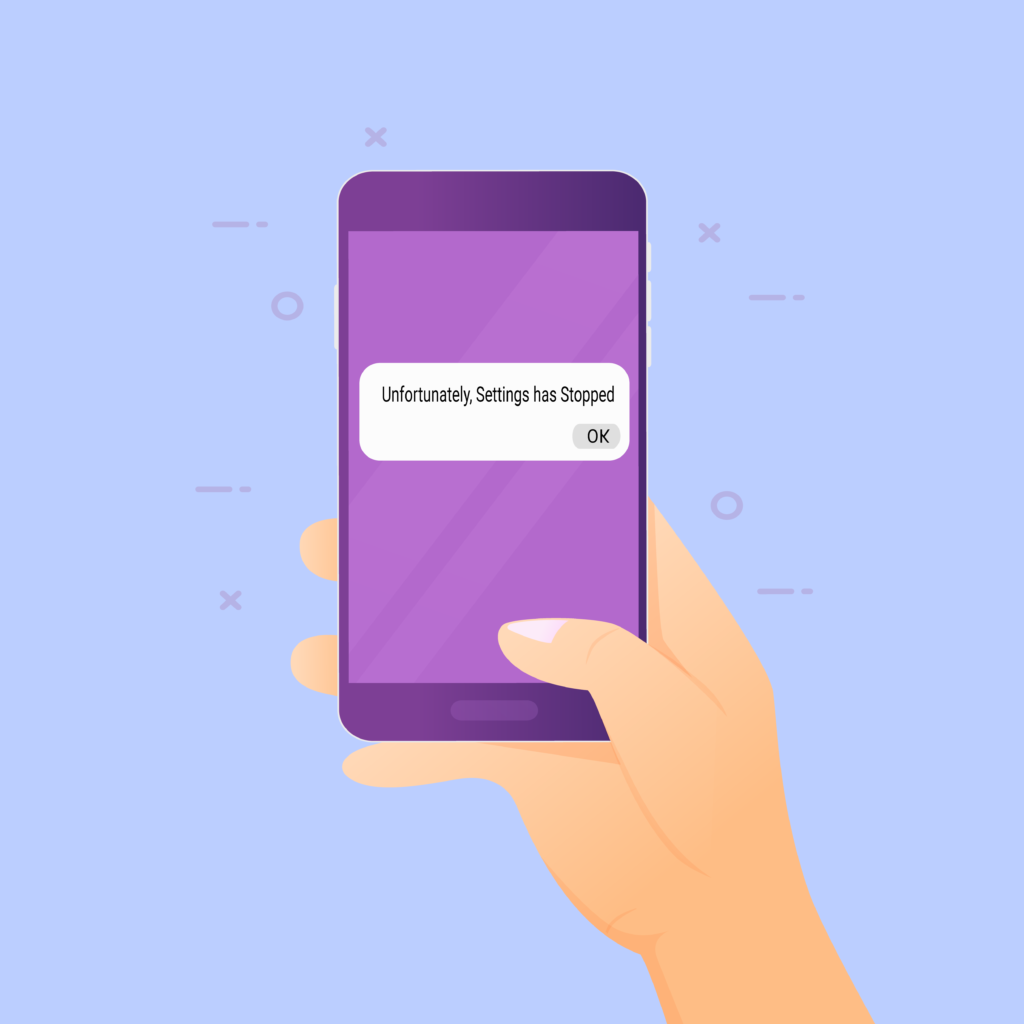
Table of Contents
- 1 Understanding “Unfortunately Setting has stopped”
- 1.1 Low Phone cache memory:
- 1.2 Incomplete Files:
- 1.3 Incompatible Google Play services update:
- 1.4 Incompatible Play Store :
- 1.5 Bugs in Firmware/ROM:
- 2 How to Get Rid of Error “Unfortunately Settings Has Stopped”:
- 2.1 Method 1- Clearing Cache memory of your phone
- 2.2 Method 2- Clearing Settings Data and Cache
- 2.3 Method 3- Uninstall Google Play Updates
- 2.4 Method 4- Reboot in Safe Mode
- 2.5 Method 5- Wiping Cache partition from recovery mode
- 2.5.1 To wipe out the cache partition follow the given steps:-
- 2.6 Method 6- Factory reset
- 3 General FAQ’s
- 3.1 How do I fix unfortunately Settings has stopped?
Understanding “Unfortunately Setting has stopped”
As I have already mentioned this fact on our other useful articles we can’t solve it unless we know the roots of the problem. Before we start learning about the solution steps let me tell you what I have found during my experiments. These are my own experiment and theories about this android error message. Also please keep this in mind that there could be more that one and different causes of a single problem in android phones.
Below are some of the serious issues that will cause the, unfortunately, Settings has stopped to occur.
Low Phone cache memory:
The android phones have both volatile and non-volatile memory. it stores data permanently such as photos, videos, etc in non-volatile memory. In other words, we can call this type of memory ROM.
However, the other kind of memory plays a very important role during the operation of the modern smartphone. For example, we put some pictures on our phones. or we run an App on our phone. This operation is stored temporarily in our Android smartphone’s RAM (random access memory). This helps the phone to perform functions swiftly and we don’t have to wait for a long period of time.
Now when our phone’s ram is full it will not be able to perform correctly. And as a result, we get Error “unfortunately Settings or any other app has stopped”.
Incomplete Files:
This is also another cause of the error. An android app works many files. If some of these files are missing from the app it will not be able to run correctly. This is possible both in the system and downloaded apps.
Incompatible Google Play services update:
The google play store is like a control tower for our android smartphone apps. All the data of these apps is controlled by google play services. Now if you have installed the google play services which is not compatible with your android version. it has some bugs in it then your apps will not work properly.
Incompatible Play Store :
Sometimes Users install the Google Play store and other app updates from third party sources. These are actually not suitable for the phone and its software version. Due to this, it becomes the root of many problems.
Bugs in Firmware/ROM:
There are different kinds of ROMs available for Android smartphones. These are called custom ROMs. These custom ROMs can be installed on almost every smartphone which hasn’t got an official Google update.
These ROMs works well but some of these are highly unstable and has got a lot of bugs in it. These bugs will not let the phone to work properly and as a result, we face a lot of errors, one of them is “Unfortunately Settings has stopped“
Now I hope you will have a solid idea about what causes this problem. Let’s learn about how to solve “Unfortunately Settings has stopped” error.
As I have already told you there could be more than one solution for a single problem. I suggest trying all of these until you get the solution to your problem.
Before trying anything I want you to simply restart your phone. A fresh reboot always solves many problems. To restart your phone simply hold your power button for a while. You will see a popup window where you can select the reboot option easily. If their problem still exists then try the following methods to uproot it successfully.
Method 1- Clearing Cache memory of your phone
If the problem is not solved by restarting your phone. Then the best thing you can do is to clear your cache memory of the phone. This will allow your phone to store fresh cache data and help your apps to work properly.
To clear the cache memory of your phone to follow these simple steps;
- Go to settings.
- Find “Storage & USB” and open it up.
- Under that, you will see “Internal Storage“. Click on it.
- Internal storage will open and locate “Cached Data“. Pressing on it, to remove cache files.
Also Read:- 8 Tricks For Solving Can’t Connect To Camera Error
Method 2- Clearing Settings Data and Cache
If your phone cache is not the cause of the problem the clear the Settings app Data and Cache. This will help clear out any settings which are not good for the app. And these may prevent the app to run properly.
- Go to settings.
- Then go to the apps or “Apps & notifications” (on some phones). Switch to the all apps tab.
- Under that find “Setting” app and open it up.
- Click on the “Storage” and open it up, which option you will see under settings.
- Under that, tap on Clear Storage & Clear Data.
Now you are good to go.
Also Read:- 9 Best Ways to Solve error retrieving information from server RH-01
Method 3- Uninstall Google Play Updates
Some times new google play store doesn’t support on phone, so you may see “unfortunately settings has stopped” error. Uninstalling Google Play store new Updates will solve the problem.
- Go to “settings” of your phone, Find Apps and notifications.

- Switch to all apps and look for the “Google Play Store”.
- In the there top right corner, you will see “Three Dots“, just click on it.
- you will see “Uninstall Updates” click on it, and confirm OK to uninstall google play store updates.
Now you are finally Uninstall Google Play store update.
Method 4- Reboot in Safe Mode
Running your device in safe mode will allow your device to run only system apps and all other third-party apps will be sleeping. This is the best way to check which application causing the problem.
- Press and hold your phone’s “Power Button” just like you do for switching off, for a while.
- Tap & Hold on “Power off”.
- In meanwhile you will see a Popup notification. It’s saying “Reboot to safe mode”, just tap on “Ok” to Reboot in Safe mode.
Reboot again to restore your device back to normal mode, don’t over headache about this. If your play store is working fine in safe mode it means that some of the third-party apps you have installed are causing the trouble.
Also Read:- Best Ways To Fix Error Code 907 In Play Store
Method 5- Wiping Cache partition from recovery mode
If you are very much annoyed by the “Unfortunately Settings has stopped” then turn off your phone and then open it in recovery mode. From there you can wipe out the cache partition and I hope this will solve your problem.
To wipe out the cache partition follow the given steps:-
- First things first Power Off your phone.
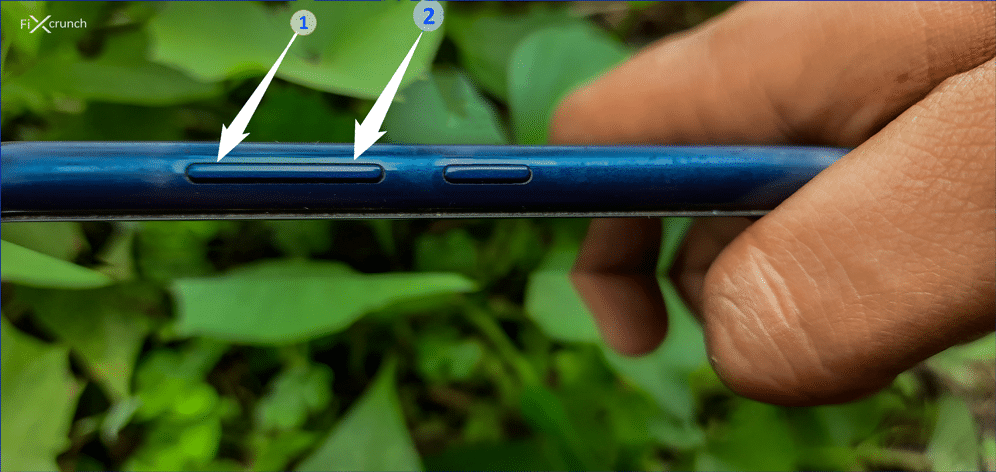
- Press and hold “Volume Up (1) + Power Button (2)” and wait for the startup screen to show.
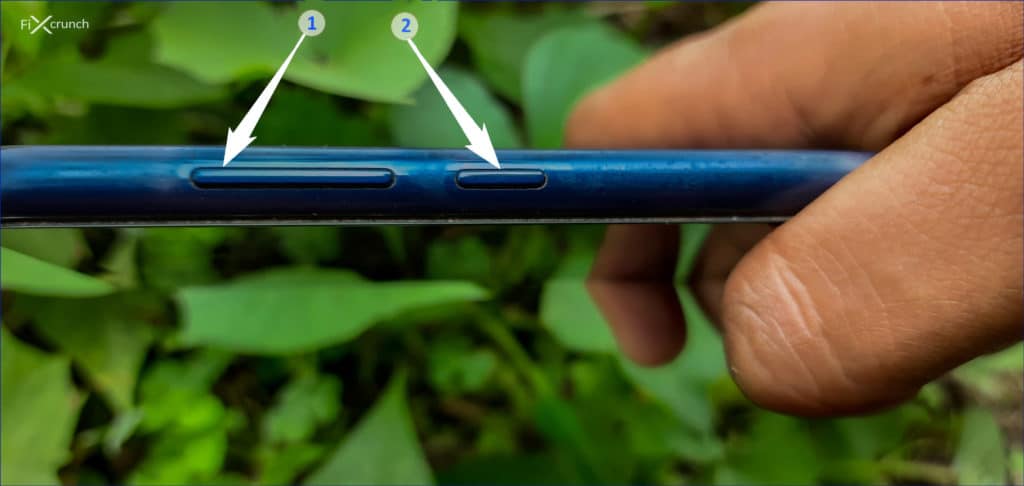
- If your phone has a physical menu button then press Volume Up + Menu + Power Button. (For Samsung Phones)
- After that Boot Mode open up, in that you need to select “Recovery Mode“. (Note:- Volume Up Button for selecting options in Boot Mode & Volume Down button to select.

- In some Phones, Android logo will open up Like this. Recovery mode next to this. For going next Press & Hold Power Button, then Click Volume Up Button Once.
![]()
- When the Recovery Mode has started to use your Volume Up and Down buttons to navigate through options.
- Navigate to “Wipe Cache Partition” and press the Power Button to select the option.
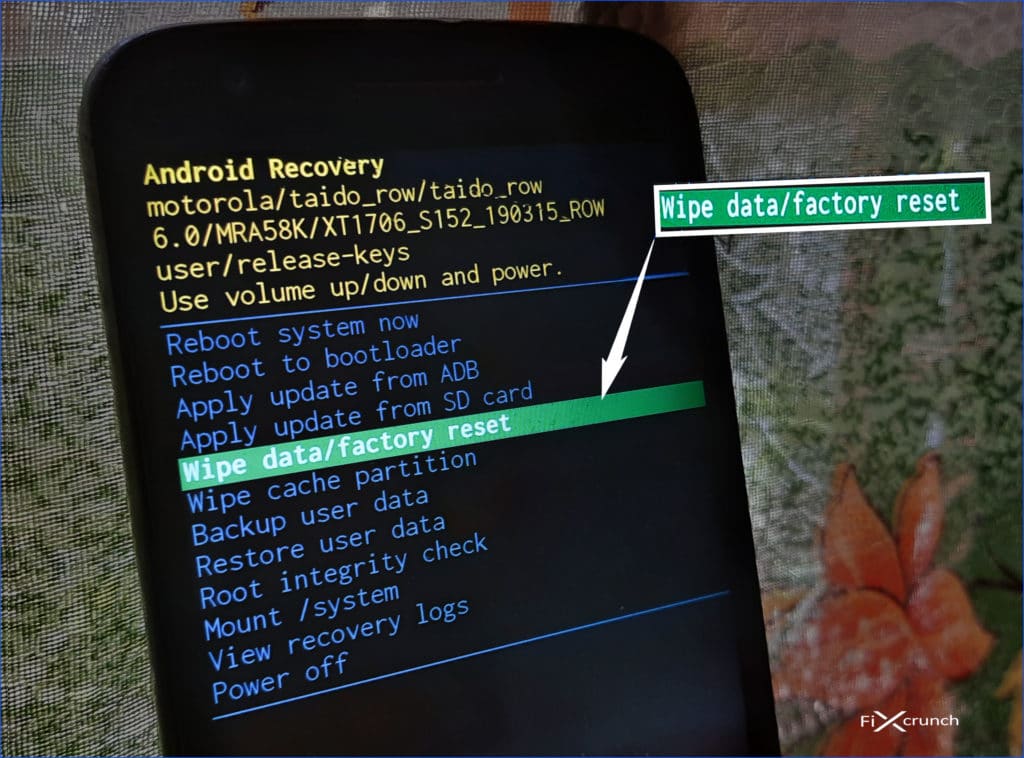

- After successfully clearing the cache partition Reboot the phone.
Also Read:- Top 7 Ways To Fix Failed to obtain IP Address Error
Method 6- Factory reset
This is the last option you have. A factory reset deletes all the data present on your smartphone. So take a backup of all the files present on your phone to factory reset.
- Go to settings of your phone
- Find “Backup & Reset” under the settings.
- Under “Backup & Reset” you will see “Factory data reset”,
- just click on it and in there click on the “Reset Phone”.
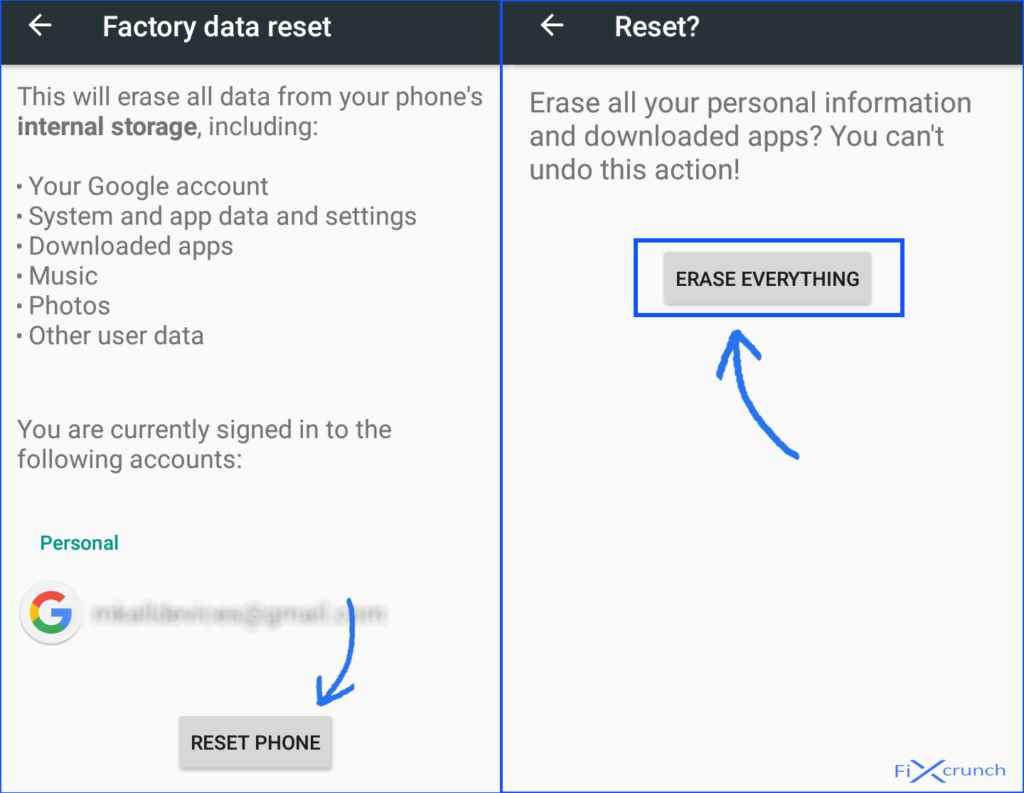
- Enter security credentials if you set on your device if you don’t have or if you don’t have to leave it. Wait for some times and your phone completely reset.
“For rooted phone users with CyanogenMod or clockwork mod recovery, I am sure the error Unfortunately Settings has stopped is caused by the incompatible rom. It is also possible that some of the rom files are corrupt.”
Also sometimes it happens due to improperly installed rom. Try downloading the ROM file from different sources and then open the app it will solve the problem.
General FAQ’s
How do I fix unfortunately Settings has stopped?
Usually this problem solved by Rebooting android device. If not Settings Data Clear, Safe Mode, Wiping these and many more help you to get rid out of your problem. Which are discuss inside !!
 “Unfortunately Settings has stopped” Error is one of the common error in Android. There are lots of users who are going through the same error. The Error has been found in both Rooted and non-rooted device. Generally, this problem is known with Android smart devices like Samsung Galaxy J7, Samsung Galaxy S4, LG G4, and ASUS. I had also recently faced the same error. My phone was not syncing Google items like Gmail and Calendar. When I try to check the account on the phone, I received a message saying, “Unfortunately Settings has stopped”.
After trying different methods I finally fixed the error. The method that worked for me was kind of weird and it is mention below. In this tutorial, I will let you know the solution to Fix “Unfortunately Settings has stopped” Error in Android.
Quick Links
- Method 1: Clear Cache Of the Device
- Method 2: Sync account through the gallery app
- Method 3: Clear cache and data of settings app
- Method 4: Uninstall Google Play Service Updates
- Method 5: Uninstall and Reinstall Google Play Store Update
- Method 6: Use Safe Mode
- Method 7: Wipe cache partition from recovery mode.
- Method 8: For custom ROM users
- Method 9: Factory Reset your device
Re-start your device
 Many of the time just by re-starting your device can solve the issue. To restart your device:
- Unlock the screen of the devices.
- Press and hold the “Power” button until a menu appears.
- Select “Power off“.
- Wait for the device to power off.
- Wait 10 seconds, then press and hold the “Power” button to power the device back ON.
- After that, see whether it fixes your issue or not.
Method 1: Clear Cache of the Device

- Go to Settings >> Scroll down and search Storage
- Click on Storage >> Tap on Clear cache
This method should fix your Error as it clear cache for all the apps on the smartphone.
Method 2: Sync account through the Gallery App
This method has got the best review from the users. I personally solved the issue using this method. So, hopefully, your error will be solved after trying this method.
- Open Gallery app >> Press on the Menu (You will see three dots on the top right side of the screen)
- Select Settings >> Select your Account
- Now sync the app that was creating you trouble.
- You can even remove the account.
This method should fix your issue. If you are still getting the error then follow the given method.
Method 3: Clear Cache and Data of Settings App
- Go to Settings >> Go to Application Setting (In some devices application setting is named as apps).
- Go to, All the apps > >Find Settings >> Clear Cache and Data
- Once you have clear everything, Next you need to Force Stop the application
- Similarly, Find the Settings Storage>> Click on “Force Stop”
- Now, Restart your device and check whether the error is fixed or not.
Method 4: Uninstall Google Play Service Updates

- Go to Setting>> Go to Application Setting (In some devices application setting is named as apps).
- Go to, All the apps > >Find the Google Play Service >> Uninstall Updates
- Now Restart your device and try to see if the fixes your error.
Method 5: Uninstall and Reinstall Google Play Store Update
There are chances that the current Version of Google play store may have Compatibility Issues. So in this case, you need to Uninstall Google Play Store updates. Just follow the step to Uninstall Google Play Store update.

- Go to Setting>> Go to Application Setting (In some devices application setting is named as apps).
- Go to, All the apps > >Find the Google Play Store >> Uninstall Updates
- Now Restart your device and try to see if the fixes your error.
If you are still getting the error message then update the Google Play Store.

- Go to Google Play Store >> Tap on three horizontal lines >> Tap on Settings
- Scroll down and tap on Build version, You will see the message
- Read the message and Tap on OK.
- Now your Google Play Store has been Updated successfully also check whether the issue is solved or not.
 Method 6: Use Safe Mode
 Method 6: Use Safe Mode
This method will let you know whether the third-party application is causing the error or not. In the safe mode, all third-party apps are disabled so we can detect the problem is with a third-party app or other.
- Press and hold the Power button
- You will see different Power option on your screen
- Now press and hold the Power Off option continuously
- After a few seconds, you will get a pop-up box asking you to restart the device in Safe Mode
- Tap OK
As soon as the device opens in Safe Mode, check whether the error is solved or not. If there is no error then a third-party app may be causing the error. So, try uninstalling the recently downloaded app and see whether the error is fixed or not.
Method 7: Wipe cache partition from Recovery Mode

- First, turn off the phone >> Press volume up and power button together to go to Recovery Mode
(It depends upon the phone that you are using to go to Recovery Mode. For some phone, pressing volume Up and Down with power button at the same time helps to go in Recovery Mode. Just find out which one works for your device to enter in Recovery Mode). - After that Recovery Mode will appear with many options >> use volume up and down to control the screen and power button to press ok.
- Select wipe cache partition >> press power button and it will then start cleaning the cache.
- A message will appear after the completion >> Select reboot system now and it will start rebooting your device.
Now your device has wiped the cache and you can use the device like previously without error. This process may erase the save data of the app.
 Method 8: For Custom ROM users
If you are using custom ROM like CyanogenMod, SlimROM, etc and facing some errors whether it is “Unfortunately settings has stopped” Error or any other than you should know either it is because of compatibility issue or the ROM has not been installed properly. So, it is better you reflash the operating system along with compatible GAPPs (Google Applications) package. If you are still getting the error, try flashing different ROM.
Method 9: Factory Reset your Device
If none of the above methods worked for you then you just got one way to solve the issue. Factory Reset your device should fix your issue.
How to Factory Reset your Android Device
So, these are some of the methods to Fix “Unfortunately Settings has stopped” Error in Android. Hopefully, your problem is solved now. Let me know which one worked for you.
Also Read:
- Fix Unfortunately, System UI has stopped
- Instagram can’t be installed due to Error code: -504: Android Fix
- How to Fix “Connection timed out” Error in Google Play Store
- How To Fix Unfortunately, the process android.process.media has stopped Error
- Hide / Unhide Message chat on Viber