Is there a way to label a screen for accessibility when using Jetpack Compose?
Getting the following error:
This item may not have a label readable by screen readers.
from the google play pre-launch report for all my app screens, cant see where you can ‘tag’ composables with content meta data.

asked Oct 20, 2022 at 10:39
![]()
You can follow the accessibility guide. Basically, the Semantics modifier will let you add content descriptions to composables. Something like:
Modifier.semantics {
    this.contentDescription = "Custom content description" }
)
Note: The call for Modifier.semantics() should be invoked from within the component itself. It is not meant to be added to the modifiers stack passed along as a function argument.
![]()
Aviran
5,0527 gold badges43 silver badges74 bronze badges
answered Oct 20, 2022 at 14:00
![]()
user496854user496854
6,31510 gold badges47 silver badges83 bronze badges
When I’m testing the simplest Hello World application by TalkBack I receive a warning
«This item may not have a label readable by screen readers» for the whole screen. Btw the Google Console internal testing shows the same issue.

I’ve already tried to wrap the Scaffold, and the MaterialApp in Semantics widget. It doesn’t help.
Code
import 'package:flutter/material.dart';
import 'package:flutter/rendering.dart';

class MyApp extends StatelessWidget {
  const MyApp({Key? key}) : super(key: key);

  @override
  Widget build(BuildContext context) {
    return const MaterialApp(
      title: 'Hello',
      debugShowCheckedModeBanner: false,
      home: MainScreen(),
    );
  }
}


class MainScreen extends StatelessWidget {
  const MainScreen({Key? key}) : super(key: key);

  @override
  Widget build(BuildContext context) {
    return Scaffold(
      appBar: AppBar(
        title: const Text('Hello world'),
      ),
      body: const Center(
        child: Text('Hello world!'),
      ),
    );
  }
}

void main() async {
  WidgetsFlutterBinding.ensureInitialized();
  if(RendererBinding.instance != null){
    RendererBinding.instance!.setSemanticsEnabled(true);
  }
  runApp(const MyApp());
}
Logs
[√] Flutter (Channel stable, 2.10.5, on Microsoft Windows [Version 10.0.19044.1706], locale ru-RU)
    • Flutter version 2.10.5 at C:flutterflutter_windows_2.8.0-stableflutter
    • Upstream repository https://github.com/flutter/flutter.git
    • Framework revision 5464c5bac7 (6 weeks ago), 2022-04-18 09:55:37 -0700
    • Engine revision 57d3bac3dd
    • Dart version 2.16.2
    • DevTools version 2.9.2

[√] Android toolchain - develop for Android devices (Android SDK version 32.0.0)
    • Android SDK at C:UsersFuturoAppDataLocalAndroidsdk
    • Platform android-32, build-tools 32.0.0
    • Java binary at: C:Program FilesAndroidAndroid Studiojrebinjava
    • Java version OpenJDK Runtime Environment (build 11.0.11+9-b60-7590822)
    • All Android licenses accepted.

[√] Chrome - develop for the web
    • Chrome at C:Program FilesGoogleChromeApplicationchrome.exe

[X] Visual Studio - develop for Windows
    X Visual Studio not installed; this is necessary for Windows development.
      Download at https://visualstudio.microsoft.com/downloads/.
      Please install the "Desktop development with C++" workload, including all of its default components

[√] Android Studio (version 2021.1)
    • Android Studio at C:Program FilesAndroidAndroid Studio
    • Flutter plugin can be installed from:
       https://plugins.jetbrains.com/plugin/9212-flutter
    • Dart plugin can be installed from:
       https://plugins.jetbrains.com/plugin/6351-dart
    • Java version OpenJDK Runtime Environment (build 11.0.11+9-b60-7590822)

[√] Connected device (4 available)
    • SM G935F (mobile) • ad06170246004eb408 • android-arm64  • Android 8.0.0 (API 26)
    • Windows (desktop) • windows            • windows-x64    • Microsoft Windows [Version 10.0.19044.1706]
    • Chrome (web)      • chrome             • web-javascript • Google Chrome 102.0.5005.62
    • Edge (web)        • edge               • web-javascript • Microsoft Edge 101.0.1210.47

[√] HTTP Host Availability
    • All required HTTP hosts are available
How can I get rid of that warning? Please, help me solve this problem.
Время на прочтение
4 мин
Количество просмотров 5.5K
Корпорацией Google разработан инструмент, позволяющий сделать интерфейсы мобильных приложений для OS Android более доступными для пользователей с ограниченными возможностями. Он представляет собой специальное приложение Accessibility Scanner, которое сканирует графический пользовательский интерфейс и выводит описание найденных проблем доступности и рекомендации по их исправлению. Accessibility Scanner может дать рекомендации по увеличению слишком мелких элементов управления, увеличению контрастности изображения, а также по добавлению к элементам управления текстовых меток, что в совокупности повысит удобство и доступность интерфейса.
Приложение Accessibility Scanner не требует для своего использования особых технических навыков и, помимо прочего, рекомендуется для использования обычными людьми, которые смогут сформировать отчёт по проблемному интерфейсу и отправить его разработчику. То есть в обозримом будущем многие Android-разработчики могут начать получать описание проблем доступности их приложений в подобной стандартизированной форме. Им останется только понять, что же именно имеет ввиду Accessibility Scanner.
С технической точки зрения Accessibility Scanner представляет собой так называемую службу доступности, то есть приложение, работающее в фоне и взаимодействующее с accessibility API OS Android с целью реализации дополнительной функциональности для пользователей с ограниченными возможностями. После установки Accessibility Scanner, необходимо открыть раздел «Спец. возможности» (Accessibility) в настройках устройства, найти в них Accessibility Scanner и активировать службу, дав ей необходимые разрешения. После этого, на экране появится кнопка Accessibility Scanner, отображаемая поверх всего интерфейса.
Открыв интерфейс, который необходимо протестировать, следует нажать на эту кнопку, после чего служба последовательно опишет все найденные проблемы и предложит варианты их исправления. Также можно будет вывести все найденные проблемы единым списком и отправить полученный отчёт по E-mail.
Отчёт может содержать примерно такие рекомендации:
Text contrast
com.habrahabr.example:id/label
The item’s text contrast ratio is 2,46. This ratio is based on an estimated foreground color of #999999 and an estimated background color of #EEEEEE. Consider increasing this item’s text contrast ratio to 3,00 or greater.
Здесь всё довольно очевидно: разработчику необходимо повысить контрастность цветов текста и фона. Accessibility Scanner рекомендует обеспечивать коэффициент контрастности для крупного текста не менее 3, а для мелкого — не менее 4,5. Это является ничем иным, как нормативами стандарта WCAG 2.0 от W3C с средним уровнем соответствия AA.
Впрочем, если разработчик желает повысить степень доступности, то может использовать более жёсткие требования по высшему уровню соответствия AAA. В этом случае коэффициент контрастности для крупного текста должен быть не менее 4,5, а для мелкого — не менее 7.
Желающие вникнуть в методику расчёта коэффициента контрастности могут кликнуть по данному тексту и прочитать под спойлером соответствующую портянку.
Коэффициент контрастности (CR) рассчитывается по следующей формуле:
CR = (L1 + 0,05)/(L2 + 0,05)
где
L1 — относительная яркость наиболее светлого из цветов;
L2 — относительная яркость наиболее тёмного из цветов.
В цветовом пространстве sRGB относительная яркость цвета (L) рассчитывается по формуле:
L = 0,2126*R + 0,7152*G + 0,0722*B
где
если RsRGB <= 0,03928, то R = RsRGB/12,92, иначе R = ((RsRGB+0,055)/1,055)^2,4;
если GsRGB <= 0,03928, то G = GsRGB/12,92, иначе G = ((GsRGB+0,055)/1,055)^2,4;
если BsRGB <= 0,03928, то B = BsRGB/12,92, иначе B = ((BsRGB+0,055)/1,055)^2,4.
RsRGB, GsRGB, BsRGB определяются как:
RsRGB = R8bit/255;
GsRGB = G8bit/255;
BsRGB = B8bit/255.
В результате значение коэффициента контрастности располагается в интервале [1; 21], где 1 — минимальная контрастность, например, белый на белом, а 21 — максимальная, например, чёрный на белом.
Item label
com.habrahabr.example:id/button
This item may not have a label readable by screen readers.
Тут разработчики Google несколько поленились, так как вряд ли подобный комментарий окажется достаточно информативным для неподготовленного разработчика. Однако всё довольно просто. Это означает, что элемент управления имеет лишь графическое представление, а текстовая метка у него отсутствует. Таким образом, пользователи, работающие с интерфейсом не при помощи зрения, а посредством программ чтения экрана, будут слышать на нём что-то типа «Кнопка 25 без ярлыка».
Для исправления этой проблемы необходимо подписать каждый элемент управления текстовой меткой посредством атрибута android:contentDescription:
<Button
	android:id="@+id/button"
	android:src="@drawable/button"
	android:contentDescription="@string/button"/>
Стоит отметить, что значение атрибута android:contentDescription не будет отображаться визуально. Оно предназначено для программ чтения экрана и произносится ими при фокусировании данного элемента управления. То есть как-либо оптимизировать длину данного текста под размер экрана не требуется. Однако android:contentDescription — это полноценный строковой ресурс, поэтому точно также нуждается в локализации. Именно поэтому его следует выносить в strings.xml и переводить на ряду со всеми остальными.
Кроме того, как было показано выше, программы чтения экрана самостоятельно определяют все необходимые метаданные о типе элемента, поэтому дублировать эту информацию в текстовой метке не требуется. Иными словами, не стоит писать «Кнопка Отмена», достаточно просто «Отмена».
Если Android-разработчики потратят немного времени на тестирование интерфейса своих приложений посредством Accessibility Scanner и потом ещё чуть больше времени на исправление найденных базовых проблем доступности, то их продукты станут более дружественны к пользователям, имеющим некоторые ограничения зрения. В ряде случаев подобный автоматический аудит и соответствующие ему исправления вообще могут обеспечить полную доступность приложения. Однако в более сложных случаях всё же не стоит полагаться исключительно на Accessibility Scanner и по возможности тестировать доступность интерфейса вручную, в том числе и с привлечением реальных пользователей. Об этом предупреждают и сами разработчики Accessibility Scanner в описании службы: «Accessibility Scanner isn’t a replacement for manual testing, and doesn’t guarantee an app’s accessibility».
К сожалению, приходится констатировать, что приложения самого Google далеко не всегда оказываются способны пройти тестирование посредством Accessibility Scanner, что заставляет вспомнить про круглые сортименты лесоматериала в сенсорных органах.
Под конец ещё раз ссылка на Play Маркет для тех, кто не кликнул по ней в начале статьи.
How to fixed this ?
app Accessibility Scanner result
item label
This item may not have a label readable by screen readers
Link Image#1 image
Link Image#2 image
my code ::
import 'package:flutter/material.dart';

void main() async {
  WidgetsFlutterBinding.ensureInitialized();

  runApp(MyApp());
}

class MyApp extends StatelessWidget {
  const MyApp({Key? key}) : super(key: key);

  @override
  Widget build(BuildContext context) {

  return MaterialApp(
		home: SafeArea(child: Scaffold(
				body: Text("THIS IS TEXT",
						textAlign: TextAlign.center,
						semanticsLabel: "TEXT semantics-Label"
                        ),
					),
                ),
			);
  }
}
Most people will have at least a short term disability at some time that makes it difficult to use their mobile device. This includes someone who was born blind, or lost fine motor skills in an accident. This also includes someone who can’t use their hands because they are carrying a wiggly child. You may have experienced difficulties using your phone while wearing gloves when it’s cold outside. Maybe you’ve had a hard time distinguishing items on the screen when it’s bright outside.
With so much of the population experiencing decreased vision, hearing, mobility, and cognitive function, you should do your best to give everyone the best experience in your apps that you can. It’s a small way you can make people’s lives better.
In this tutorial, you are going to learn ways you can make your Android app more accessible by updating a coffee tracking app. There are many things that help, and by the end of this tutorial you will know the most basic ways you can improve your app for accessibility. You will learn:
- What accessibility tools people are using to navigate your app
- How to discover existing accessibility issues, and prevent accessibility regression
- Android attributes you can use to make your app more accessible
- Design guidelines to allow your user to use your app with ease
This tutorial assumes you have basic knowledge of Kotlin and Android. If you’re new to Android, check out our Android tutorials. If you know Android, but are unfamiliar with Kotlin, take a look at Kotlin For Android: An Introduction.
Getting Started
The app you will be improving allows you to set the number of cups of coffee you want to limit yourself to, and keeps track of where you are within that limit. There is an EditText field to enter the number of cups you want to limit consumption to. There is also a button to add cups of coffee that have been consumed. To show how much of the limit has been consumed, there is a coffee cup that fills up as more cups are consumed, reaching full when the limit is reached.
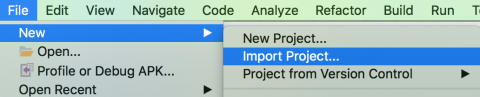
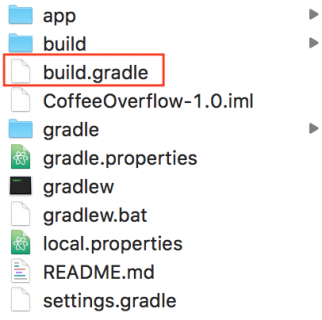
Start by downloading the starter project. Then open the project in Android Studio 3.0.1 or greater by going to File/New/Import Project, and selecting the build.gradle file in the root of the project.
Once it finishes loading and building, you will be able to run the application on a device or emulator. Try setting a new limit, and adding cups of coffee to see how the app works.
The two main files you will be working with for this tutorial are MainActivity.kt and activity_main.xml. Here’s a quick summary of all the files you’ll see in this tutorial.
- MainActivity.kt contains the view code for the main screen. It listens for events from the user updating the limit and how many cups of coffee have been consumed, and updates the view accordingly.
- activity_main.xml is the layout for the main screen. In it you’ll see all the components that make up the view.
- strings.xml holds all the strings you define that are user visible or audible.
- styles.xml contains the app wide styles of the app.
- CoffeeRepository.kt keeps track of how much coffee has been consumed. You won’t need to change anything in it, just know this is what it is used for.
Now that you have the app up and running, and have a basic understanding of how it works, you can look for accessibility shortcomings, and make changes to fix them.
Enabling accessibility tools
There are many tools that people use to interact with their Android devices. This includes TalkBack, Magnification, and Switch Access, to name a few.
TalkBack allows you to explore the view using gestures, while also audibly describing what’s on the screen. Magnification allows you to zoom in on parts of the screen. Both TalkBack and Magnification are helpful for people with limited visibility. People with limited mobility can use Switch Access to allow them to navigate without using the touch screen. You can find all the accessibility features in Settings/Accessibility on your device.

This tutorial is going to look mainly at TalkBack, as it incorporates both screen traversal for navigation and screen reading to understand what is in focus. You can enable all the accessibility tools the same way as you will turn on TalkBack in this tutorial.
By using TalkBack, a user can use gestures, such as swiping left to right, on the screen to traverse the items shown on the screen. As each item is in focus, there is an audible description given. This is useful for people with vision impairments that cannot see the screen well enough to understand what is there, or select what they need to.
Note: TalkBack is only available on physical devices running Lollipop or higher, and cannot be accessed on an emulator.
To turn on TalkBack, go to Settings on your Android device. Then find Accessibility/TalkBack, and toggle the tool on.
With the default settings, in a left to right language, swipe right to advance to the next item on the screen, left to go to the previous, and double tap to select. In a right to left language, the swipe directions are reversed.
With these gestures you can start exploring the application using TalkBack. Try closing your eyes while using it to see if you can understand what you’re “looking” at. Don’t be shy to try out the other accessibility tools too. By trying these out you are able to spot things that are hard to access or understand by those that are impaired.
Testing Tools
While using TalkBack and other accessibility tools is helpful for finding accessibility shortcomings, there are a couple other testing tools provided for developers to help identify accessibility issues.
Lint
The simplest of these is the linter that Google provides. This is enabled by default in Android Studio, and will warn you of accessibility issues such as missing contentDescription (Later in this tutorial you’ll learn why using contentDescription in important).

Espresso tests
For more in depth checks, you can turn on checks in your Espresso tests. Do this by adding the following line to your test or test runner.
AccessibilityChecks.enable()
Check the Google docs for how you can further configure these tests.
Accessibility Scanner
Google also gives us an Accessibility Scanner that you can download from the Play Store. Download it now so you can use it with this tutorial. After downloading, the scanner can be turned on in the same Accessibility settings menu you were in before to turn on TalkBack. Navigate to Settings/Accessibility/Accessibility Scanner, and toggle it on.
Once turned on, navigate to the screen you want to scan, tap the check mark in the blue circle. Wait a moment for the results of the scan to show.

The results will show the scanned screen with orange boxes around any issues it found. By clicking on any of these boxes, you’ll get the description of what was found to be wrong, and a suggestion for how to fix it.

Now that you know how to find accessibility issues, you can get to work on fixing them, and making the world a better place!
Accessibility Attributes
One of the things that are highlighted by the Accessibility Scanner is the “add coffee” FloatingActionButton. It gives you the message “This item may not have a label readable by screen readers.”

You can better understand the implications of this while using TalkBack. Try navigating to it using TalkBack. When the button comes into focus you hear the audio “unlabeled button”. This is not very descriptive for a person who cannot see the screen well enough to infer the meaning.

Content description
You can easily improve this user experience by adding a android:contentDescription attribute to the “add coffee” FloatingActionButton. contentDescription is a small bit of text that describes the view. You don’t need to include that it is a button in your description. This is already inferred by the screen reader, and it will announce it on its own. Add the content description “Add Coffee” to the button. This is done directly on that element in activity_main.xml. You will also need to add the string resource in the strings.xml.
activity_main.xml
<android.support.design.widget.FloatingActionButton
   android:id="@+id/addCoffee"
   android:layout_width="wrap_content"
   android:layout_height="wrap_content"
   android:clickable="true"
   android:contentDescription="@string/add_coffee"
   android:focusable="true"
   android:src="@drawable/ic_add_24px"
   app:fabSize="normal"
   app:layout_anchor="@id/mainContent"
   app:layout_anchorGravity="bottom|right|end"
   tools:targetApi="lollipop_mr1"/>
strings.xml
<resources>
  <string name="app_name">CoffeeOverflow</string>
  <string name="coffee_limit_label">Coffee Limit</string>
  <string name="default_coffee_limit">5</string>
  <string name="coffee_limit_input_hint">Limit</string>
  <string name="amount_consumed">Amount Consumed</string>
  <string name="consumed_format">%1$d of %2$s</string>
  <string name="add_coffee">Add Coffee</string>
</resources>
Once this change is made, build and run the app again. By running the Accessibility Scanner, you will no longer see this warning.

Then, when you test it out with TalkBack, you will hear the audio “add coffee button” when the FloatingActionButton is selected. Yay! Already making improvements.

See how the reader includes “button” in the audio without us including that into the description, along with instructions on how to use: “double tap to activate.” When a user can further interact with an element they have in focus, the screen reader will give clues on how to do that automatically.

Adding a content description is something you should do for every image or button that does not otherwise have text for the screen reader to read. If the element is not important to understand what is on the screen, the contentDescription can be set to @null. If you do this, TalkBack, and other screen readers will skip the element entirely, and move onto the next thing in the view.
Another attribute you can use to tell the screen reader to skip the view element is android:isImportantForAccessibility. When set to ”no”, the screen reader will skip this element while traversing the view.
Grouping
While using the TalkBack tool, you may have noticed how hard it was to get to the “add coffee” FloatingActionButton.

TalkBack traverses through everything on the screen, in order of the file. This can make some core actions, like incrementing the cups of coffee, harder to reach. There are other things, like label/value pairs, that require extra steps to get all the information when they should be grouped together. You should make sure everything on the screen is reached in a logical order, and grouped in a way that makes sense.
There are attributes you can use to improve these issues. Start with the “Amount Consumed” label, and the associated value. These are both parts of the same piece of information, and should be grouped together instead of requiring you to traverse each one separately.

To specify that both the elements should be in focus at the same time, add the android:focusable attribute with the value ”true” the parent element of the two, the LinearLayout with the id consumedContainer. Also add the attribute android:focusableInTouchMode with the value ”false”, as you only want this to be focusable for the screen reader.
activity_main.xml
<LinearLayout
   android:id="@+id/consumedContainer"
   android:layout_width="match_parent"
   android:layout_height="wrap_content"
   android:focusable="true"
   android:focusableInTouchMode="false"
   android:orientation="horizontal">
Run the app with these changes, and try out TalkBack. Observe that “Amount Consumed” and the value are read at the same time. Now that the information is grouped together, it is clear that they are part of the same bit of information, and is it quicker to understand and consume.

Labels
That solved the grouping for the consumption, but you have a similar issue for “Coffee Limit”. The label is read separately from the editable value, with nothing linking the two. This will use a different solution than you used for the amount consumed. The EditText still needs to be individually focusable to change the value. Add the android:labelFor attribute to the “Coffee Limit” TextView, with a value of the id of the EditText value, coffeeLimitValue.
activity_main.xml
<TextView
   android:id="@+id/coffeeLimitLabel"
   android:layout_width="wrap_content"
   android:layout_height="wrap_content"
   android:layout_gravity="start|center_vertical"
   android:layout_weight="1"
   android:labelFor="@id/coffeeLimitValue"
   android:text="@string/coffee_limit_label"
   android:textAppearance="@style/TextAppearance.AppCompat.Title"/>
Now run the app to observe the changes. When the EditText with the value for the limit is selected, it includes the text of the label in the audio: ‘limit for “Coffee Limit”’. This provides the user context about what the editable value is for, relating it to the previous element. Use labelFor whenever you have a situation where you have a label and a value that should be individually focusable, but are referring to the same thing.

Traversal order
Now to handle the FloatingActionButton. You can use android:accessibilityTraversalBefore on a view to specify what item this should come before. Add this to the FloatingActionButton using the id of the container holding the consumed amount as the value.
activity_main.xml
<android.support.design.widget.FloatingActionButton
   android:id="@+id/addCoffee"
   android:layout_width="wrap_content"
   android:layout_height="wrap_content"
   android:accessibilityTraversalBefore="@+id/consumedContainer"
   android:clickable="true"
   android:contentDescription="@string/add_coffee"
   android:focusable="true"
   android:src="@drawable/ic_add_24px"
   app:fabSize="normal"
   app:layout_anchor="@id/mainContent"
   app:layout_anchorGravity="bottom|right|end"
   tools:targetApi="lollipop_mr1"/>
Now when you rebuild and run the app with TalkBack, you will reach the “add coffee” button before the container holding the consumption, and therefore, the rest of the view. This will also be helpful for navigating the app using Switch Access.
Note: accessibilityTraversalBefore is only available on Lollipop and higher, and will only work if the element whose id you provided is focusable. Because the LinearLayout with the id consumedContainer is focusable, this works here if you’re running on a device with version 5.0 or higher.
Announce for accessibility
Have you tried adding a cup of coffee with TalkBack on? Did you notice anything missing for those with visual impairments? When the cup is added the value of the amount consumed is changed along with the ratio of coffee in the coffee cup. These are great visual cues, but it is lacking for those who can’t see them. How can you make this audible?

For this you can use the method announceForAccessibility() on a view. When announceForAccessibility() is called, Android will give an audible announcement for those using a screen reader, and do nothing if an accessibility tool is not in use. You can use this to inform the user that the value has been incremented.
In the onCreate() method in MainActivity, there is a click listener on the “add coffee” button that increments the number of cups of coffee, and shows the result. Add a call to announceForAccessibility() on the updated view to announce the change was made. Put the string you’re using for the message in the strings file. There is already a helper method, consumedString(), you can use to get the resulting value.
MainActivity.kt
override fun onCreate(savedInstanceState: Bundle?) {
 // …

 addCoffee.setOnClickListener {
   coffeeRepo.increment()
   showCount()

   amountConsumed.announceForAccessibility(getString(R.string.count_updated, consumedString()))
 }
}
strings.xml
<resources>
  <string name="app_name">CoffeeOverflow</string>
  <string name="coffee_limit_label">Coffee Limit</string>
  <string name="default_coffee_limit">5</string>
  <string name="coffee_limit_input_hint">Limit</string>
  <string name="amount_consumed">Amount Consumed</string>
  <string name="consumed_format">%1$d of %2$s</string>
  <string name="add_coffee">Add Coffee</string>
  <string name="count_updated">Count updated %s</string>
</resources>
Try using TalkBack to increment the cups of coffee consumed with this update. Now there is an audible cue in addition to the visual when the amount consumed is incremented.

If you don’t want the experience to change for sighted users, announceForAccessibility() is a great thing to use. Use it whenever you have a place where there is a meaningful change that was previously only indicated visually.
Another option for updating the user about a change is with Toasts. When Toasts are shown on screen, they are announced when accessibility tools such as TalkBack are enabled.
Designing for accessibility
There are things you can build into the design of your apps to make it easier for all your users to use. Size, colors, and layouts are all things you can be considerate of.
Touch targets
Take a look at your Accessibility Scanner results again. You can open the app to see the history of any scans you have taken, or perform a new scan. There is a warning on the limit EditText. It says, “Consider making this clickable item larger. This item’s height is 44dp. Consider making the height of this touch target 48dp or larger.”

It’s recommended by Google to make any clickable items at least 48dp in size. That is because anything smaller is difficult for people with vision and motor impairments to tap accurately. In addition, you’ll help out all your users that might be in a bumpy vehicle, wearing gloves, or in bright light that makes it hard to see the screen. Everyone benefits from making this improvement.
To solve this, add the android:minHeight attribute to that EditText. Make sure the value is at least 48dp. Alternatively, you could set android:height to 48dp or higher. This example uses minHeight.
activity_main.xml
<EditText
   android:id="@+id/coffeeLimitValue"
   android:layout_width="wrap_content"
   android:layout_height="wrap_content"
   android:layout_gravity="end"
   android:layout_weight="1"
   android:hint="@string/coffee_limit_input_hint"
   android:inputType="number"
   android:minHeight="48dp"
   android:text="@string/default_coffee_limit"
   android:textAlignment="textEnd"/>
Run the Accessibility Scanner again to make sure this works. There should no longer be a warning for the height of this item.
Color contrast
There are two warnings remaining. There is still one on the EditText that says “Multiple items have the same description.” Because you put the labelFor on the label for this field, the description for the label is part of the description for the limit field. You can leave this one be.
The other is on the text in the toolbar. The message says “Consider increasing this item’s text foreground to background contrast ratio.” Having low vision, color blindness, or a dimmed screen can make it difficult to read text with a low color contrast.

The recommended contrast ratio for text this size is at least 3.0 to 1.
Depending on where this is in your app, there are multiple possible actions you can take. You can change the font color. You can also change the background color. These are usually done in the layout xml file, activity_main.xml in this case. Because this is in the the action bar, you are going to change it in the styles in styles.xml.
Open the file and observe the parent style. The app is currently using a parent dark action bar theme, Theme.AppCompat.Light.DarkActionBar. The action bar is yellow, a light color, so this should be a light theme. Replace the parent style with Theme.AppCompat.Light.
styles.xml
<style name="AppTheme" parent="Theme.AppCompat.Light">
  <item name="colorPrimary">@color/colorPrimary</item>
  <item name="colorPrimaryDark">@color/colorPrimaryDark</item>
  <item name="colorAccent">@color/colorAccent</item>
</style>
This will change the text of the action bar from white to black. Run the Scanner again to see that this warning is gone.

Where to go from here
By completing this tutorial, you’ve learned many ways to make your apps more accessible. You can download the finished project here.
Now you know how to use TalkBack and the Accessibility Scanner to identify accessibility issues in your app. You also know that you can use Espresso and Lint to catch and make sure issues don’t creep in.
Through using the Accessibility Scanner and TalkBack, you identified areas of the app that could use accessibility improvements, then learned and completed the steps to fix them. You can use contentDescription, isImportantForAccessibility, focusable, accessibilityTraversalBefore, and announceForAccessibility to give the user the right information at the right time when using a screen reader.
You also know some tips for creating accessible designs. Making sure touch targets are big enough, and you have a high enough color contrast will benefit all your users.
These are some of the main things you can do to make your app accessible, but there are also many more things. Make sure to go through Google’s accessibility checklist when creating your app. You’ll find things you learned here, as well ways to get started making even more improvements.
Write your app with everyone in mind!
Here are some more resources on accessibility for you:
- Google’s overview about Android accessibility
- Google’s “Implementing Accessibility”
- ‘How to Earn an “A” for Android Accessibility’ by Nick Bonatsakis
- “Android is for Everyone” by Kelly Shuster
Please join the comments below with any questions or thoughts!