- Photoshop User Guide
- Introduction to Photoshop
- Dream it. Make it.
- What’s new in Photoshop
- Edit your first photo
- Create documents
- Photoshop | Common Questions
- Photoshop system requirements
- Migrate presets, actions, and settings
- Get to know Photoshop
- Photoshop and other Adobe products and services
- Work with Illustrator artwork in Photoshop
- Work with Photoshop files in InDesign
- Substance 3D Materials for Photoshop
- Photoshop and Adobe Stock
- Use the Capture in-app extension in Photoshop
- Creative Cloud Libraries
- Creative Cloud Libraries in Photoshop
- Use the Touch Bar with Photoshop
- Grid and guides
- Creating actions
- Undo and history
- Photoshop on the iPad
- Photoshop on the iPad | Common questions
- Get to know the workspace
- System requirements | Photoshop on the iPad
- Create, open, and export documents
- Add photos
- Work with layers
- Draw and paint with brushes
- Make selections and add masks
- Retouch your composites
- Work with adjustment layers
- Adjust the tonality of your composite with Curves
- Apply transform operations
- Crop and rotate your composites
- Rotate, pan, zoom, and reset the canvas
- Work with Type layers
- Work with Photoshop and Lightroom
- Get missing fonts in Photoshop on the iPad
- Japanese Text in Photoshop on the iPad
- Manage app settings
- Touch shortcuts and gestures
- Keyboard shortcuts
- Edit your image size
- Livestream as you create in Photoshop on the iPad
- Correct imperfections with the Healing Brush
- Create brushes in Capture and use them in Photoshop
- Work with Camera Raw files
- Create and work with Smart Objects
- Adjust exposure in your images with Dodge and Burn
- Photoshop on the web beta
- Common questions | Photoshop on the web beta
- Introduction to the workspace
- System requirements | Photoshop on the web beta
- Keyboard shortcuts | Photoshop on the web beta
- Supported file types | Photoshop on the web beta
- Open and work with cloud documents
- Apply limited edits to your cloud documents
- Collaborate with stakeholders
- Generative AI
- Experience the future of Photoshop with Generative Fill
- Cloud documents
- Photoshop cloud documents | Common questions
- Photoshop cloud documents | Workflow questions
- Manage and work with cloud documents in Photoshop
- Upgrade cloud storage for Photoshop
- Unable to create or save a cloud document
- Solve Photoshop cloud document errors
- Collect cloud document sync logs
- Share access and edit your cloud documents
- Share files and comment in-app
- Workspace
- Workspace basics
- Preferences
- Learn faster with the Photoshop Discover Panel
- Create documents
- Place files
- Default keyboard shortcuts
- Customize keyboard shortcuts
- Tool galleries
- Performance preferences
- Use tools
- Presets
- Grid and guides
- Touch gestures
- Use the Touch Bar with Photoshop
- Touch capabilities and customizable workspaces
- Technology previews
- Metadata and notes
- Touch capabilities and customizable workspaces
- Place Photoshop images in other applications
- Rulers
- Show or hide non-printing Extras
- Specify columns for an image
- Undo and history
- Panels and menus
- Position elements with snapping
- Position with the Ruler tool
- Web, screen, and app design
- Photoshop for design
- Artboards
- Device Preview
- Copy CSS from layers
- Slice web pages
- HTML options for slices
- Modify slice layout
- Work with web graphics
- Create web photo galleries
- Image and color basics
- How to resize images
- Work with raster and vector images
- Image size and resolution
- Acquire images from cameras and scanners
- Create, open, and import images
- View images
- Invalid JPEG Marker error | Opening images
- Viewing multiple images
- Customize color pickers and swatches
- High dynamic range images
- Match colors in your image
- Convert between color modes
- Color modes
- Erase parts of an image
- Blending modes
- Choose colors
- Customize indexed color tables
- Image information
- Distort filters are unavailable
- About color
- Color and monochrome adjustments using channels
- Choose colors in the Color and Swatches panels
- Sample
- Color mode or Image mode
- Color cast
- Add a conditional mode change to an action
- Add swatches from HTML CSS and SVG
- Bit depth and preferences
- Layers
- Layer basics
- Nondestructive editing
- Create and manage layers and groups
- Select, group, and link layers
- Place images into frames
- Layer opacity and blending
- Mask layers
- Apply Smart Filters
- Layer comps
- Move, stack, and lock layers
- Mask layers with vector masks
- Manage layers and groups
- Layer effects and styles
- Edit layer masks
- Extract assets
- Reveal layers with clipping masks
- Generate image assets from layers
- Work with Smart Objects
- Blending modes
- Combine multiple images into a group portrait
- Combine images with Auto-Blend Layers
- Align and distribute layers
- Copy CSS from layers
- Load selections from a layer or layer mask’s boundaries
- Knockout to reveal content from other layers
- Selections
- Get started with selections
- Make selections in your composite
- Select and Mask workspace
- Select with the marquee tools
- Select with the lasso tools
- Adjust pixel selections
- Move, copy, and delete selected pixels
- Create a temporary quick mask
- Select a color range in an image
- Convert between paths and selection borders
- Channel basics
- Save selections and alpha channel masks
- Select the image areas in focus
- Duplicate, split, and merge channels
- Channel calculations
- Image adjustments
- Replace object colors
- Perspective warp
- Reduce camera shake blurring
- Healing brush examples
- Export color lookup tables
- Adjust image sharpness and blur
- Understand color adjustments
- Apply a Brightness/Contrast adjustment
- Adjust shadow and highlight detail
- Levels adjustment
- Adjust hue and saturation
- Adjust vibrance
- Adjust color saturation in image areas
- Make quick tonal adjustments
- Apply special color effects to images
- Enhance your image with color balance adjustments
- High dynamic range images
- View histograms and pixel values
- Match colors in your image
- Crop and straighten photos
- Convert a color image to black and white
- Adjustment and fill layers
- Curves adjustment
- Blending modes
- Target images for press
- Adjust color and tone with Levels and Curves eyedroppers
- Adjust HDR exposure and toning
- Dodge or burn image areas
- Make selective color adjustments
- Adobe Camera Raw
- Camera Raw system requirements
- What’s new in Camera Raw
- Introduction to Camera Raw
- Create panoramas
- Supported lenses
- Vignette, grain, and dehaze effects in Camera Raw
- Default keyboard shortcuts
- Automatic perspective correction in Camera Raw
- Radial Filter in Camera Raw
- Manage Camera Raw settings
- Open, process, and save images in Camera Raw
- Repair images with the Enhanced Spot Removal tool in Camera Raw
- Rotate, crop, and adjust images
- Adjust color rendering in Camera Raw
- Process versions in Camera Raw
- Make local adjustments in Camera Raw
- Image repair and restoration
- Remove objects from your photos with Content-Aware Fill
- Content-Aware Patch and Move
- Retouch and repair photos
- Correct image distortion and noise
- Basic troubleshooting steps to fix most issues
- Image enhancement and transformation
- Replace sky in your images
- Transform objects
- Adjust crop, rotation, and canvas size
- How to crop and straighten photos
- Create and edit panoramic images
- Warp images, shapes, and paths
- Vanishing Point
- Content-aware scaling
- Transform images, shapes, and paths
- Drawing and painting
- Paint symmetrical patterns
- Draw rectangles and modify stroke options
- About drawing
- Draw and edit shapes
- Painting tools
- Create and modify brushes
- Blending modes
- Add color to paths
- Edit paths
- Paint with the Mixer Brush
- Brush presets
- Gradients
- Gradient interpolation
- Fill and stroke selections, layers, and paths
- Draw with the Pen tools
- Create patterns
- Generate a pattern using the Pattern Maker
- Manage paths
- Manage pattern libraries and presets
- Draw or paint with a graphics tablet
- Create textured brushes
- Add dynamic elements to brushes
- Gradient
- Paint stylized strokes with the Art History Brush
- Paint with a pattern
- Sync presets on multiple devices
- Text
- Add and edit the text
- Unified Text Engine
- Work with OpenType SVG fonts
- Format characters
- Format paragraphs
- How to create type effects
- Edit text
- Line and character spacing
- Arabic and Hebrew type
- Fonts
- Troubleshoot fonts
- Asian type
- Create type
- Filters and effects
- Use the Liquify filter
- Use the Blur Gallery
- Filter basics
- Filter effects reference
- Add Lighting Effects
- Use the Adaptive Wide Angle filter
- Use the Oil Paint filter
- Use the Liquify filter
- Layer effects and styles
- Apply specific filters
- Smudge image areas
- Saving and exporting
- Save your files in Photoshop
- Export your files in Photoshop
- Supported file formats
- Save files in graphics formats
- Move designs between Photoshop and Illustrator
- Save and export video and animations
- Save PDF files
- Digimarc copyright protection
- Color Management
- Understanding color management
- Keeping colors consistent
- Color settings
- Duotones
- Work with color profiles
- Color-managing documents for online viewing
- Color-managing documents when printing
- Color-managing imported images
- Proofing colors
- Web, screen, and app design
- Photoshop for design
- Artboards
- Device Preview
- Copy CSS from layers
- Slice web pages
- HTML options for slices
- Modify slice layout
- Work with web graphics
- Create web photo galleries
- Video and animation
- Video editing in Photoshop
- Edit video and animation layers
- Video and animation overview
- Preview video and animations
- Paint frames in video layers
- Import video files and image sequences
- Create frame animations
- Creative Cloud 3D Animation (Preview)
- Create timeline animations
- Create images for video
- Printing
- Print 3D objects
- Print from Photoshop
- Print with color management
- Contact Sheets and PDF Presentations
- Print photos in a picture package layout
- Print spot colors
- Print images to a commercial printing press
- Improve color prints from Photoshop
- Troubleshoot printing problems | Photoshop
- Automation
- Creating actions
- Create data-driven graphics
- Scripting
- Process a batch of files
- Play and manage actions
- Add conditional actions
- About actions and the Actions panel
- Record tools in actions
- Add a conditional mode change to an action
- Photoshop UI toolkit for plug-ins and scripts
- Content authenticity
- Learn about content credentials
- Identity and provenance for NFTs
- Connect accounts for creative attribution
- Photoshop 3D
- Photoshop 3D | Common questions around discontinued 3D features
Learn how to crop parts of your photos to create interesting composites
Try it in-app
Discover relevant tools, help articles, and tutorials to crop parts of your images, right within the Photoshop app.
Cropping is the process of removing portions of a photo to create focus or strengthen the composition. Use the Crop tool to crop and straighten photos in Photoshop. The Crop tool is non-destructive, and you can choose to retain the cropped pixels to optimize the crop boundaries later. The Crop tool also provides intuitive methods to straighten a photo while cropping.
For all operations, visual guides provide an interactive preview. When you crop or straighten photos, real-time feedback helps you visualize the final result.
Crop a photo
-
From the toolbar, select the Crop Tool
 . Crop borders display on the edges of the photo.
 -
Draw a new cropping area or drag the corner and edge handles to specify the crop boundaries in your photo.
-
(Optional) Specify the Crop options using the Control bar.
Crop tool options in Photoshop A. Aspect Ratio menu B. Swap Width and Height values C. Overlay Options
Size and proportions
Choose a ratio or size for the crop box. You can also choose a preset, enter your own, or even define your own preset values for later use.
Overlay Options
Choose a view to display overlay guides while cropping. Guides such as Rule of Thirds, Grid, and Golden Ratio are available. To cycle through all the options, press O.
Crop Options
Click the Settings (gear) menu to specify additional crop options.
Use Classic mode
Enable this option if you want to use the Crop tool like it was in previous versions of Photoshop (CS5 and earlier).
Auto Center Preview
Enable this option to place the preview in the center of the canvas.
Show Cropped Area
Enable this option to display the area that is cropped. If this option is disabled, only the final area is previewed.
Enable Crop Shield
Use the crop shield to overlay the cropped areas with a tint. You can specify a color and opacity. If you Enable Auto Adjust Opacity, the opacity is reduced when you edit the crop boundaries.
Delete cropped pixels
Disable this option to apply a non-destructive crop and retain pixels outside the crop boundaries. Non-destructive cropping does not remove any pixels. You can later click the image to see areas outside current crop borders.
Enable this option to delete any pixels that are outside the crop area. These pixels are lost and are not available for future adjustments.
Right-click the Crop box to access common crop options from the context menu.
-
Press Enter (Windows) or Return (Mac OS) to crop the photo.
Content-Aware Fill on Crop
Introduced in Photoshop CC 2015.5 release
Photoshop now uses content-aware technology to intelligently fill in the gaps when you use the Crop tool for straightening or rotating an image, or expanding your canvas beyond the image’s original size.
Follow these steps:
-
From the toolbar, select the Crop Tool (
). Crop borders display on the edges of the photo.
-
In the Options bar, select Content-Aware. The default Crop rectangle expands to include the whole image.
-
Using the handles around the image, straighten or rotate it. Alternatively, expand the canvas beyond the original size of the image.
-
When you are satisfied with the results, click the tick icon in the Options bar to commit the crop operation. Photoshop intelligently fills in the white/gap areas in the image.
Content-Aware Fill On Crop is not supported in the Classic mode of the Crop tool. To disable the Classic mode, do the following:
- With the Crop tool selected, click the Set Additional Crop Options icon in the toolbar.
- In the settings menu that appears, deselect Use Classic Mode.
Straighten a photo while cropping
If you’re using a recent release of Photoshop, you may prefer using Content-Aware Fill on Crop while straightening images.
You can straighten a photo while cropping. The photo is rotated and aligned to straighten it. The canvas is automatically resized to accommodate the rotated pixels.
-
To straighten a photo, do one of the following:
- Place the pointer a little outside the corner handles and drag to rotate the image. A grid displays inside the crop box and the image rotates behind it.
- Click Straighten in the control bar and then using the Straighten tool, draw a reference line to straighten the photo. For example, draw a line along the horizon or an edge to straighten the image along it.
See Straightening a crooked image to watch a video explaining straightening an image using the Crop tool.
Transform perspective while cropping
The Perspective Crop tool lets you transform the perspective in an image while cropping. Use the Perspective Crop tool when working with images that contain keystone distortion. Keystone distortion occurs when an object is photographed from an angle rather than from a straight‑on view. For example, if you take a picture of a tall building from ground level, the edges of the building appear closer to each other at the top than they do at the bottom.
A. Original image B. Adjust
cropping marquee to match the object’s edges C. Final
image
-
To correct image perspective, hold down the Crop tool and select the Perspective Crop tool
. -
Draw a marquee around the distorted object. Match the edges of the marquee to the rectangular edges of the object.
-
Press Enter (Windows) or Return (Mac OS) to complete the perspective crop.
See the video Adjust perspective in a photo for more information.
Resize the canvas using the Crop tool
You can use the Crop tool to resize the image canvas.
-
From the toolbar, select the Crop Tool
. Crop borders display on the edges of the image. -
Drag the crop handles outwards to enlarge the canvas. Use the Alt/Option modifier key to enlarge from all sides.
-
Press Enter (Windows) or Return (Mac OS) to confirm the action.
To resize the canvas, you can also choose Image > Canvas Size. See Change the Canvas size.
Кадрирование или Crop – один из основных инструментов Adobe Photoshop. Композиционный инструмент. Ведь, по сути, сама фотография и есть кадрирование. Но даже несмотря на то, что Photoshop многим из нас давно и хорошо знаком, часто бывает, что о Кадрировании мы знаем не так много. Именно поэтому мы предлагаем подробно изучить возможности кадрирования в самом популярном графическом редакторе, и расскажем вам о 10 вещах, которые обязательно нужно знать каждому фотографу или дизайнеру.
Вы можете посмотреть видеоурок, в котором подробно рассказывает о кадрировании на английском, или прочитать текстовое описание на русском языке.
1. Режим наложение сетки кадрирования (Crop Guide Overlays)
В режиме Crop есть несколько вариантов наложения сетки кадрирования. Вы можете их увидеть сразу после того, как выберете инструмент Crop, и переключаться между ними нажатием клавиши O. Доступны такие виды наложения:
– Rule of Thirds (правило третей)
– Grid (сетка)
– Diagonal (диагональ)
– Triangle (треугольник)
– Golden Ratio (Золотое сечение)
– Golden Spiral (Золотая спираль)
Все они помогают выстроить картинку по композиции согласно ее законам, и облегчают кадрирование. Также можно изменить положение спирали или треугольника в случае, когда выбраны Golden Spiral или Triangle с помощью нажатия комбинации клавиш Shift+O.

2. Изменение ориентации кадрирования
Наверное вы уже сталкивались с тем, что повернуть настроенную вами кадрировочную рамку в Photoshop не так-то просто. Когда вы хотите повернуть рамку на 90 градусов, сохранив пропорции, нажмите клавишу X. Так вы сможете легко переключаться между альбомной и портретной ориентацией.

3. Скрыть обрезанные области
Для того, чтобы было проще понять насколько хорошо будет смотреться кадр после нажатия кнопки Accept, вы можете скрыть обрезанные поля кадрирования нажав H. Это позволит вам увидеть конечный результат до подтверждения кадрирования. В настройках есть больше возможностей отрегулировать предпросмотр кадрирования: нажмите на иконку настроек кадрирования, где вы сможете изменить интенсивность затемнения отрезаемой области, а так же ее цвет.

4. Классический режим кадрирования
В Photoshop CC вы наверное уже сталкивались с тем, что кадрирование стало другим, нежели в предыдущих версиях. А именно, окно кадрирования стало статичным, и передвигать и подстраивать под сетку нужно само изображение. Для тех, кто предпочитает использовать классический режим кадрирования, в котором двигать нужно не саму картинку, а рамку, есть возможность сделать это нажав клавишу P, которая переключит вас в Classic Mode. Так же это можно сделать в меню настройки кадрирования на панели настроек.

5. Использование Front Image
При работе с двумя документами, разрешение и размеры изображения в которых разнятся, вы можете с легкостью кадрировать один документ под размеры другого используя опцию Front Image. Для начала нужно открыть оба документа и выбрать тот, который вы хотите использовать в качестве эталона. Далее выберите Crop Tool, и на всплывающем окне в панели параметров выберите Front Image или нажмите клавишу I . Это позволит запомнить размер и разрешение первого документа. Далее вы можете переключиться на другой документ, в котором Crop Tool уже будет содержать настройку размера и разрешения первого изображения.

6. Как можно подтвердить кадрирование
Помимо клика на галочку на панели настроек есть еще варианты как можно подтвердить сделанное вами кадрирование:
– Нажать Enter
– Двойной клик по области кадрирования
– Клик на иконку подтвердить на панели настроек
– Правый клик > Контекстное меню > Crop
– Меню Настройка изображения > Crop

7. Инструмент перспективного кадрирования
Если в кадре есть объект с выраженной перспективой, как, например, здание, то его плоскости могут быть не параллельны рамке кадра. В этом случае вы можете воспользоваться Perspective Crop Tool. Для кадрирования вам нужно отметить четыре угла, и нажать Enter после того, как образуется рамка кадрирования. Готовый кадр будет расположен к вам фронтально с ровными плоскостями. Если вы хотите выровнять объект без применения кадрирования, воспользуйтесь Auto Upright во вкладке Lens Corrections в настройках Camera Raw Filter.

8. Обратимое кадрирование
Лучший способ сохранить «отрезанные» части изображения при кадрировании, это снять флажок с опции Delete Cropped Pixels в настройках кадрирования. Еще один способ, это создание слоя Smart Object, который вы сможете кадрировать не боясь необратимых последствий даже независимо от того, была включена галочка Delete Cropped Pixels, или нет.

9. Расширение границ
В то время как большинство пользователей с помощью кадрирования отрезают лишнее от фотографии, некоторые используют его чтобы добавить что-то к изображению, расширив его рамки. Для этого нужно просто потянуть уголки кадрировочной рамки за пределы картинки, и если у вас есть фоновый слой, к картинке приплюсуются пикселы такого же цвета как и фоновый слой, если нет, то области расширения останутся прозрачными.

10. Выпрямление фотографии с помощью кадрирования
Вы также можете использовать Crop Tool, чтобы выправлять свои фотографии. Просто удерживая Command / Ctrl, щелкните и перетащите, чтобы нарисовать линию, указывающую горизонт фотографии. Вы также можете использовать любые вертикальные прямые линии, чтобы выровнять изображение.

 Признаюсь честно, очень люблю снимать архитектуру. При этом, не имея специального объектива, достаточно часто сталкиваюсь с неприятным эффектом – параллельные вертикали на фотографии становятся сходящимися. Выражается это в том, что стены зданий или колонны и т.п. выглядят как бы наклоненными друг к другу. Такие искажения перспективы происходят из-за того, что при съемке высоких вертикальных зданий нужно наклонить камеру, чтобы объект целиком попал в кадр. Обойти этот эффект непосредственно при съемке можно, но, увы, не всегда удается, поэтому приходится применять исправление перспективы в фотошопе.
В начале хочу рассказать, как можно немного уменьшить искажения перспективы при съемке. Это важно, потому что при коррекции в фотошопе часть изображения будет отсечена. Как я уже говорил, эффект сходящихся линий возникает при оклонении матрицы от плоскости объекта, например, при съемке снизу высокого объекта.

Чтобы уменьшить угол наклона фотоаппарата, можно попробовать:
- отойти от объекта съемки,
- постараться встать на какое-нибудь возвышение и поднять фотоаппарат над головой,
- изменить фокусное расстояние, чтобы обрезать нижнюю и/или верхнюю часть снимка,
- использовать специальный объектив tilt-shift.
Об этом стоит помнить при съемке, но иногда кадр уже сделан, а проблема стала заметна только через некоторое время. Что ж, тут на помошь приходит возможность исправления перспективы в фотошоп. Хочу добавить, что при подобной коррекции нет особенных цифровых эффектов, метод перенесен еще из пленочной фотографии. По сути он заключается в том, чтобы при печати фотобумагу отклонить от плоскости кадра, компенсировав таким образом искажение вертикалей.
Исправление перспективы в фотошопе
Как всегда, в фотошопе есть несколько путей решения задачи. Я расскажу о двух, на мой взгляд, самых простых и удобных. Первый подходит для исправления перспективы в автоматическом режиме и не всегда выдает нужный результат, зато по скорости отнимает лишь несколько секунд. В качестве основы возьмем фотографию армянской церкви:

Исходное изображение с перспективными искажениями
Явно видно, что вертикали завалены к центру. Выбираем инструмент “Crop Tool” (“Обрезка“), и обязательно ставим наверху галочку “Perspective” (“Перспектива“). Далее верхние края кадра сдвигаем к середине так, чтобы они были параллельны вертикалям на фотографии.

Исправление перспективы инструментом «Crop Tool» («Обрезка»)
Нажимаем “Enter” и получаем исправленную картинку. Здание стало немного приплюснутым, чтобы избавится от этого нужно растянуть картинку по вертикали. Этот эффект проявляется и во втором методе, поэтому об исправлении я расскажу ближе к концу статьи.

Перспектива исправлена, но картинка слегка приплюснута
Второй метод заключается в применении команды “Perspective” (“Перспектива“) из меню “Edit” (“Правка“) – “Transform” (“Трансформация“). Он дает больше возможностей и позволяет, кроме перспективы, исправлять завал изображения влево или вправо, если при съемке камера была наклонена в сторону.

Применение команды «Perspective» («Перспектива»)
При применении этой команды нужно потянуть за любой верхний край в сторону и визуально подобрать желаемый уровень изменения перспективы. Кроме этого, если переместить среднюю верхнюю точку влево или вправо, то можно “наклонить” изображение в нужную сторону, чтобы компенсировать наклон при съемке.

Полученный результат несколько отличается от предыдущего. Теперь нам нужно растянуть изображение по вертикали, чтобы компенсировать его “уплощение”. Для этого опять идем в меню “Edit” (“Правка“) – “Transform” (“Трансформация“) и выбираем команду “Scale” (“Масштаб“). Растягиваем изображение наверх за центральную точку.

Конечное изображение с исправленой перспективой
Любым из этих методов можно легко и быстро исправить перспективу в фотошоп. При этом второй способ дает несколько больше возможностей. В некоторых случаях не стоит стремиться к абсолютной параллельности вертикальных линий т.к. картинка при исправлении деформируется, что особенно заметно, если в кадре есть круглые объекты, например купола.
Источник: xela.ru
Learn how to crop your images and fix perspective distortions at the same time using the Perspective Crop Tool in Photoshop! For Photoshop CC and CS6.
Whenever we photograph our subject on an angle, we get what’s called keystone distortion, or keystoning. This means that, rather than the edges of our subject looking straight and perpendicular, they look as if they’re leaning back or tilting inward towards the horizon. To fix the perspective, and crop the image at the same time, we can use Photoshop’s Perspective Crop Tool. And in this tutorial, I’ll show you how it works!
Adobe first added the Perspective Crop Tool in Photoshop CS6. I’ll be using Photoshop CC here but CS6 users can also follow along.
Let’s get started!
A little perspective on the problem
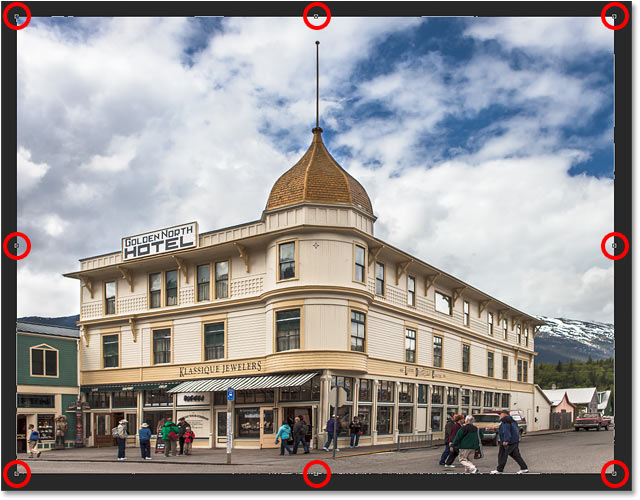
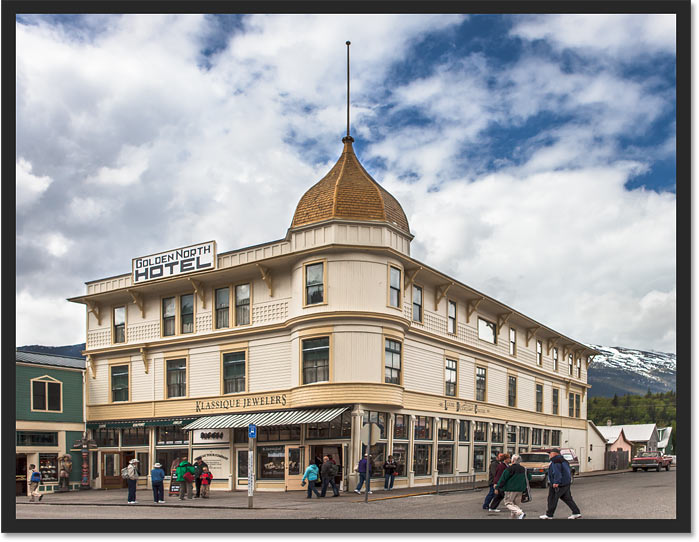
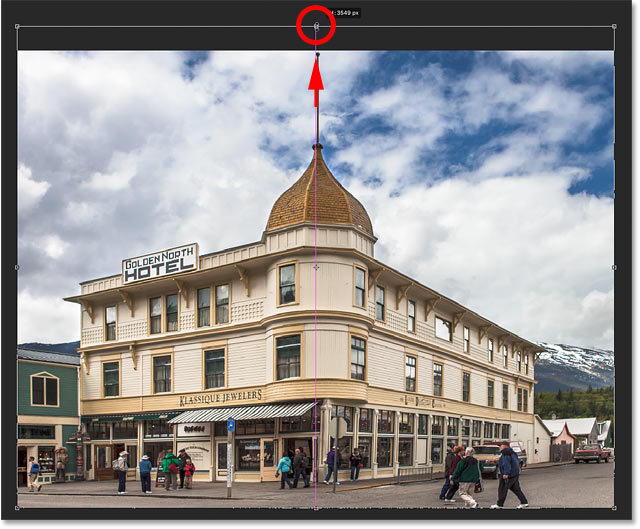
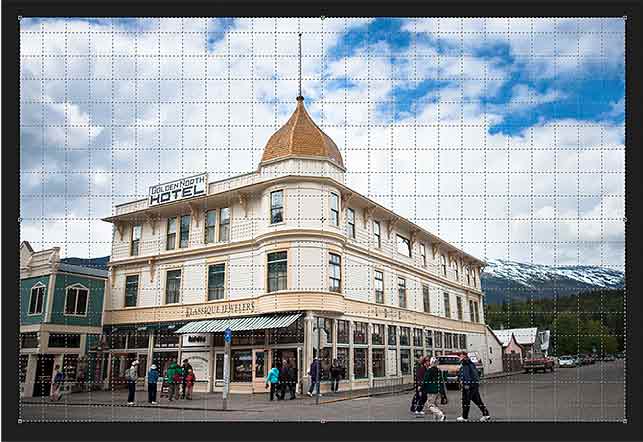
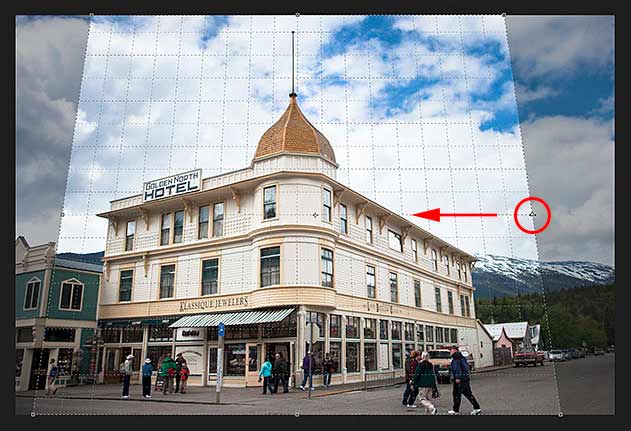
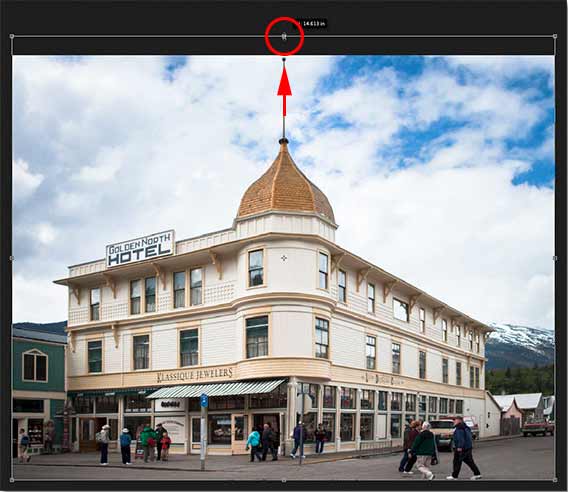
Here’s a photo I’ve opened in Photoshop that has some issues with perspective. Because the photo was shot from the ground and looking up at the hotel, the building seems to be leaning back as it rises upward, making the top look more narrow than the bottom. And the smaller building to the left of the hotel also looks like it’s leaning backwards. In fact, everything in this photo seems to be tilting inward towards some imaginary center point high above the image:
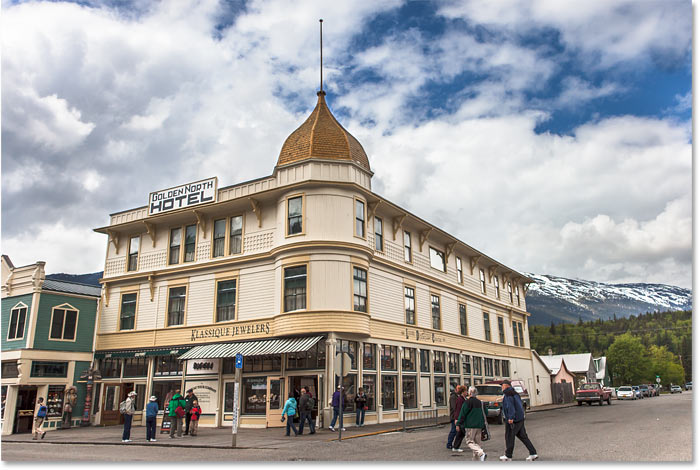
Photos of buildings often suffer from perspective distortion. Photo credit: Steve Patterson.
How to fix the perspective with the Perspective Crop Tool
Let’s see how the Perspective Crop Tool can fix this problem.
Step 1: Select the Perspective Crop Tool
You’ll find the Perspective Crop Tool nested in behind the standard Crop Tool in the Toolbar. To get to it, click and hold the Crop Tool’s icon until a fly-out menu appears showing the other tools also available in that spot. Then choose the Perspective Crop Tool from the list:
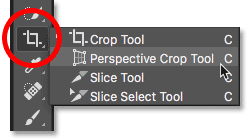
Click and hold on the standard Crop Tool to access the Perspective Crop Tool.
Related: How to customize the Toolbar in Photoshop
Step 2: Draw a crop border around the image
Unlike Photoshop’s standard Crop Tool, the Perspective Crop Tool does not automatically place a cropping border around the image. So the first thing we need to do is draw one ourselves. To do that, I’ll click in the top left corner of the photo and, with my mouse button held down, I’ll drag diagonally downward to the bottom right corner:
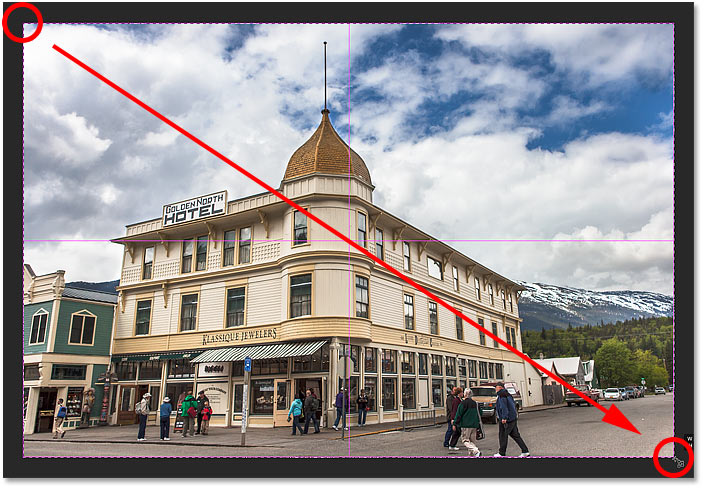
Click and drag out an initial crop box around the image.
I’ll release my mouse button, at which point Photoshop adds a crop border around the image. And just like we’d see with the standard Crop Tool, handles appear around the border. There’s one at the top, bottom, left and right, and one in each corner:
The handles around the crop border.
The Perspective Grid
Notice that a grid also appears inside the crop border. This is the perspective grid, and it’s what allows us to fix our perspective problem, as we’ll see in a moment:
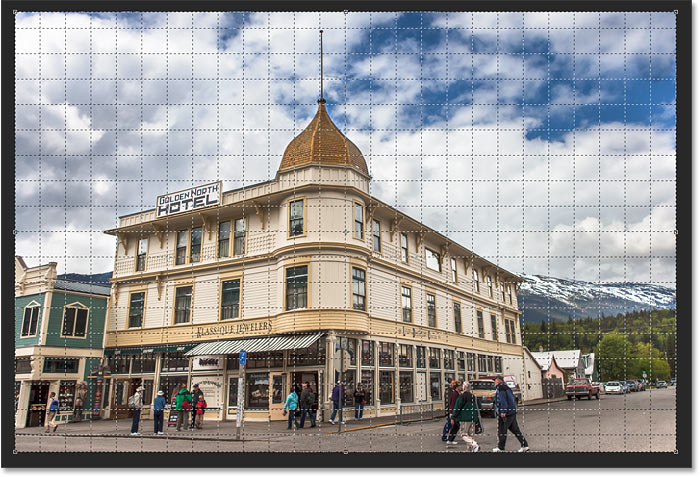
The perspective grid inside the crop border.
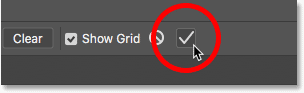
If you’re not seeing the grid, make sure you have the Show Grid option selected (checked) in the Options Bar along the top of the screen:
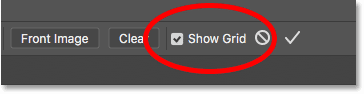
Make sure «Show Grid» is selected.
Step 3: Line up the perspective grid with the edges of your subject
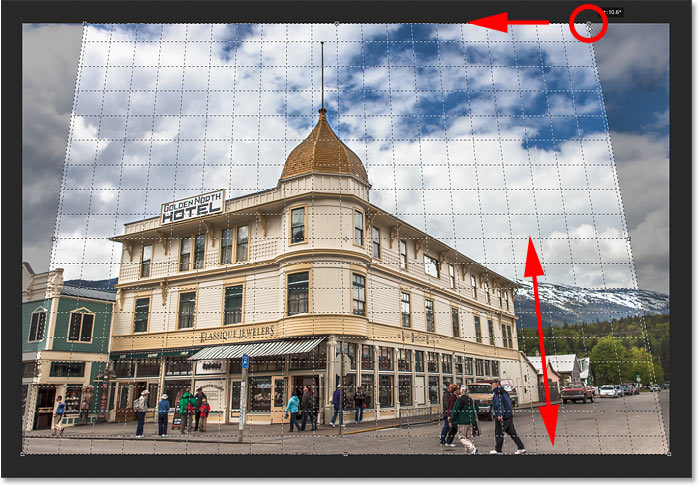
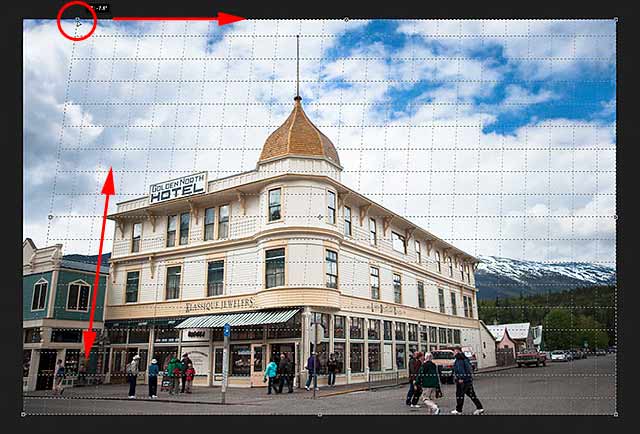
To fix the perspective problem, all we need to do is drag the corner crop handles left or right to line up the vertical grid lines with something in the image that should be vertically straight. For example, with my photo, the sides of the hotel should be straight. So to correct the perspective, I’ll drag the corner handles inward until the grid lines and the sides of the building are tilting at the same angles.
I’ll start by dragging the handle in the top left corner towards the right until the vertical grid line closest to the left side of the hotel lines up with the angle of that side of the building. As I drag the handle, I’ll also press and hold my Shift key. This makes it easier to drag the handle straight across horizontally:
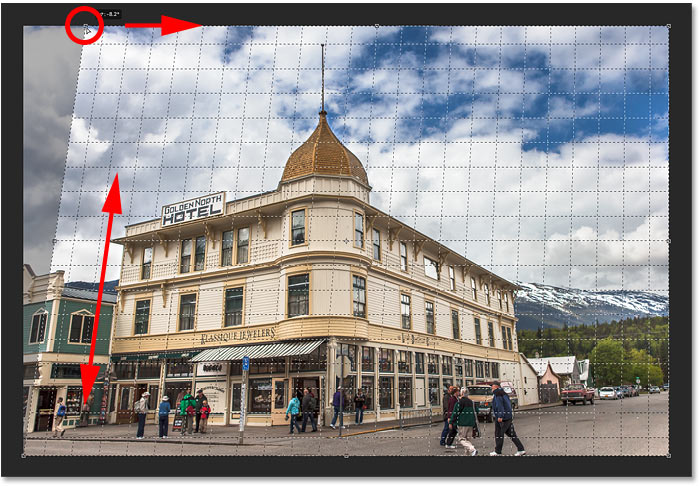
Matching the perspective grid line with the left side of the building.
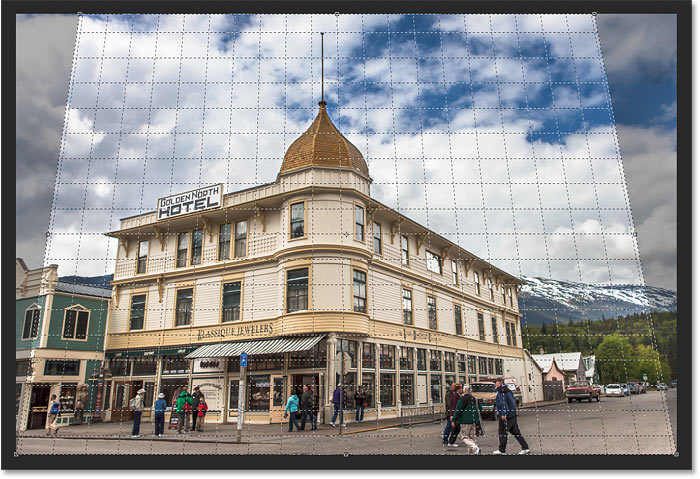
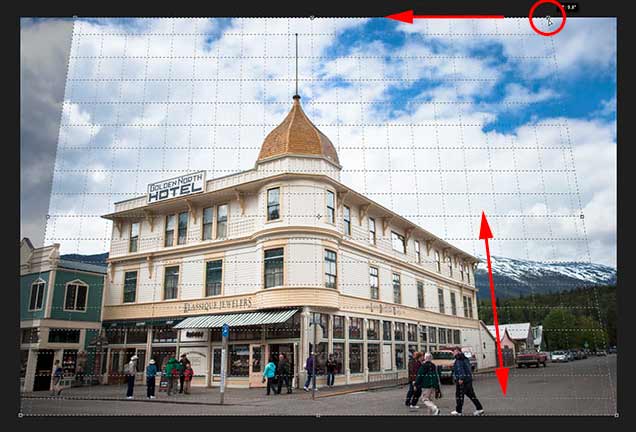
Then I’ll drag the handle in the top right corner towards the left until the vertical grid line closest to the right side of the hotel is tilting at the same angle as that side of the building. Again, I’ll press and hold my Shift key as I drag so it’s easier to drag straight across:
Matching the grid line with the right side of the building.
Adjusting the grid line on one side of your subject may throw off the other side, so you may need to go back and forth a bit with the handles. But after a bit of fine-tuning, you should have both sides of the grid lined up with something that should be vertically straight. You can also drag the handles in the bottom left and right corners of the crop border if you need to, but in my case it wasn’t necessary.
Just like with the standard Crop Tool, the darker areas outside the crop border will be cropped away once the crop is applied:
To fix the perspective, the shaded areas outside the crop border will be tossed away.
Step 4: Adjust the crop border
Once you’ve lined up the grid lines with the angles of your subject, you can drag the top, bottom, left or right handles to reshape the crop border and crop away more of the image. Here, I’m dragging the left and right sides inward:
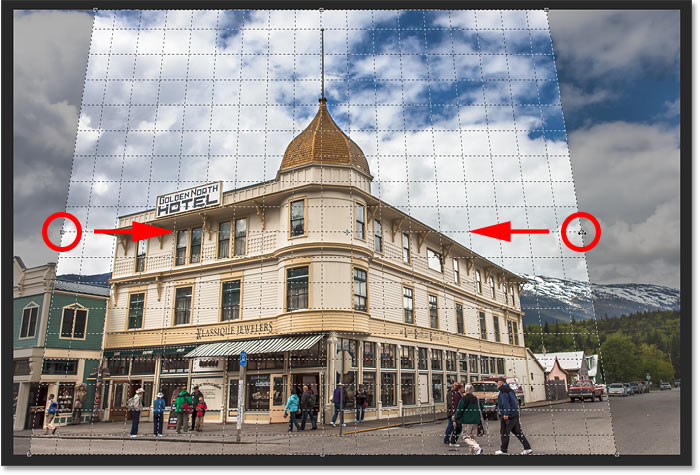
Making further adjustments to the crop border.
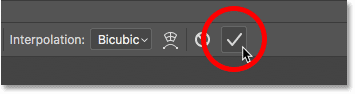
Step 5: Apply the crop
When you’re ready to crop the image, click the checkmark in the Options Bar. Or press Enter (Win) / Return (Mac) on your keyboard:
Clicking the checkmark to apply the perspective crop.
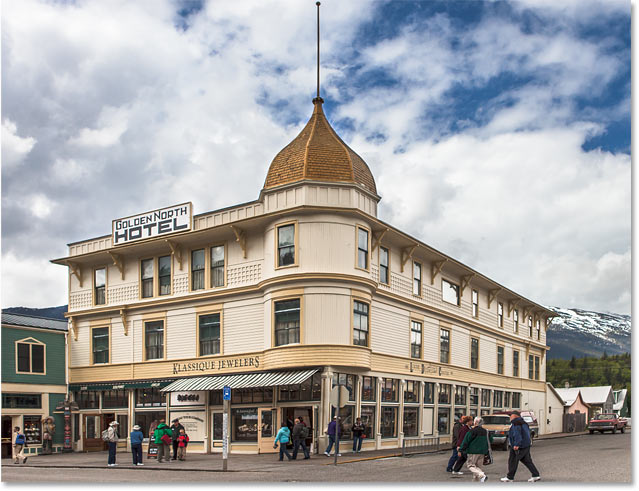
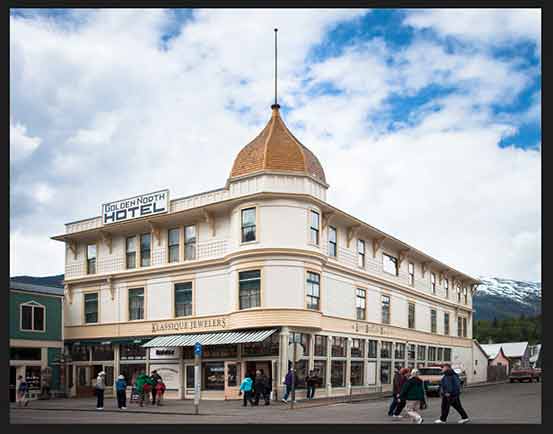
Photoshop instantly crops away the area outside the crop box and fixes the perspective problem in one shot. The hotel in my photo, as well as everything else that was tilted, now appears vertically straight.
The hotel is no longer leaning backwards.
One problem with the Perspective Crop Tool is that it’s not an exact science. After you’ve applied the crop, you may find that your image still looks a bit «wonky» (technical term), and that’s because the angles of your grid lines didn’t quite match up with your subject. If that happens, undo the crop by pressing Ctrl+Z (Win) / Command+Z (Mac) on your keyboard and then try again. It may take a couple of tries, but stick with it and you’ll get it right.
How to fix the «squished» look after correcting the perspective
Another problem you may run into with the Perspective Crop Tool is that everything in your image may look a bit vertically «squished» after applying the crop. In my case, the hotel no longer looks as tall as it did originally, and the people walking in front of it all look shorter. We can fix this problem by stretching the image using Photoshop’s Free Transform command.
Step 1: Unlock the Background layer
Before we do that, we first need to look at the Layers panel where we see that my photo is currently sitting on the Background layer:
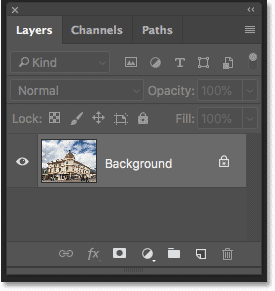
The Layers panel showing the image on the Background layer.
The problem is that Photoshop won’t let us use Free Transform on a Background layer. But the easy solution is to simply rename the layer. In Photoshop CC, click on the lock icon. In CS6, press and hold the Alt (Win) / Option (Mac) key on your keyboard and double-click on the Background layer. This will instantly rename the layer to «Layer 0»:
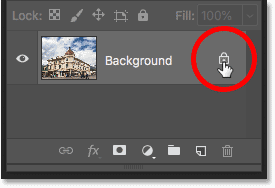
Unlocking the Background layer.
Step 2: Choose the Free Transform command
With the layer renamed, go up to the Edit menu in the Menu Bar and choose Free Transform:
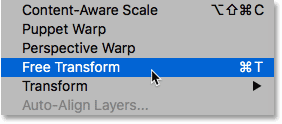
Go to Edit > Free Transform.
Step 3: Stretch the image vertically
Photoshop places the Free Transform box and handles around the image. To stretch the image, I’ll click on the top handle and, with my mouse button held down, I’ll drag it straight up. Again, this isn’t an exact science so all we can really do is eyeball it. But I’ll drag the handle upward until the hotel and the people in the photo all look roughly as tall as they should be. Or in this case, as tall as I can make them without losing the very top of the building:
Stretching the photo vertically to restore the height.
Step 4: Click the checkmark
When you’re happy with the results, click the checkmark in the Options Bar to apply the transformation. You can also apply it by pressing Enter (Win) / Return (Mac) on your keyboard:
Clicking the checkmark in the Options Bar to apply the Free Transform command.
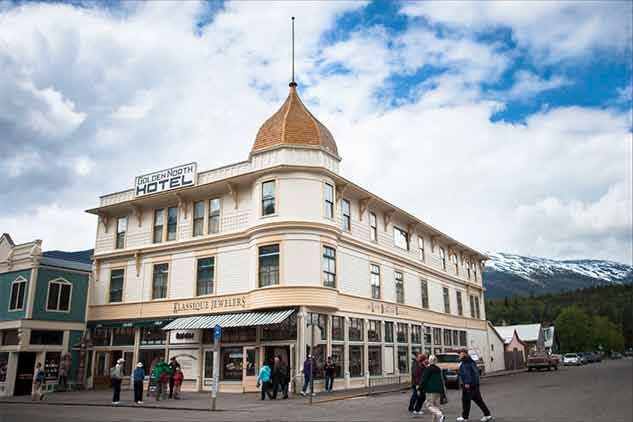
And with that, we’re done! Here for comparison is my original image once again with the perspective problem:
The original photo with the original problem.
And here, after correcting the perspective, cropping the image and «unsquishing» it with Free Transform, is my final result:
The final result.
And there we have it! That’s how to crop images and fix perspective distortions at the same time using the Perspective Crop Tool in Photoshop! In the next lesson, I show you how the Crop Tool makes it easy to crop and resize your photos to match any frame size you need!
You can jump to any of the other lessons in this Cropping Images in Photoshop series. Or visit our Photoshop Basics section for more topics!
Наряду с новым инструментом обрезки изображения «Рамка» (Crop Tool) , в Photoshop CS6 кардинальным изменениям и улучшениям подвергся и инструмент исправления искажений перспективы (Perspective Crop Tool), в официальной русскоязычной версии этот инструмент называется «Кадрирование перспективы».
Для примера возьмём фотографию, имеющую некоторые проблемы с перспективой. Если вы посмотрите внимательно, то заметите, что центральное здание отеля на снимке, вместо вертикального положения, как бы наклонено от нас внутрь снимка, иными словами, верх здания выглядит более узким, чем низ. Меньшее здание, расположенное слева от отеля, также наклонено внутрь:
Давайте рассмотрим, как этот новый инструмент Photoshop CS6 сможет разрешить данную проблему. Он находится в группе «Рамка» (Crop Tool) в инструментальной панели программы. Чтобы добраться до него, кликните правой клавишей мыши по иконке «Рамки» (Crop Tool) и выберите его из списка в выпадающем меню (в англ. версии программы он называется Perspective Crop Tool):
В отличие от стандартного инструмента «Рамка» в Photoshop CS6, рассмотренного в предыдущей статье, данный инструмент самостоятельно не создаёт рамку обрезки вокруг изображения, поэтому первое, что нам нужно сделать, это поместить курсор мыши в левый верхний угол фотографии и, зажав левую клавишу, протащить курсор до правого нижнего угла.
Теперь отпускаем клавишу мыши, и Photoshop добавляет рамку вокруг изображения, внутри рамки имеется сетка, а в углах и в серединах сторон находятся маркеры перемещения:
Если вы не видите сетку, убедитесь, что у вас проставлена галка у опции «Показать сетку» (Show Grid) на панели параметров в верхней части экрана:

Теперь нам надо перетащить левый верхний маркер рамки вправо до того момента, когда линии внутренней сетки станут параллельны наклонённой левой стене здания. Для того, чтобы маркер перемещался строго в горизонтальном направлении, следует предварительно зажать клавишу Shift:
Далее, такие же действия следует произвести с правым верхним маркером рамки, только перемещать, конечно же, его следует влево, перед перетаскиванием не забываем нажать и удерживать клавишу Shift:
Скорее всего, изменение правой стороны сетки рамки затронет и левую, уже готовую, сторону, так что придётся подправить заново и её. Вы также можете перетащить маркеры, расположенные в нижних углах, но в моем случае это не требуется. Обратите внимание, что часть изображения на левой и правой стороне в настоящее время выходит за пределы рамки обрезки. Эти области будут обрезаны после окончательного применения инструмента:

После того, как вы настроили угол наклона сетки, можно еще и изменить размер рамки обрезки путем перетаскивания маркеров, расположенных на серединах сторон рамки. Здесь я перетаскиваю правый правый маркер влево, чтобы обрезать нежелательную область в правой части фотографии:
Когда вы закончите настройки, для окончательного применения инструмента нажмите на галочку в панели параметров или клавишу Enter:

Photoshop мгновенно обрежет лишнее и применит исправление перспективы, наклонённые ранее дома стоят теперь вертикально:
А теперь о грустном. Одна из проблем данного инструмента заключается в том, что это не то, что точных алгоритмов его применения не существует. После применения инструмента может получиться, что углы наклона предметов получились не такими, как мы хотели, т.е, в нашем случае, наклон исправлен не до конца или наоборот, завалены в другую сторону. Если так получилось, просто нажмите комбинацию клавиш Ctrl+Z, чтобы отменить изменения, внесенные с помощью инструмента исправления перспективы, а затем повторите попытку. Возможно, для достижения необходимого результата придётся сделать несколько попыток.
Еще одна проблема, с которой Вы можете столкнуться, заключается в том, что после того как вы исправили угол наклона, все предметы в получившемся изображении могут выглядеть немного сплющенными по вертикали. В моем случае, здание отеля выглядит ниже, чем он было изначально, и люди, идущие на переднем плане, выглядит короче, чем раньше. Мы можем легко решить эту проблему путем растягивания изображения с помощью «Свободного трансформирования» (Free Transform).
Прежде приступить к этому, посмотрим на панель слоёв, где видно, что моё фото в настоящее является фоновым слоем (в англ. Фотошопе вместо названия слоя «Фон» будет «Background»):
Photoshop не позволяет нам использовать свободное трансформирование на фоновом слое, но, к счастью, все, что нужно сделать, это переименовать слой. Для этого зажмите клавишу Alt и дважды щелкните левой клавишей мыши по слою в палитре слоёв. Это действие переименует слой в «Слой 0 (Layer 0) и снимет иконку замочка (блокировку):
Теперь мы можем применить свободное трансформирование, для этого нажмите комбинацию Ctrl+T. Появится габаритная рамка, и, чтобы растянуть изображение, перетащите маркер этой рамки, расположенный на верхней кромке, несколько вверх:
После того, как Вы будете удовлетворены результатом, для применения трансформации нажмите клавишу Enter.
Ну вот, вроде бы и всё, посмотрите на готовый результат:
