При работе на компьютере иногда возникает необходимость получить полный список файлов и папок в каталоге или даже целом томе. Понадобиться он может для самых разных целей, например, для каталогизации, для сравнения, для использования в какой-то базе данных и так далее. В большинстве случаев приходится иметь дело с большим числом объектов, поэтому нечего и думать, чтобы составить такой список вручную.
Если создание списка файлов вручную представляется едва ли возможным, то какая есть тому альтернатива, какие программные инструменты лучше всего подойдут для этих целей? Решений существует несколько, все они очень просты и удобны. Получить список файлов и папок можно с помощью обычной командной строки, с помощью PowerShell, штатного Проводника, любого браузера, а также с помощью сторонних специализированных утилит.
Получаем список файлов и папок в командной строке
Для чтения содержимого каталогов в старой доброй командной строке предусмотрена команда dir, её то как раз мы и будем использовать. Итак, запускаем консоль CMD, командой cd Буква диска:/путь (если нужно перейти в другой диск, добавляем после cd ключ /d) переходим в нужное расположение и выполняем эти две команды:
chcp 1251
dir /b /s > D:filelist.tхt
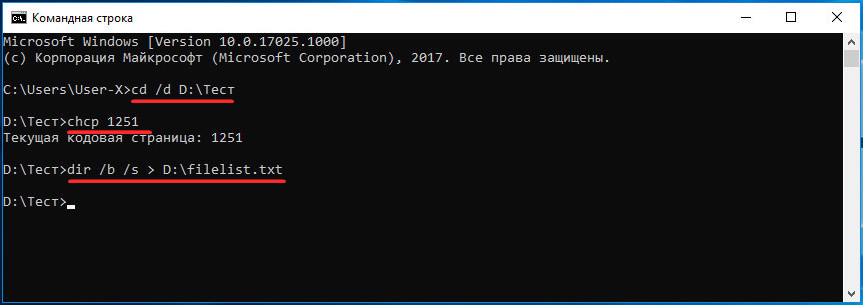
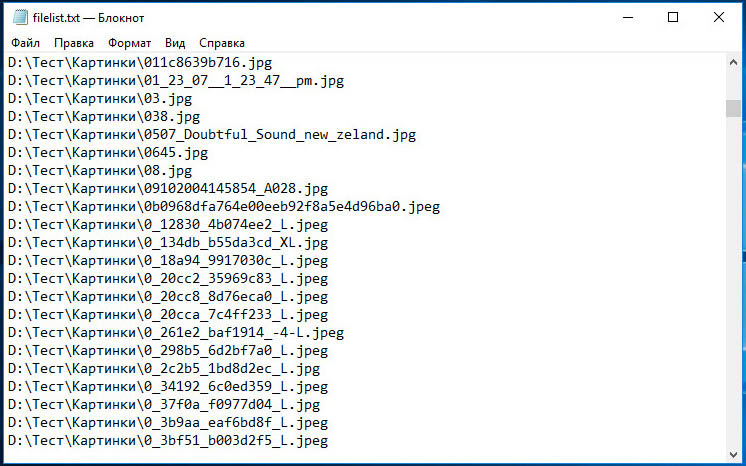
Первая команда устанавливает кириллическую кодировку, вторая сохраняет список всех файлов, папок и вложенных в них объектов в текстовый лог на диске D.
Если нужно получить список только файлов (без вложенных каталогов), достаточно использовать только ключ /b.
Примечание: в Windows 8.1 и 7 для быстрого перехода в папку в командной строке, зажмите Shift, кликните ПКМ по папке и выберите в контекстном меню опцию «Открыть окно команд».
Список файлов и папок в PowerShell
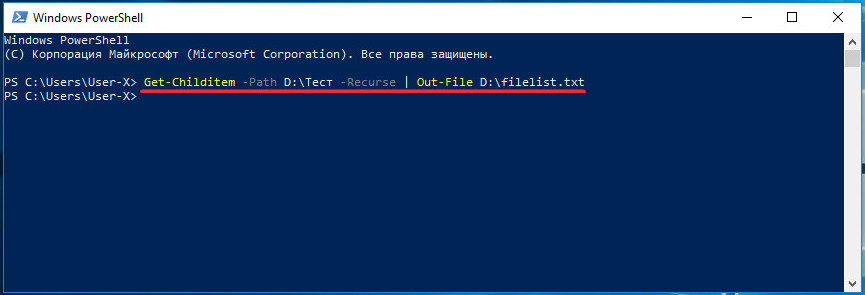
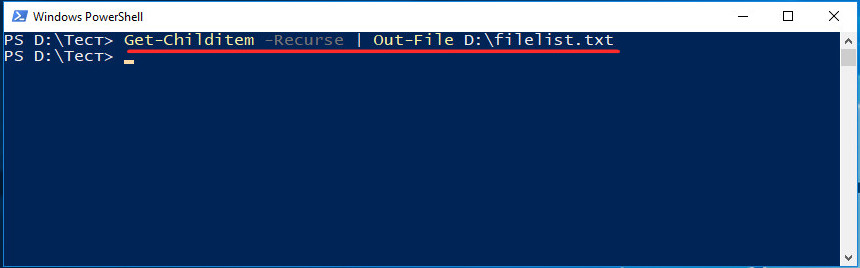
В Windows 10 командная строка заменена консолью PowerShell, для получения списка файлов можете использовать её. Для примера выведем в файл содержимое папки Тест с её подкаталогами:
Get-Childitem -Path D:Тест -Recurse | Out-File D:filelist.tхt
А можно и проще. Зажав Shift, кликаем по папке ПКМ, выбираем в меню «Открыть PowerShell здесь».
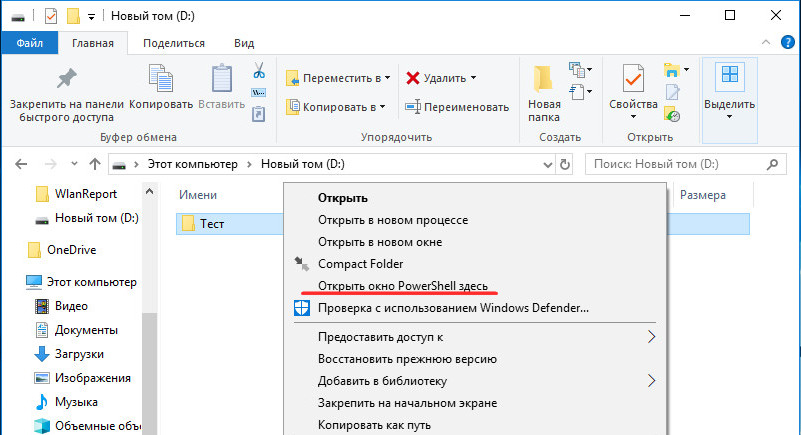
И выполняем в открывшемся окне консоли команду Get-Childitem -Recurse | Out-File D:filelist.tхt.
Необходимость использования параметра -Path с указанием пути в данном случае отпадает.
Получение списка файлов или папок в Проводнике
Этот способ позволяет получить список либо файлов, либо папок в конкретном расположении. Заходим в целевую папку, выделяем в ней все файлы или папки, зажимаем Shift, кликаем правой кнопкой мыши и выбираем в меню опцию «Копировать как путь».
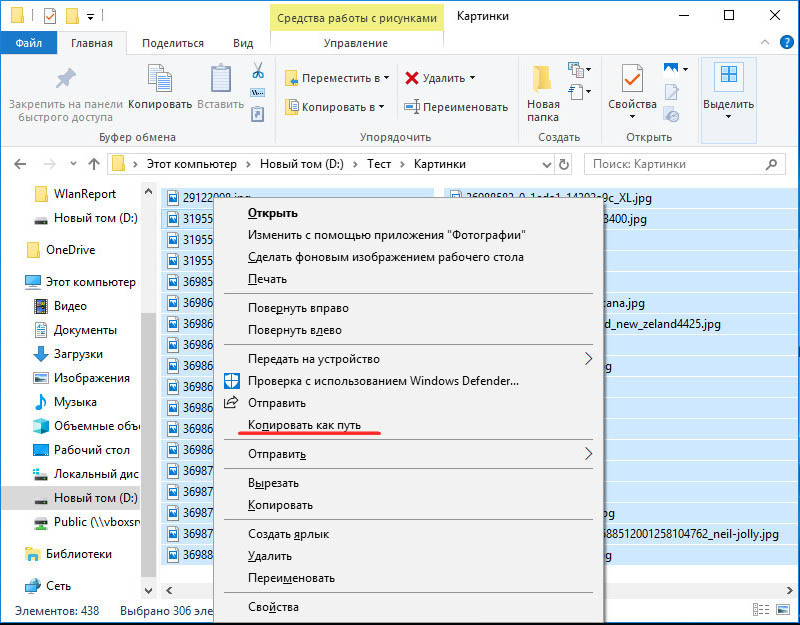
Пути и имена выделенных объектов будут переданы в буфер обмена, откуда вы уже сможете перенести их в текстовый файл.
Получение списка файлов с помощью DirLister
Для получения хорошо структурированного списка объектов файловой системы можно воспользоваться бесплатной портативной утилитой DirLister, скачав её с официального сайта:
www.barrysoft.it/blog/software/dirlister
Запустив утилиту, укажите в разделе «Directory To Scan» путь к сканируемому каталогу или диску, в разделе «Output File» выберите расположение для сохранения списка.
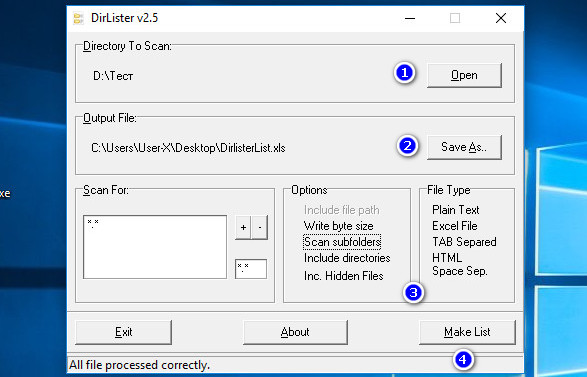
Здесь же можно задать параметры сканирования — выбрать формат, указать, нужно ли включать в список вложенные директории и скрытые объекты, задать поиск по маске. После нажатия кнопки «Make List» список будет сохранён в выбранном расположении.
Используем для получения списка файлов браузер
На худой конец для создания списка файлов и папок на диске можно воспользоваться любым браузером. Перетаскиваем папку или диск на новую вкладку браузера и получаем список имеющихся в ней файлов и каталогов.

Рекурсивно пройтись по всем вложенным каталогам, правда, не получится да и для копирования путей и имён файлов и переноса их в отдельный файл придется использовать Ctrl + C и Ctrl + V.
![]() Загрузка…
Загрузка…

Вопрос от пользователя
Здравствуйте.
Помогите с одним вопросом… У меня есть несколько внешних дисков и на них записаны фильмы. Я хочу получить список всех названий (имен) этих файлов в тексте, чтобы его распечатать и положить рядом в коробочку с диском (скажем, навести порядок!).
Это серьезно бы облегчило поиск и подключение нужного диска.
Доброго дня!
Эту задачу можно решить несколькими способами (несмотря на то, что я ниже приведу универсальные варианты — в зависимости от вашей версии Windows, часть из них может не сработать…). Так что проверяйте сразу несколько из них… 👌
*
Содержание статьи
- 1 Способы получить список имен файлов
- 1.1 Вариант 1 (с помощью Total Commander)
- 1.2 Вариант 2 (через браузер)
- 1.3 Вариант 3 (список со вложенными файлами и папками)
- 1.3.1 Как убрать путь (C:Video) из списка
- 1.4 Вариант 4 (без доп. софта)

→ Задать вопрос | дополнить
Способы получить список имен файлов
Вариант 1 (с помощью Total Commander)
Наиболее простой и предпочтительный вариант (к тому же точно работающий во всех версиях ОС) — воспользоваться помощью 👉 Total Commander (ссылка на офиц. сайт). Если кто не знает — это спец. программа для работы с файлами (альтернатива проводнику).
Запустив Total Commander, перейдите в нужный каталог (в тот, где у вас хранятся фильмы, например) и выделите все файлы (для этого достаточно нажать Ctrl+A).
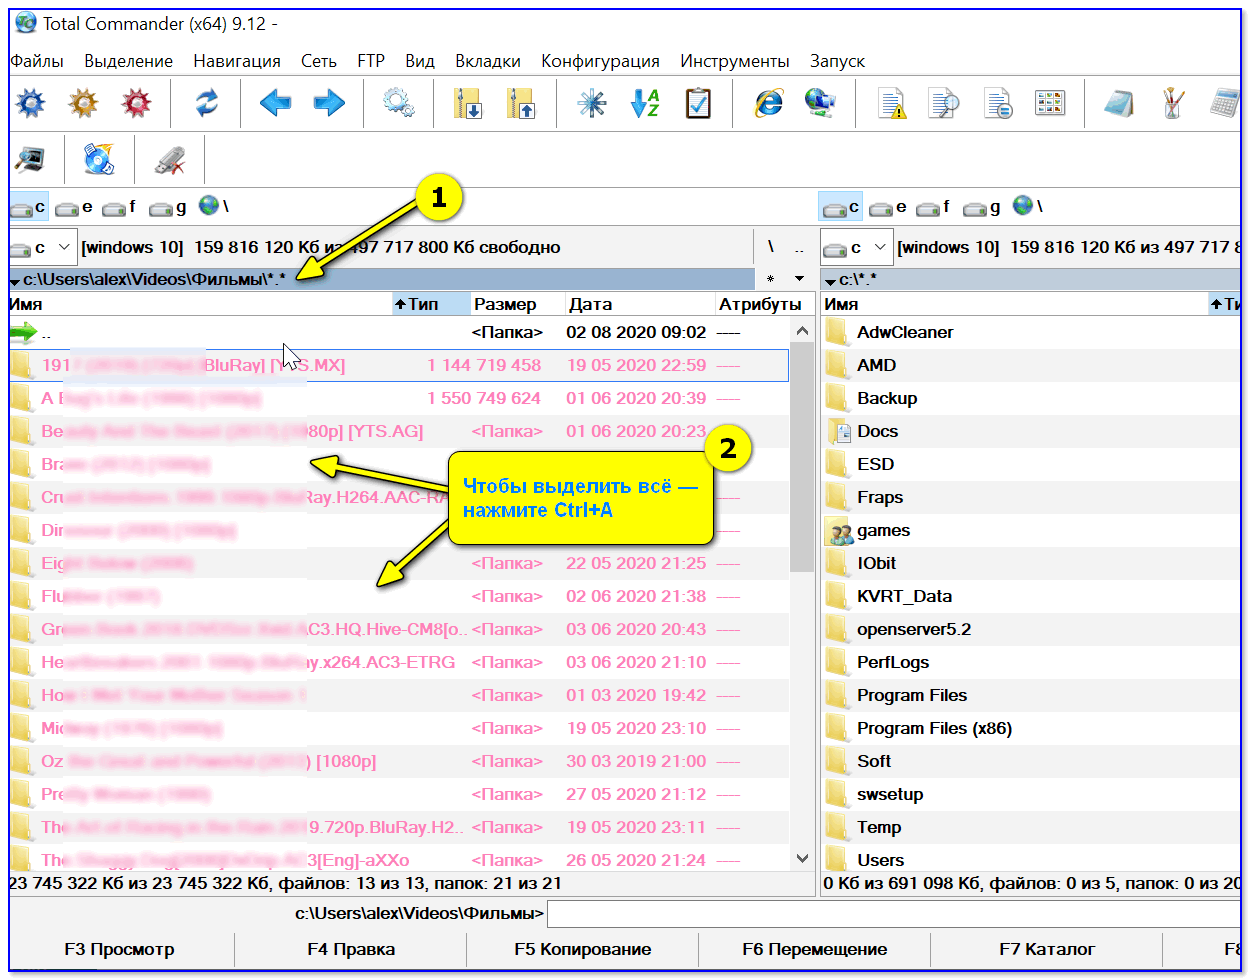
Выделяем все файлы в нужном каталоге
Далее в меню «Выделение» выберите опцию «Сохранить выделение в файл…» (в некоторых версиях программы есть возможность скопировать имена файлов в буфер — если сделаете так, то потом откройте документ Word и вставьте список, нажав Ctrl+V).
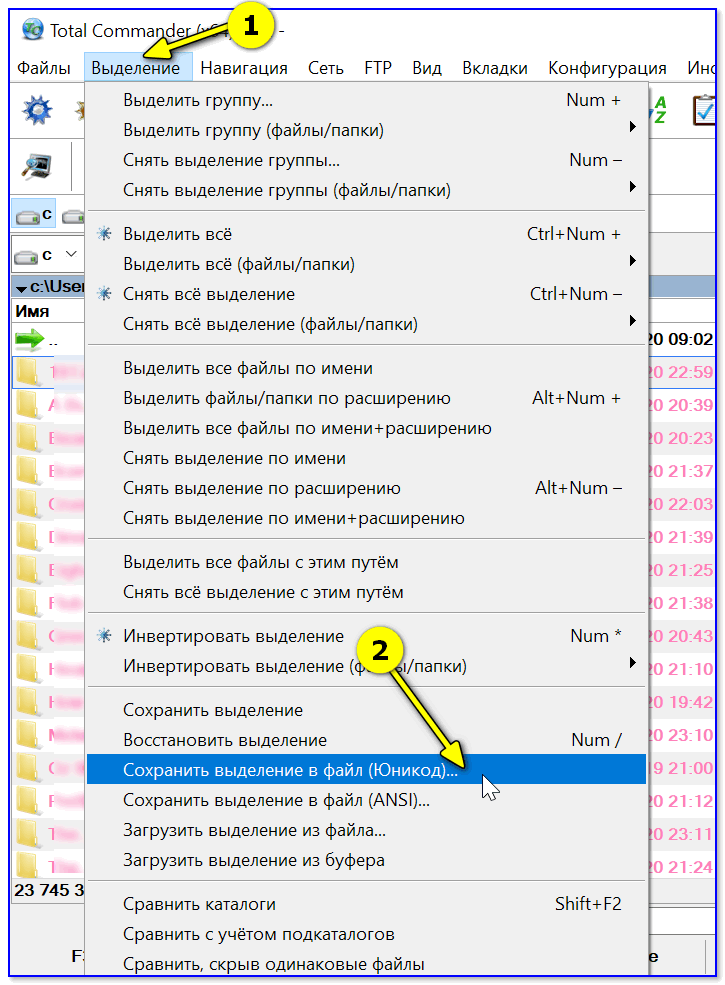
Сохранить выделение в файл (Total Commander)
Собственно, полученный текстовый файл можно открыть в любом блокноте (я использую Notepad++), ну и после распечатать список (Ctrl+P) … 👌
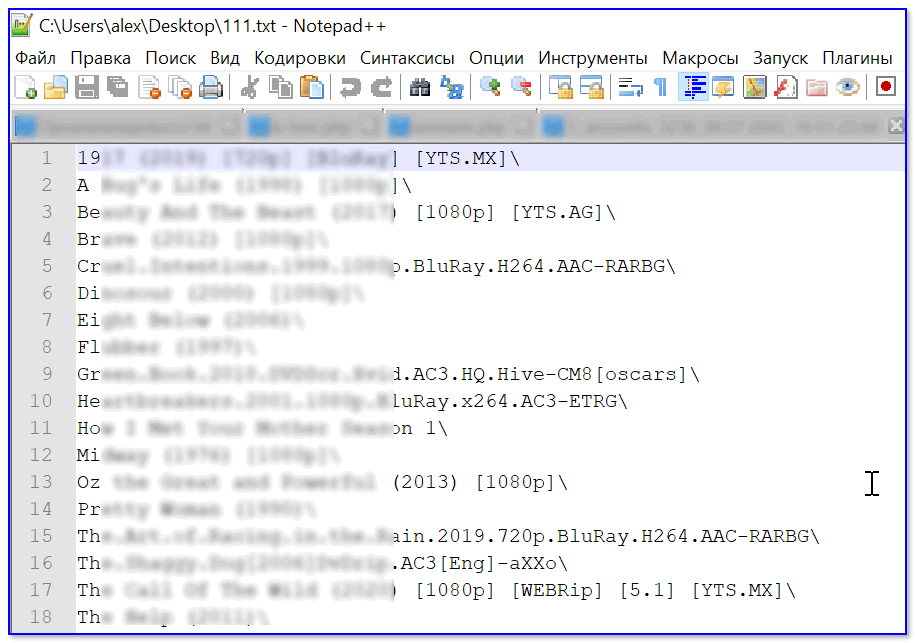
Текстовый файл можно открывать — список готов!
*
Вариант 2 (через браузер)
Для этого нам понадобиться запустить какой-нибудь современный 👉 браузер (я проверял на Chrome и Firefox).
После откройте проводник и перейдите в папку с нужными вам файлами — нужно будет скопировать путь до нее, нажать сочетание Ctrl+C (адрес, вида: «C:UsersalexVideosФильмы»)
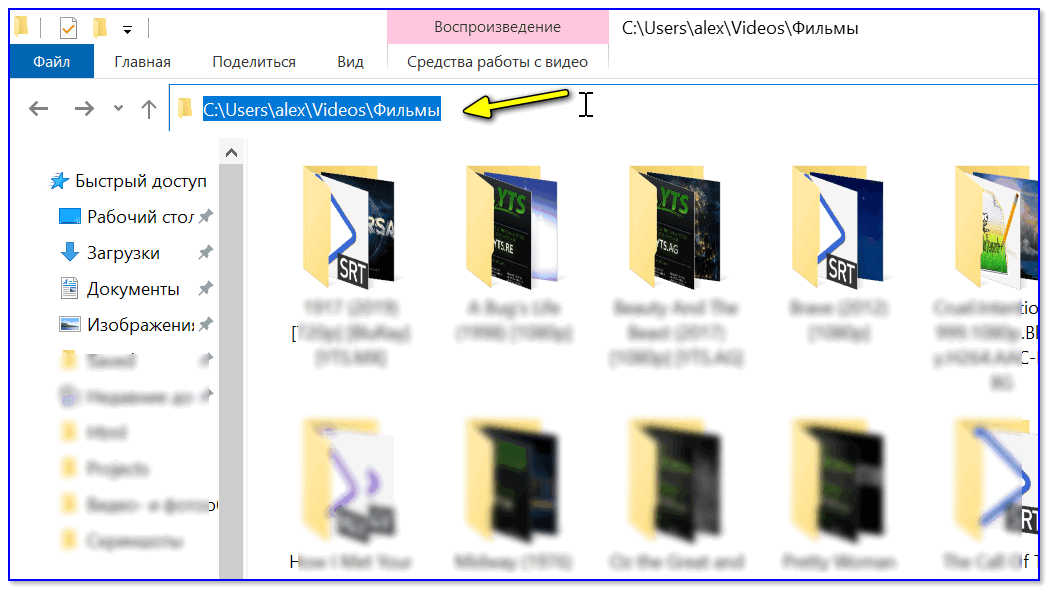
Открываем каталог
После, вставить этот скопированный «путь» в адресную строку браузера и нажать Enter. В результате вы увидите, что обозреватель покажет вам список всех файлов и дату последнего изменения.
Теперь достаточно выделить всё нужное на странице и скопировать это (👇).
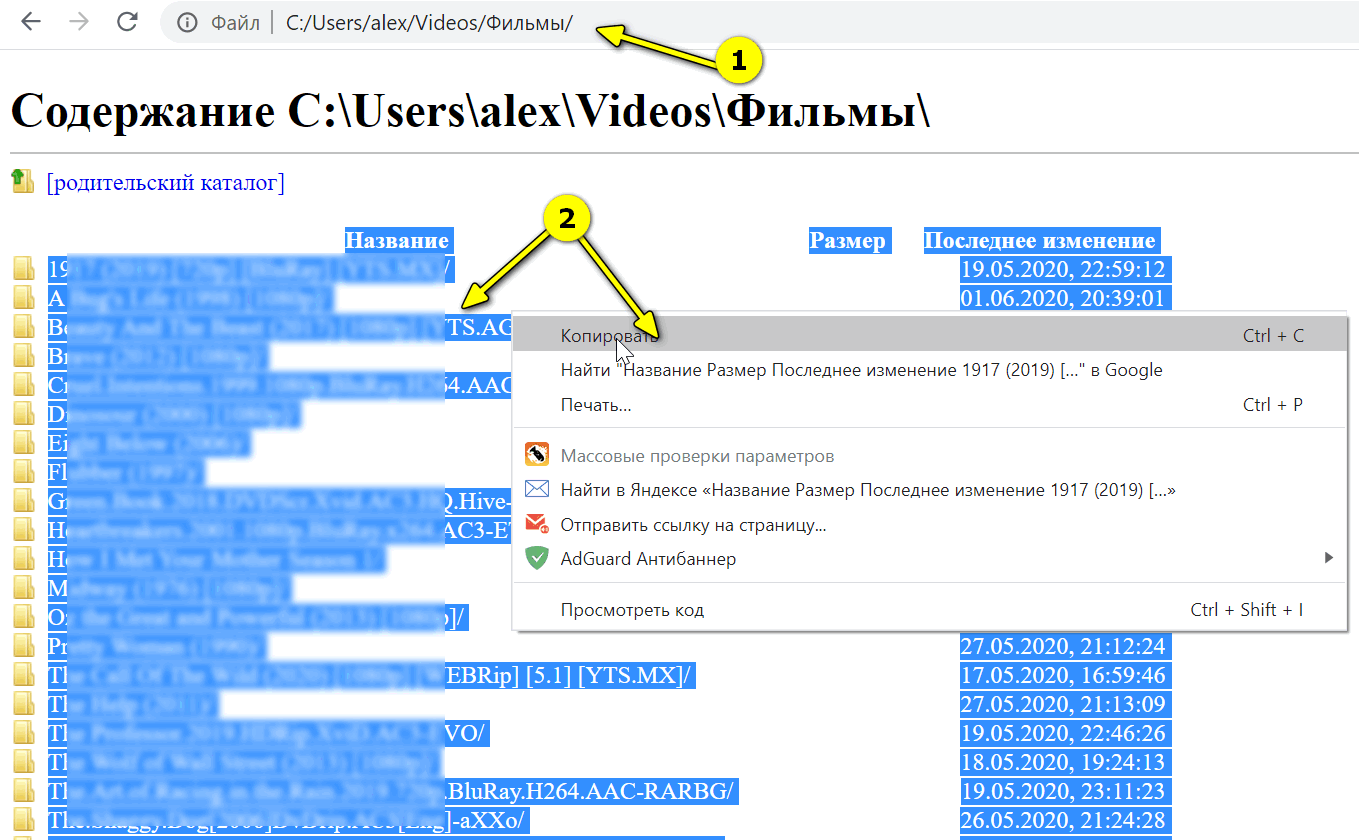
Открываем путь в Chrome
Затем скопированный список лучше всего вставить (сочетание Ctrl+V) в Excel (или 👉 его аналоги). Это удобнее тем, что в Excel вы легко сможете удалить ненужные вам столбики (с датой, например) …
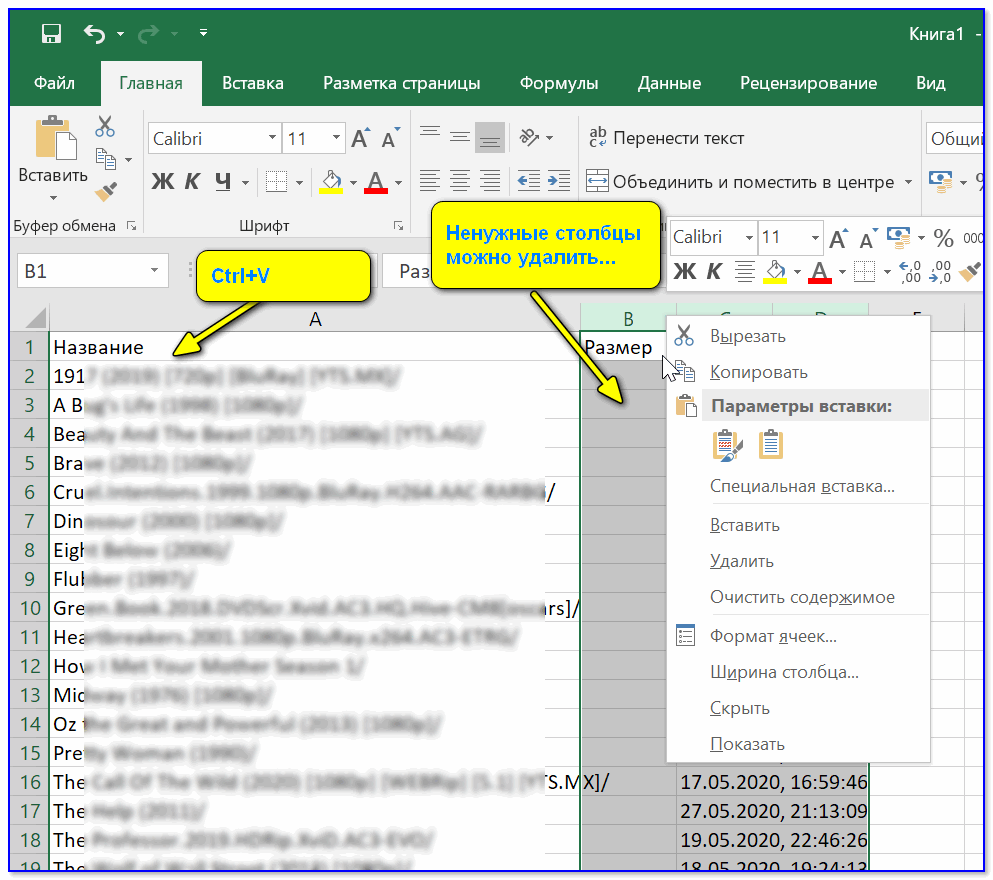
Вставляем список в Excel для дальнейшей работы…
*
Вариант 3 (список со вложенными файлами и папками)
Этот способ универсальный, и к тому же позволяет получить не только список файлов из текущего каталога, но и из всех вложенных.
Например, есть у вас в каталоге «Видео» отдельная папка «Кино 90-х», в которой 2 десятка др. фильмов — вышеперечисленные способы бы не позволили узнать их название (из полученного списка), а этот позволит!
Для работы нам понадобиться 👉 командная строка (ничего сложного там не будет!).
В ней нужно последовательно ввести две команды, после каждой нажать Enter:
- cd C:UsersalexVideosФильмы (вместо «C:UsersalexVideosФильмы» укажите свой каталог);
- dir /b /s | sort > List.txt (эта команда создаст файл «List.txt» в выбранной вами папке со всеми файлами и каталогами, что в нем есть! Кроме этого, она отсортирует список от А к Я).
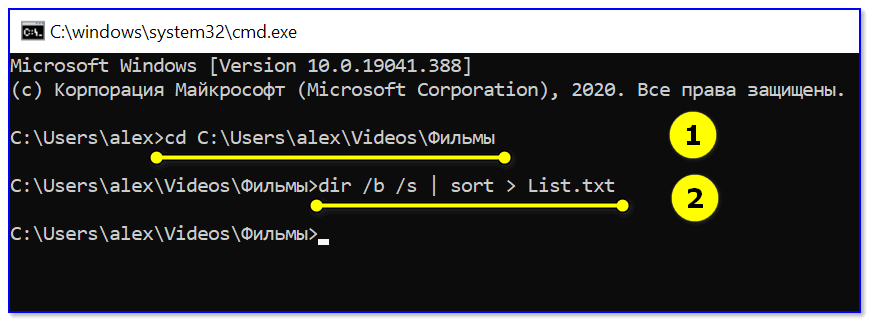
CMD — открываем каталог, получаем список

Файл-список готов!
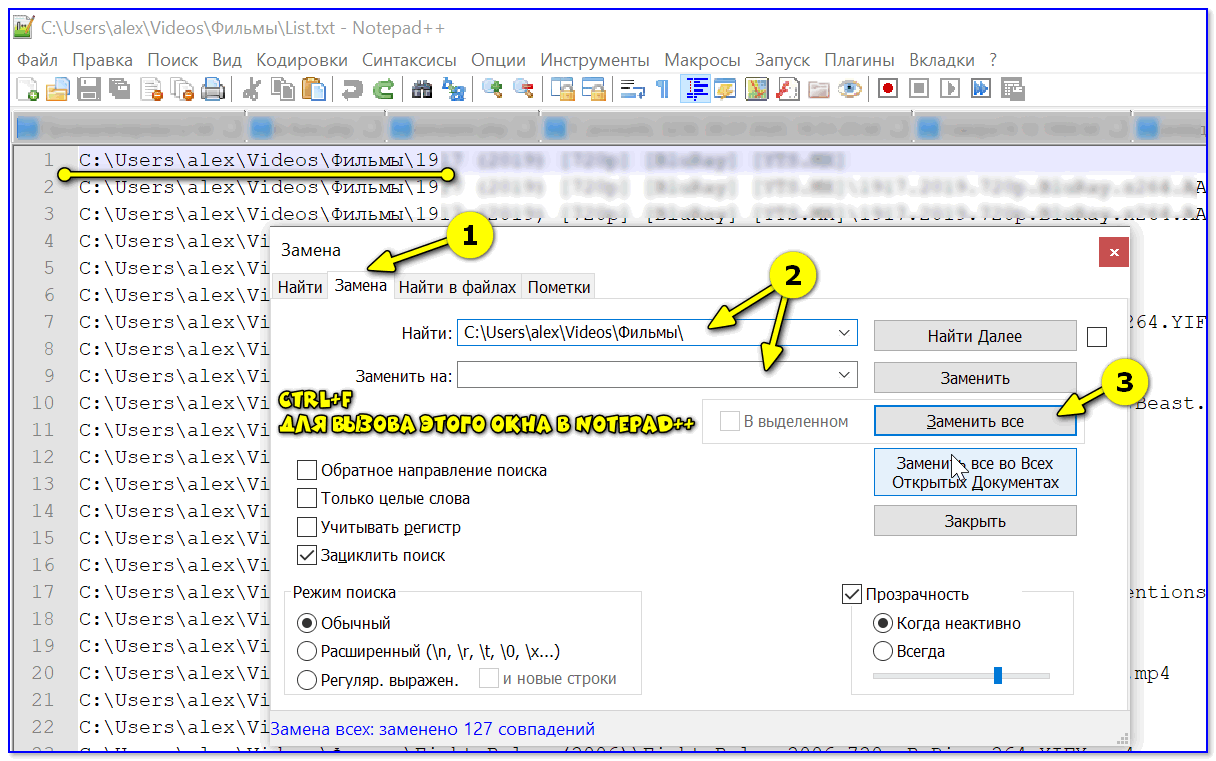
Как убрать путь (C:Video) из списка
Кстати, если в списке файлов вам среди названия фильмов (файлов) не нужен их путь — то его легко убрать. Для этого в Notepad++ достаточно:
- нажать на Ctrl+F;
- в окне «Замена» в строку «найти» указать путь (который повторяется в каждой строке);
- в строке «Заменить на» проверить, чтобы была пустота;
- и нажать кнопку «заменить все». В результате: в вашем списке будут только имена (без пути)!
Убираем путь до каталога в блокноте
*
Вариант 4 (без доп. софта)
Этот способ работает не во всех версиях ОС Windows (в 10-ке все OK). Зато он быстрый и не требует вообще никакого доп. софта…
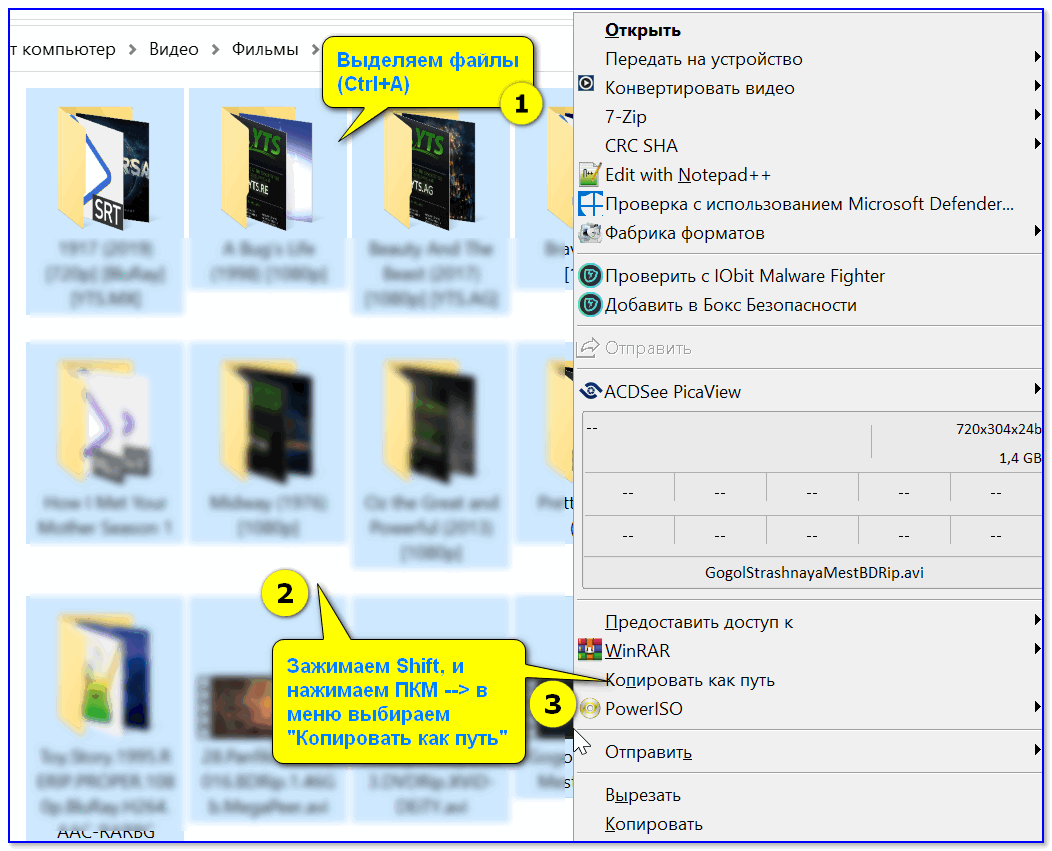
Что делать:
- зайти в нужный каталог;
- выделить файлы (Ctrl+A);
- зажать клавишу Shift (левую);
- нажать ПКМ (правую кнопку мыши), не отпуская Shift;
- из появившегося меню проводника выбрать опцию «Копировать как путь». Теперь в буфере обмена есть все имена файлов из каталога!
Выделяем и копируем путь
Теперь можно открыть блокнот или тот же Word и вставить список (Ctrl+V).
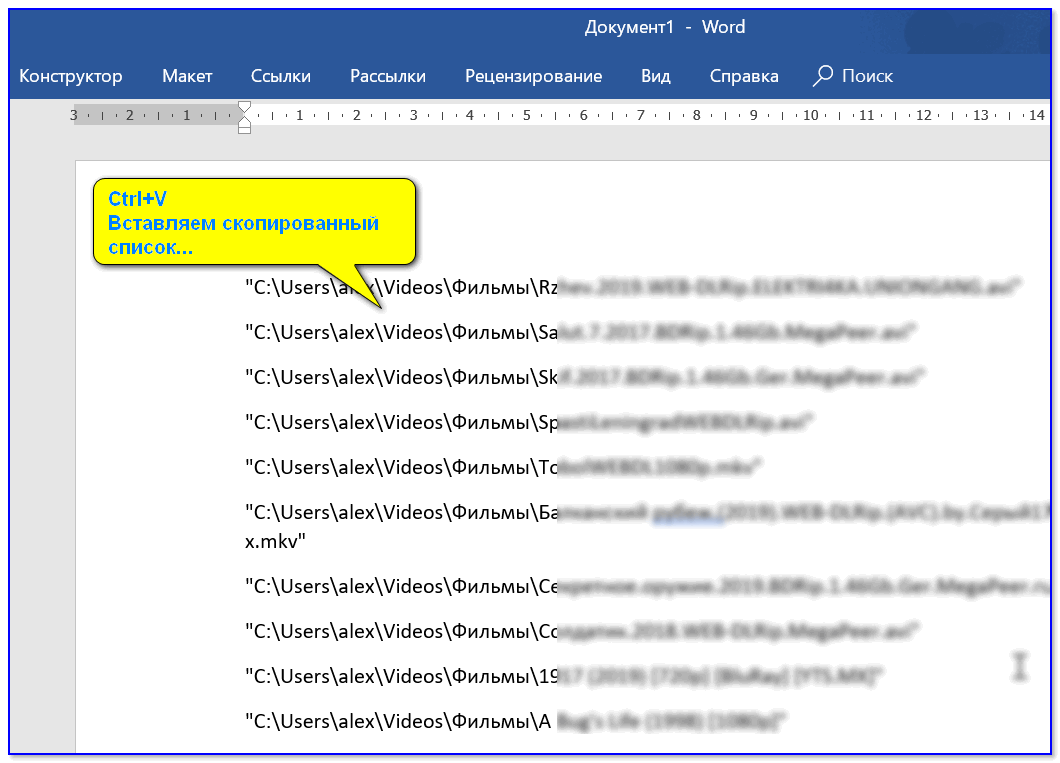
Вставляем скопированный список
Если вам мешает в каждой строке путь («C:Users») — то как его убрать см. чуть выше.
На этом, думаю, задача решена!? 😉
*
Дополнения по теме приветствуются!
Удачи!
👣


Полезный софт:
-

- Видео-Монтаж

Отличное ПО для создания своих первых видеороликов (все действия идут по шагам!).
Видео сделает даже новичок!
-
- Ускоритель компьютера

Программа для очистки Windows от «мусора» (удаляет временные файлы, ускоряет систему, оптимизирует реестр).
Preliminary notes
-
Although there’s a clear differentiation between file and directory terms in the question text, some may argue that directories are actually special files
-
The statement: «all files of a directory» can be interpreted in two ways:
-
All direct (or level 1) descendants only
-
All descendants in the whole directory tree (including the ones in sub-directories)
-
-
When the question was asked, I imagine that Python 2, was the LTS version, however the code samples will be run by Python 3(.5) (I’ll keep them as Python 2 compliant as possible; also, any code belonging to Python that I’m going to post, is from v3.5.4 — unless otherwise specified).
That has consequences related to another keyword in the question: «add them into a list«:-
In pre Python 2.2 versions, sequences (iterables) were mostly represented by lists (tuples, sets, …)
-
In Python 2.2, the concept of generator ([Python.Wiki]: Generators) — courtesy of [Python.Docs]: Simple statements — The yield statement) — was introduced. As time passed, generator counterparts started to appear for functions that returned / worked with lists
-
In Python 3, generator is the default behavior
-
Not sure if returning a list is still mandatory (or a generator would do as well), but passing a generator to the list constructor, will create a list out of it (and also consume it). The example below illustrates the differences on [Python.Docs]: Built-in functions — map(function, iterable, *iterables)
>>> import sys
>>>
>>> sys.version
'2.7.10 (default, Mar  8 2016, 15:02:46) [MSC v.1600 64 bit (AMD64)]'
>>> m = map(lambda x: x, [1, 2, 3])  # Just a dummy lambda function
>>> m, type(m)
([1, 2, 3], <type 'list'>)
>>> len(m)
3
>>> import sys >>> >>> sys.version '3.5.4 (v3.5.4:3f56838, Aug 8 2017, 02:17:05) [MSC v.1900 64 bit (AMD64)]' >>> m = map(lambda x: x, [1, 2, 3]) >>> m, type(m) (<map object at 0x000001B4257342B0>, <class 'map'>) >>> len(m) Traceback (most recent call last): File "<stdin>", line 1, in <module> TypeError: object of type 'map' has no len() >>> lm0 = list(m) # Build a list from the generator >>> lm0, type(lm0) ([1, 2, 3], <class 'list'>) >>> >>> lm1 = list(m) # Build a list from the same generator >>> lm1, type(lm1) # Empty list now - generator already exhausted ([], <class 'list'>) -
-
The examples will be based on a directory called root_dir with the following structure (this example is for Win, but I’m using the same tree on Nix as well). Note that I’ll be reusing the console:
[cfati@CFATI-5510-0:e:WorkDevStackOverflowq003207219]> sopr.bat
### Set shorter prompt to better fit when pasted in StackOverflow (or other) pages ###

[prompt]>
[prompt]> tree /f "root_dir"
Folder PATH listing for volume Work
Volume serial number is 00000029 3655:6FED
E:WORKDEVSTACKOVERFLOWQ003207219ROOT_DIR
¦   file0
¦   file1
¦
+---dir0
¦   +---dir00
¦   ¦   ¦   file000
¦   ¦   ¦
¦   ¦   +---dir000
¦   ¦           file0000
¦   ¦
¦   +---dir01
¦   ¦       file010
¦   ¦       file011
¦   ¦
¦   +---dir02
¦       +---dir020
¦           +---dir0200
+---dir1
¦       file10
¦       file11
¦       file12
¦
+---dir2
¦   ¦   file20
¦   ¦
¦   +---dir20
¦           file200
¦
+---dir3
Solutions
Programmatic approaches
1. [Python.Docs]: os.listdir(path=’.’)
Return a list containing the names of the entries in the directory given by path. The list is in arbitrary order, and does not include the special entries
'.'and'..'…
>>> import os
>>>
>>> root_dir = "root_dir"  # Path relative to current dir (os.getcwd())
>>>
>>> os.listdir(root_dir)  # List all the items in root_dir
['dir0', 'dir1', 'dir2', 'dir3', 'file0', 'file1']
>>>
>>> [item for item in os.listdir(root_dir) if os.path.isfile(os.path.join(root_dir, item))]  # Filter items and only keep files (strip out directories)
['file0', 'file1']
A more elaborate example (code_os_listdir.py):
#!/usr/bin/env python

import os
import sys
from pprint import pformat as pf


def _get_dir_content(path, include_folders, recursive):
    entries = os.listdir(path)
    for entry in entries:
        entry_with_path = os.path.join(path, entry)
        if os.path.isdir(entry_with_path):
            if include_folders:
                yield entry_with_path
            if recursive:
                for sub_entry in _get_dir_content(entry_with_path, include_folders, recursive):
                    yield sub_entry
        else:
            yield entry_with_path


def get_dir_content(path, include_folders=True, recursive=True, prepend_folder_name=True):
    path_len = len(path) + len(os.path.sep)
    for item in _get_dir_content(path, include_folders, recursive):
        yield item if prepend_folder_name else item[path_len:]


def _get_dir_content_old(path, include_folders, recursive):
    entries = os.listdir(path)
    ret = list()
    for entry in entries:
        entry_with_path = os.path.join(path, entry)
        if os.path.isdir(entry_with_path):
            if include_folders:
                ret.append(entry_with_path)
            if recursive:
                ret.extend(_get_dir_content_old(entry_with_path, include_folders, recursive))
        else:
            ret.append(entry_with_path)
    return ret


def get_dir_content_old(path, include_folders=True, recursive=True, prepend_folder_name=True):
    path_len = len(path) + len(os.path.sep)
    return [item if prepend_folder_name else item[path_len:] for item in _get_dir_content_old(path, include_folders, recursive)]


def main(*argv):
    root_dir = "root_dir"
    ret0 = get_dir_content(root_dir, include_folders=True, recursive=True, prepend_folder_name=True)
    lret0 = list(ret0)
    print("{:} {:d}n{:s}".format(ret0, len(lret0), pf(lret0)))
    ret1 = get_dir_content_old(root_dir, include_folders=False, recursive=True, prepend_folder_name=False)
    print("n{:d}n{:s}".format(len(ret1), pf(ret1)))


if __name__ == "__main__":
    print("Python {:s} {:03d}bit on {:s}n".format(" ".join(elem.strip() for elem in sys.version.split("n")),
                                                   64 if sys.maxsize > 0x100000000 else 32, sys.platform))
    rc = main(*sys.argv[1:])
    print("nDone.n")
    sys.exit(rc)
Notes:
-
There are two implementations:
-
One that uses generators (of course here it seems useless, since I immediately convert the result to a list)
-
The classic one (function names ending in _old)
-
-
Recursion is used (to get into subdirectories)
-
For each implementation there are two functions:
-
One that starts with an underscore (_): «private» (should not be called directly) — that does all the work
-
The public one (wrapper over previous): it just strips off the initial path (if required) from the returned entries. It’s an ugly implementation, but it’s the only idea that I could come with at this point
-
-
In terms of performance, generators are generally a little bit faster (considering both creation and iteration times), but I didn’t test them in recursive functions, and also I am iterating inside the function over inner generators — don’t know how performance friendly is that
-
Play with the arguments to get different results
Output:
[prompt]> "e:WorkDevVEnvspy_pc064_03.05.04_test0Scriptspython.exe" ".code_os_listdir.py"
Python 3.5.4 (v3.5.4:3f56838, Aug  8 2017, 02:17:05) [MSC v.1900 64 bit (AMD64)] 064bit on win32

<generator object get_dir_content at 0x000002C080418F68> 22
['root_dir\dir0',
 'root_dir\dir0\dir00',
 'root_dir\dir0\dir00\dir000',
 'root_dir\dir0\dir00\dir000\file0000',
 'root_dir\dir0\dir00\file000',
 'root_dir\dir0\dir01',
 'root_dir\dir0\dir01\file010',
 'root_dir\dir0\dir01\file011',
 'root_dir\dir0\dir02',
 'root_dir\dir0\dir02\dir020',
 'root_dir\dir0\dir02\dir020\dir0200',
 'root_dir\dir1',
 'root_dir\dir1\file10',
 'root_dir\dir1\file11',
 'root_dir\dir1\file12',
 'root_dir\dir2',
 'root_dir\dir2\dir20',
 'root_dir\dir2\dir20\file200',
 'root_dir\dir2\file20',
 'root_dir\dir3',
 'root_dir\file0',
 'root_dir\file1']

11
['dir0\dir00\dir000\file0000',
 'dir0\dir00\file000',
 'dir0\dir01\file010',
 'dir0\dir01\file011',
 'dir1\file10',
 'dir1\file11',
 'dir1\file12',
 'dir2\dir20\file200',
 'dir2\file20',
 'file0',
 'file1']

Done.
2. [Python.Docs]: os.scandir(path=’.’)
In Python 3.5+ only, backport: [PyPI]: scandir:
Return an iterator of os.DirEntry objects corresponding to the entries in the directory given by path. The entries are yielded in arbitrary order, and the special entries
'.'and'..'are not included.Using scandir() instead of listdir() can significantly increase the performance of code that also needs file type or file attribute information, because os.DirEntry objects expose this information if the operating system provides it when scanning a directory. All os.DirEntry methods may perform a system call, but is_dir() and is_file() usually only require a system call for symbolic links; os.DirEntry.stat() always requires a system call on Unix but only requires one for symbolic links on Windows.
>>> import os
>>>
>>> root_dir = os.path.join(".", "root_dir")  # Explicitly prepending current directory
>>> root_dir
'.\root_dir'
>>>
>>> scandir_iterator = os.scandir(root_dir)
>>> scandir_iterator
<nt.ScandirIterator object at 0x00000268CF4BC140>
>>> [item.path for item in scandir_iterator]
['.\root_dir\dir0', '.\root_dir\dir1', '.\root_dir\dir2', '.\root_dir\dir3', '.\root_dir\file0', '.\root_dir\file1']
>>>
>>> [item.path for item in scandir_iterator]  # Will yield an empty list as it was consumed by previous iteration (automatically performed by the list comprehension)
[]
>>>
>>> scandir_iterator = os.scandir(root_dir)  # Reinitialize the generator
>>> for item in scandir_iterator :
...     if os.path.isfile(item.path):
...             print(item.name)
...
file0
file1
Notes:
-
Similar to os.listdir
-
But it’s also more flexible (and offers more functionality), more Pythonic (and in some cases, faster)
3. [Python.Docs]: os.walk(top, topdown=True, onerror=None, followlinks=False)
Generate the file names in a directory tree by walking the tree either top-down or bottom-up. For each directory in the tree rooted at directory top (including top itself), it yields a 3-tuple (
dirpath,dirnames,filenames).
>>> import os
>>>
>>> root_dir = os.path.join(os.getcwd(), "root_dir")  # Specify the full path
>>> root_dir
'E:\Work\Dev\StackOverflow\q003207219\root_dir'
>>>
>>> walk_generator = os.walk(root_dir)
>>> root_dir_entry = next(walk_generator)  # First entry corresponds to the root dir (passed as an argument)
>>> root_dir_entry
('E:\Work\Dev\StackOverflow\q003207219\root_dir', ['dir0', 'dir1', 'dir2', 'dir3'], ['file0', 'file1'])
>>>
>>> root_dir_entry[1] + root_dir_entry[2]  # Display dirs and files (direct descendants) in a single list
['dir0', 'dir1', 'dir2', 'dir3', 'file0', 'file1']
>>>
>>> [os.path.join(root_dir_entry[0], item) for item in root_dir_entry[1] + root_dir_entry[2]]  # Display all the entries in the previous list by their full path
['E:\Work\Dev\StackOverflow\q003207219\root_dir\dir0', 'E:\Work\Dev\StackOverflow\q003207219\root_dir\dir1', 'E:\Work\Dev\StackOverflow\q003207219\root_dir\dir2', 'E:\Work\Dev\StackOverflow\q003207219\root_dir\dir3', 'E:\Work\Dev\StackOverflow\q003207219\root_dir\file0', 'E:\Work\Dev\StackOverflow\q003207219\root_dir\file1']
>>>
>>> for entry in walk_generator:  # Display the rest of the elements (corresponding to every subdir)
...     print(entry)
...
('E:\Work\Dev\StackOverflow\q003207219\root_dir\dir0', ['dir00', 'dir01', 'dir02'], [])
('E:\Work\Dev\StackOverflow\q003207219\root_dir\dir0\dir00', ['dir000'], ['file000'])
('E:\Work\Dev\StackOverflow\q003207219\root_dir\dir0\dir00\dir000', [], ['file0000'])
('E:\Work\Dev\StackOverflow\q003207219\root_dir\dir0\dir01', [], ['file010', 'file011'])
('E:\Work\Dev\StackOverflow\q003207219\root_dir\dir0\dir02', ['dir020'], [])
('E:\Work\Dev\StackOverflow\q003207219\root_dir\dir0\dir02\dir020', ['dir0200'], [])
('E:\Work\Dev\StackOverflow\q003207219\root_dir\dir0\dir02\dir020\dir0200', [], [])
('E:\Work\Dev\StackOverflow\q003207219\root_dir\dir1', [], ['file10', 'file11', 'file12'])
('E:\Work\Dev\StackOverflow\q003207219\root_dir\dir2', ['dir20'], ['file20'])
('E:\Work\Dev\StackOverflow\q003207219\root_dir\dir2\dir20', [], ['file200'])
('E:\Work\Dev\StackOverflow\q003207219\root_dir\dir3', [], [])
Notes:
-
Under the scenes, it uses os.scandir (os.listdir on older (Python) versions)
-
It does the heavy lifting by recurring in subfolders
4. [Python.Docs]: glob.glob(pathname, *, root_dir=None, dir_fd=None, recursive=False, include_hidden=False)
Or glob.iglob:
Return a possibly-empty list of path names that match pathname, which must be a string containing a path specification. pathname can be either absolute (like
/usr/src/Python-1.5/Makefile) or relative (like../../Tools/*/*.gif), and can contain shell-style wildcards. Broken symlinks are included in the results (as in the shell).
…
Changed in version 3.5: Support for recursive globs using “**”.
>>> import glob, os
>>>
>>> wildcard_pattern = "*"
>>> root_dir = os.path.join("root_dir", wildcard_pattern)  # Match every file/dir name
>>> root_dir
'root_dir\*'
>>>
>>> glob_list = glob.glob(root_dir)
>>> glob_list
['root_dir\dir0', 'root_dir\dir1', 'root_dir\dir2', 'root_dir\dir3', 'root_dir\file0', 'root_dir\file1']
>>>
>>> [item.replace("root_dir" + os.path.sep, "") for item in glob_list]  # Strip the dir name and the path separator from begining
['dir0', 'dir1', 'dir2', 'dir3', 'file0', 'file1']
>>>
>>> for entry in glob.iglob(root_dir + "*", recursive=True):
...     print(entry)
...
root_dir
root_dirdir0
root_dirdir0dir00
root_dirdir0dir00dir000
root_dirdir0dir00dir000file0000
root_dirdir0dir00file000
root_dirdir0dir01
root_dirdir0dir01file010
root_dirdir0dir01file011
root_dirdir0dir02
root_dirdir0dir02dir020
root_dirdir0dir02dir020dir0200
root_dirdir1
root_dirdir1file10
root_dirdir1file11
root_dirdir1file12
root_dirdir2
root_dirdir2dir20
root_dirdir2dir20file200
root_dirdir2file20
root_dirdir3
root_dirfile0
root_dirfile1
Notes:
-
Uses os.listdir
-
For large trees (especially if recursive is on), iglob is preferred
-
Allows advanced filtering based on name (due to the wildcard)
5. [Python.Docs]: class pathlib.Path(*pathsegments)
Python 3.4+, backport: [PyPI]: pathlib2.
>>> import pathlib
>>>
>>> root_dir = "root_dir"
>>> root_dir_instance = pathlib.Path(root_dir)
>>> root_dir_instance
WindowsPath('root_dir')
>>> root_dir_instance.name
'root_dir'
>>> root_dir_instance.is_dir()
True
>>>
>>> [item.name for item in root_dir_instance.glob("*")]  # Wildcard searching for all direct descendants
['dir0', 'dir1', 'dir2', 'dir3', 'file0', 'file1']
>>>
>>> [os.path.join(item.parent.name, item.name) for item in root_dir_instance.glob("*") if not item.is_dir()]  # Display paths (including parent) for files only
['root_dir\file0', 'root_dir\file1']
Notes:
-
This is one way of achieving our goal
-
It’s the OOP style of handling paths
-
Offers lots of functionalities
6. [Python 2.Docs]: dircache.listdir(path)
-
Python 2 only
-
But, according to [GitHub]: python/cpython — (2.7) cpython/Lib/dircache.py, it’s just a (thin) wrapper over os.listdir with caching
def listdir(path):
    """List directory contents, using cache."""
    try:
        cached_mtime, list = cache[path]
        del cache[path]
    except KeyError:
        cached_mtime, list = -1, []
    mtime = os.stat(path).st_mtime
    if mtime != cached_mtime:
        list = os.listdir(path)
        list.sort()
    cache[path] = mtime, list
    return list
7. Native OS APIs
POSIX specific:
-
[Man7]: OPENDIR(3)
-
[Man7]: READDIR(3)
-
[Man7]: CLOSEDIR(3)
Available via [Python.Docs]: ctypes — A foreign function library for Python:
ctypes is a foreign function library for Python. It provides C compatible data types, and allows calling functions in DLLs or shared libraries. It can be used to wrap these libraries in pure Python.
Not directly related, but check [SO]: C function called from Python via ctypes returns incorrect value (@CristiFati’s answer) out before working with CTypes.
code_ctypes.py:
#!/usr/bin/env python3

import ctypes as cts
import sys


DT_DIR = 4
DT_REG = 8


class NixDirent64(cts.Structure):
    _fields_ = (
        ("d_ino", cts.c_ulonglong),
        ("d_off", cts.c_longlong),
        ("d_reclen", cts.c_ushort),
        ("d_type", cts.c_ubyte),
        ("d_name", cts.c_char * 256),
    )

NixDirent64Ptr = cts.POINTER(NixDirent64)


libc = this_process = cts.CDLL(None, use_errno=True)

opendir = libc.opendir
opendir.argtypes = (cts.c_char_p,)
opendir.restype = cts.c_void_p
readdir = libc.readdir
readdir.argtypes = (cts.c_void_p,)
readdir.restype = NixDirent64Ptr
closedir = libc.closedir
closedir.argtypes = (cts.c_void_p,)


def get_dir_content(path):
    ret = [path, [], []]
    pdir = opendir(cts.create_string_buffer(path.encode()))
    if not pdir:
        print("opendir returned NULL (errno: {:d})".format(cts.get_errno()))
        return ret
    cts.set_errno(0)
    while True:
        pdirent = readdir(pdir)
        if not pdirent:
            break
        dirent = pdirent.contents
        name = dirent.d_name.decode()
        if dirent.d_type & DT_DIR:
            if name not in (".", ".."):
                ret[1].append(name)
        elif dirent.d_type & DT_REG:
            ret[2].append(name)
    if cts.get_errno():
        print("readdir returned NULL (errno: {:d})".format(cts.get_errno()))
    closedir(pdir)
    return ret


def main(*argv):
    root_dir = "root_dir"
    entries = get_dir_content(root_dir)
    print("Entries:n{:}".format(entries))


if __name__ == "__main__":
    print("Python {:s} {:03d}bit on {:s}n".format(" ".join(elem.strip() for elem in sys.version.split("n")),
                                                   64 if sys.maxsize > 0x100000000 else 32, sys.platform))
    rc = main(*sys.argv[1:])
    print("nDone.n")
    sys.exit(rc)
Notes:
-
It loads the three functions from LibC (libc.so — loaded in the current process) and calls them (for more details check [SO]: How do I check whether a file exists without exceptions? (@CristiFati’s answer) — last notes from item #4.). That would place this approach very close to the Python / C edge
-
NixDirent64 is the CTypes representation of struct dirent64 from [Man7]: dirent.h(0P) (so are the DT_ constants) from my Ubuntu OS. On other flavors / versions, the structure definition might differ, and if so, the CTypes alias should be updated, otherwise it will yield Undefined Behavior
-
It returns data in the os.walk‘s format. I didn’t bother to make it recursive, but starting from the existing code, that would be a fairly trivial task
-
Everything is doable on Win as well, the data (libraries, functions, structs, constants, …) differ
Output:
[cfati@cfati-5510-0:/mnt/e/Work/Dev/StackOverflow/q003207219]> python3.5 ./code_ctypes.py
Python 3.5.10 (default, Jan 15 2022, 19:53:00) [GCC 9.3.0] 064bit on linux

Entries:
['root_dir', ['dir0', 'dir1', 'dir2', 'dir3'], ['file0', 'file1']]

Done.
8. [TimGolden]: win32file.FindFilesW
Win specific:
Retrieves a list of matching filenames, using the Windows Unicode API. An interface to the API FindFirstFileW/FindNextFileW/Find close functions.
>>> import os, win32file as wfile, win32con as wcon
>>>
>>> root_dir = "root_dir"
>>> root_dir_wildcard = os.path.join(root_dir, "*")
>>> entry_list = wfile.FindFilesW(root_dir_wildcard)
>>> len(entry_list)  # Don't display the whole content as it's too long
8
>>> [entry[-2] for entry in entry_list]  # Only display the entry names
['.', '..', 'dir0', 'dir1', 'dir2', 'dir3', 'file0', 'file1']
>>>
>>> [entry[-2] for entry in entry_list if entry[0] & wcon.FILE_ATTRIBUTE_DIRECTORY and entry[-2] not in (".", "..")]  # Filter entries and only display dir names (except self and parent)
['dir0', 'dir1', 'dir2', 'dir3']
>>>
>>> [os.path.join(root_dir, entry[-2]) for entry in entry_list if entry[0] & (wcon.FILE_ATTRIBUTE_NORMAL | wcon.FILE_ATTRIBUTE_ARCHIVE)]  # Only display file "full" names
['root_dir\file0', 'root_dir\file1']
Notes:
- win32file.FindFilesW is part of [GitHub]: mhammond/pywin32 — Python for Windows (pywin32) Extensions, which is a Python wrapper over WinAPIs
9. Use some (other) 3rd-party package that does the trick
Most likely, will rely on one (or more) of the above (maybe with slight customizations).
Notes:
-
Code is meant to be portable (except places that target a specific area — which are marked) or cross:
-
OS (Nix, Win, )
-
Python version (2, 3, )
-
-
Multiple path styles (absolute, relatives) were used across the above variants, to illustrate the fact that the «tools» used are flexible in this direction
-
os.listdir and os.scandir use opendir / readdir / closedir ([MS.Learn]: FindFirstFileW function (fileapi.h) / [MS.Learn]: FindNextFileW function (fileapi.h) / [MS.Learn]: FindClose function (fileapi.h)) (via [GitHub]: python/cpython — (main) cpython/Modules/posixmodule.c)
-
win32file.FindFilesW uses those (Win specific) functions as well (via [GitHub]: mhammond/pywin32 — (main) pywin32/win32/src/win32file.i)
-
_get_dir_content (from point #1.) can be implemented using any of these approaches (some will require more work and some less)
- Some advanced filtering (instead of just file vs. dir) could be done: e.g. the include_folders argument could be replaced by another one (e.g. filter_func) which would be a function that takes a path as an argument:
filter_func=lambda x: True(this doesn’t strip out anything) and inside _get_dir_content something like:if not filter_func(entry_with_path): continue(if the function fails for one entry, it will be skipped), but the more complex the code becomes, the longer it will take to execute
- Some advanced filtering (instead of just file vs. dir) could be done: e.g. the include_folders argument could be replaced by another one (e.g. filter_func) which would be a function that takes a path as an argument:
-
Nota Bene! Since recursion is used, I must mention that I did some tests on my laptop (Win 10 pc064), totally unrelated to this problem, and when the recursion level was reaching values somewhere in the (990 .. 1000) range (recursionlimit — 1000 (default)), I got StackOverflow :). If the directory tree exceeds that limit (I am not an FS expert, so I don’t know if that is even possible), that could be a problem.
I must also mention that I didn’t try to increase recursionlimit, but in theory there will always be the possibility for failure, if the dir depth is larger than the highest possible recursionlimit (on that machine).
Check [SO]: _csv.Error: field larger than field limit (131072) (@CristiFati’s answer) for more details on the topic -
Code samples are for demonstrative purposes only. That means that I didn’t take into account error handling (I don’t think there’s any try / except / else / finally block), so the code is not robust (the reason is: to keep it as simple and short as possible). For production, error handling should be added as well
Other approaches:
1. Use Python only as a wrapper
-
Everything is done using another technology
-
That technology is invoked from Python
-
The most famous flavor that I know is what I call the SysAdmin approach:
-
Use Python (or any programming language for that matter) in order to execute Shell commands (and parse their outputs)
-
Some consider this a neat hack
-
I consider it more like a lame workaround (gainarie), as the action per se is performed from Shell (Cmd in this case), and thus doesn’t have anything to do with Python
-
Filtering (grep / findstr) or output formatting could be done on both sides, but I’m not going to insist on it. Also, I deliberately used os.system instead of [Python.Docs]: subprocess — Subprocess management routines (run, check_output, …)
-
[prompt]> "e:WorkDevVEnvspy_pc064_03.05.04_test0Scriptspython.exe" -c "import os;os.system("dir /b root_dir")"
dir0
dir1
dir2
dir3
file0
file1
[cfati@cfati-5510-0:/mnt/e/Work/Dev/StackOverflow/q003207219]> python3.5 -c "import os;os.system("ls root_dir")"
dir0  dir1  dir2  dir3  file0  file1
In general, this approach is to be avoided, since if some command output format slightly differs between OS versions / flavors, the parsing code should be adapted as well — not to mention differences between locales.
Для определённых целей может потребоваться составить список файлов, содержащихся в папке. Если таковых немного, то задачу можно выполнить вручную без особых затруднений, но если в папке десятки, сотни или даже тысячи файлов, то пытаться составить их список вручную это бесполезная трата времени. Можно ли этот процесс как-то автоматизировать?

Содержание
- Автоматическое создание списка файлов
- Вариант 1: «Командная строка»
- Вариант 2: Использование BAT-файла
- Вариант 3: DirLister
- Вариант 4: Total Commander
- Вариант 5: Браузер
Автоматическое создание списка файлов
К счастью, функционал Windows и других программных решений, позволяет создавать списки файлов в папках в автоматическом порядке. Данные списки можно потом будет без проблем скопировать в текстовый файл и редактировать по мере необходимости.
Рассмотрим все имеющиеся способы создания такого списка.
Вариант 1: «Командная строка»
Этот способ является стандартным и не требует от пользователя каких-либо особых умений, за исключением базового владения «Командной строкой». Итак, инструкция к данному варианту выглядит следующим образом:
- Перейдите в ту папку, список файлов из которой вы хотели бы получить.
- Теперь зажмите Shift на клавиатуре и нажмите правой кнопкой мыши по пустому месту в окне «Проводника».
- Должно появится контекстное меню, где требуется выбрать вариант «Запуск командной строки» или «Открыть окно команд здесь». В случае с последними версиями Windows 10 такого пункта может не быть. Вместо этого нужно нажать на «Запустить окно PowerShell здесь». PowerShell – это новый аналог «Командной строки», который Майкрософт активно внедряет в последние версии Windows 10. По сути отличий в функционале нет никаких.
- Теперь вы можете ввести одну из следующих команд:
dir /b>spisok.txtДанная команда сохраняет только имена файлов в файл spisok.txt. Вы можете вместо него указать любое другое название, какое вам будет удобно, но учтите, что оно не должно содержать кириллических символов;dir /s>spisok.txtСохраняет не только имена файлов, содержащихся в папке, но и имена папок и подпапок, которые могут быть расположена в основной папке.
- Для применения выбранной команды впишите её и нажмите на Enter.
- Спустя некоторое время в той папке, в которую вы перешли в первом шаге появится файл с названием spisok.txt или другим, если вы задавали другое. Откройте его с помощью «Блокнота».


Читайте также:
Как изменить расширение файла в Windows
Как изменить файл hosts в Windows
Конвертеры ODT в DOC онлайн
Всю информацию из него можно скопировать в документ Word, так как последний удобнее редактировать. К тому же, если в папке содержались файлы или другие папки в названии которых присутствовали кириллические символы, то в «Блокноте» таковые могут отображаться некорректно, так как нужные кодировки не поддерживаются.
Вариант 2: Использование BAT-файла
Данный способ тоже не отличается какой-либо сложностью, плюс даёт почувствовать себя немного программистом. Суть заключается в создании специального файла с алгоритмом, который выведет список всех элементов в папке в отдельный текстовый файл. Итак, рассмотрим инструкцию к этому варианту более подробно:
- Создайте в любом месте на компьютере текстовый файл. Для этого нажмите правой кнопкой мыши и в меню выберите пункт «Создать». Из открывшегося подменю выберите вариант «Текстовый файл».
- Теперь откройте только что созданный файл при помощи «Блокнота».
- Пропишите туда следующий алгоритм:
chcp 1251echo %date% %time% >spisok.txtdir /b /d >>spisok.txt - После исполнения данного BAT-файла в папке, где он был выполнен будет создан текстовый файл spisok.txt, где будет представлен список всех элементов, находящихся в папке. Но для начала вам нужно сохранить этот алгоритм, как BAT-файл. Нажмите в верхнем меню на «Файл», а из контекстного меню выберите вариант «Сохранить как».
- В поле «Имя файла» введите spisok.bat, а в «Тип файла» поставьте значение «Все файлы».
- Нажмите «Сохранить».
- Теперь перенесите созданный BAT-файл в папку, из которой требуется получить список файлов.
- Запустите его двойным нажатием левой кнопки мыши.
- Появится окно, где будет показано выполнение алгоритма, спустя несколько секунд окно исчезнет, а в папке появится файл spisok.txt, где будет представлен список всех элементов в папке.


Содержимое данного файла также можно перенести в текстовый документ MS Word. Однако в этом случае проблем с кодировкой и неверным отображением кириллических символов не наблюдается.
Вариант 3: DirLister
Данное бесплатное ПО не требуется установки на компьютер и с его помощью вы можете создать список всех элементов в той или иной папке. Инструкция по её использованию выглядит следующим образом:
- Перейдите на официальный сайт разработчика и скачайте архив с программой.
- Распакуйте архив, вытащив от туда исполняемый EXE-файл.
- Запустите его.
- Обратите внимание на блок «Directory To Scan». Здесь будет расположен адрес папки, которую нужно просканировать. Выберите её при помощи кнопки «Open».
- Откроется окно «Проводника» Windows, где нужно выбрать нужную папку и открыть её.
- Теперь перейдите в блок ниже – «Output File». Здесь указывается место для сохранения текстового файла со списком. Нажмите на кнопку «Save as», чтобы указать расположение для сохранения.
- В блоке «File Type» можно указать критерии сохранения файлов в список. Например, сохранятся будут только названия файлов с расширением HTML, TXT и т.д. Для этого нужно установить маркеры напротив соответствующих пунктов.
- Чтобы начать процедуру создания списка, нажмите на кнопку «Make List», что расположена в нижней части окна.
- Спустя некоторое время вы увидите надпись «All file processed correctly», что означает успешное завершение процедуры.

Вариант 4: Total Commander
Total Commander – это популярный файловый менеджер, где пользователь может быстро получить и скопировать всю основную информацию о файлах, а также о содержимом папок. В данном случае получить список файлов, находящихся в папке, можно следующим образом:
- В окне Total Commander откройте нужную папку.
- В верхнем меню нажмите на пункт «Выделение». Появится контекстное меню, где нужно нажать на вариант «Выделить всё».
- Затем в этом же меню выберите пункт «Копировать имена файлов в буфер обмена».
- Создайте и откройте текстовый документ. Это можно сделать как при помощи простого Блокнота, так и Word или других офисных программ.
- Вставьте содержимое буфера обмена на страницу, воспользовавшись комбинацией клавиш Ctrl+V или вызвав контекстное меню и выбрав там соответствующий пункт.

Вариант 5: Браузер
Во всех современных браузерах, будь то Opera, Google Chrome, Yandex и т.д., есть функция просмотра содержимого папок и некоторых файлов, расположенных на компьютере.
Инструкция к этому варианту выглядит следующим образом:
- Откройте «Проводник». Выберите при помощи щелчка левой кнопкой мыши ту папку, которую хотите просмотреть в браузере.
- Перетащите эту папку в любой удобный для вас браузер. В данном случае рассматривается вариант с Opera.
- Здесь откроется папка со всем содержимым, которое будет представлено в виде списка. Выделите его и скопируйте, использовав сочетание клавиш Ctrl+C.
- Создайте любой текстовый документ и откройте его.
- Вставьте скопированный список.

Это были все способы, позволяющие вывести список содержимых в папке файлов в отдельный текстовый документ.
Время чтения 2 мин.
В Python есть модуль ОС, предоставляющий функции для работы с файлами. Мы можем перечислить файлы в каталоге и подкаталоге программно в Python, используя модуль ОС. В этой статье мы обсудим различные методы создания списка всех файлов в дереве каталогов и подкаталогах..
Содержание
- Как распечатать список файлов Python
- Список файлов в каталоге и подкаталогах с os.listdir()
- Получение списка файлов в каталоге и подкаталогах с помощью os.walk()
- Перечисление всех файлов txt в указанном каталоге с Glob в Python
- Список всех каталогов в указанном каталоге + подкаталоги(**)
- Заключение
Давайте напечатаем все файлы, перечисленные в нашем текущем рабочем каталоге. Во-первых, вам нужно импортировать модуль os в свой файл, а затем использовать функцию os.listdir().
Напишите следующий код в файле app.py.
|
# app.py import os print(os.listdir(path=‘.’)) |
Выход:
|
python3 app.py [‘index.html’, ‘demo.txt’, ‘.DS_Store’, ‘person.txt’, ‘app.json’, ‘DataScience.ipynb’, ‘ads.txt’, ‘example.http’, ‘student.csv’, ‘app.txt’, ‘__pycache__’, ‘data.csv’, ‘app.component.ts’, ‘data.json’, ‘help_examples.py’, ‘MergeSort.java’, ‘app.sql’, ‘NumPy.ipynb’, ‘TensorFlow.ipynb’, ‘data.csv.numbers’, ‘app.py’, ‘info.log’, ‘.ipynb_checkpoints’, ‘SciKit Learn.ipynb’, ‘.vscode’, ‘app.rs’, ‘mod.py’, ‘output.txt’, ‘data.txt’, ‘sample.txt’, ‘app.cpp’] |
Список файлов в каталоге и подкаталогах с os.listdir()
Нам нужно рекурсивно вызвать функцию os.listdir() для подкаталогов, чтобы создать полный список файлов в заданном дереве каталогов.
См. следующий код.
|
1 2 3 4 5 6 7 8 9 10 11 12 13 14 15 16 17 18 19 20 21 |
# app.py import os def getFiles(dirName): listOfFile = os.listdir(dirName) completeFileList = list() for file in listOfFile: completePath = os.path.join(dirName, file) if os.path.isdir(completePath): completeFileList = completeFileList + getFiles(completePath) else: completeFileList.append(completePath) return completeFileList dirName = ‘/Users/krunal/desktop/code/pyt’ listOfFiles = getFiles(dirName) print(listOfFiles) |
Вывод:
|
1 2 3 4 5 6 7 8 9 10 11 12 13 14 15 16 17 18 19 20 21 22 23 24 25 26 27 28 29 30 31 32 33 34 35 36 |
python3 app.py [‘/Users/krunal/desktop/code/pyt/index.html’, ‘/Users/krunal/desktop/code/pyt/demo.txt’, ‘/Users/krunal/desktop/code/pyt/.DS_Store’, ‘/Users/krunal/desktop/code/pyt/person.txt’, ‘/Users/krunal/desktop/code/pyt/app.json’, ‘/Users/krunal/desktop/code/pyt/DataScience.ipynb’, ‘/Users/krunal/desktop/code/pyt/ads.txt’, ‘/Users/krunal/desktop/code/pyt/example.http’, ‘/Users/krunal/desktop/code/pyt/student.csv’, ‘/Users/krunal/desktop/code/pyt/app.txt’, ‘/Users/krunal/desktop/code/pyt/__pycache__/help_examples.cpython-36.pyc’, ‘/Users/krunal/desktop/code/pyt/__pycache__/mod.cpython-36.pyc’, ‘/Users/krunal/desktop/code/pyt/data.csv’, ‘/Users/krunal/desktop/code/pyt/app.component.ts’, ‘/Users/krunal/desktop/code/pyt/data.json’, ‘/Users/krunal/desktop/code/pyt/help_examples.py’, ‘/Users/krunal/desktop/code/pyt/MergeSort.java’, ‘/Users/krunal/desktop/code/pyt/app.sql’, ‘/Users/krunal/desktop/code/pyt/NumPy.ipynb’, ‘/Users/krunal/desktop/code/pyt/TensorFlow.ipynb’, ‘/Users/krunal/desktop/code/pyt/data.csv.numbers’, ‘/Users/krunal/desktop/code/pyt/app.py’, ‘/Users/krunal/desktop/code/pyt/info.log’, ‘/Users/krunal/desktop/code/pyt/.ipynb_checkpoints/NumPy-checkpoint.ipynb’, ‘/Users/krunal/desktop/code/pyt/.ipynb_checkpoints/SciKit Learn-checkpoint.ipynb’, ‘/Users/krunal/desktop/code/pyt/.ipynb_checkpoints/DataScience-checkpoint.ipynb’, ‘/Users/krunal/desktop/code/pyt/.ipynb_checkpoints/TensorFlow-checkpoint.ipynb’, ‘/Users/krunal/desktop/code/pyt/SciKit Learn.ipynb’, ‘/Users/krunal/desktop/code/pyt/.vscode/settings.json’, ‘/Users/krunal/desktop/code/pyt/app.rs’, ‘/Users/krunal/desktop/code/pyt/mod.py’, ‘/Users/krunal/desktop/code/pyt/output.txt’, ‘/Users/krunal/desktop/code/pyt/data.txt’, ‘/Users/krunal/desktop/code/pyt/sample.txt’, ‘/Users/krunal/desktop/code/pyt/app.cpp’] |
В приведенном выше коде мы определили функцию с именем getFiles(), которая принимает один аргумент с именем dirname. Затем мы создаем список и добавляем полный путь к файлам.
Итак, он начнет перебирать один за другим файл и добавит его полный путь в список, и, в конце концов, мы получим наш полный список файлов.
Получение списка файлов в каталоге и подкаталогах с помощью os.walk()
Модуль python os предоставляет функцию walk() для перебора дерева каталогов.
Функция os.walk() перебирает дерево каталогов при указании пути и для каждого каталога или подкаталога возвращает кортеж, содержащий(, , ).
См. следующий код.
|
# app.py import os dirName = ‘/Users/krunal/desktop/code/pyt’ listOfFiles = list() for(dirpath, dirnames, filenames) in os.walk(dirName): listOfFiles += [os.path.join(dirpath, file) for file in filenames] for elem in listOfFiles: print(elem) |
Вывод:
|
1 2 3 4 5 6 7 8 9 10 11 12 13 14 15 16 17 18 19 20 21 22 23 24 25 26 27 28 29 30 31 32 33 34 35 36 |
python3 app.py /Users/krunal/desktop/code/pyt/index.html /Users/krunal/desktop/code/pyt/demo.txt /Users/krunal/desktop/code/pyt/.DS_Store /Users/krunal/desktop/code/pyt/person.txt /Users/krunal/desktop/code/pyt/app.json /Users/krunal/desktop/code/pyt/DataScience.ipynb /Users/krunal/desktop/code/pyt/ads.txt /Users/krunal/desktop/code/pyt/example.http /Users/krunal/desktop/code/pyt/student.csv /Users/krunal/desktop/code/pyt/app.txt /Users/krunal/desktop/code/pyt/data.csv /Users/krunal/desktop/code/pyt/app.component.ts /Users/krunal/desktop/code/pyt/data.json /Users/krunal/desktop/code/pyt/help_examples.py /Users/krunal/desktop/code/pyt/MergeSort.java /Users/krunal/desktop/code/pyt/app.sql /Users/krunal/desktop/code/pyt/NumPy.ipynb /Users/krunal/desktop/code/pyt/TensorFlow.ipynb /Users/krunal/desktop/code/pyt/data.csv.numbers /Users/krunal/desktop/code/pyt/app.py /Users/krunal/desktop/code/pyt/info.log /Users/krunal/desktop/code/pyt/SciKit Learn.ipynb /Users/krunal/desktop/code/pyt/app.rs /Users/krunal/desktop/code/pyt/mod.py /Users/krunal/desktop/code/pyt/output.txt /Users/krunal/desktop/code/pyt/data.txt /Users/krunal/desktop/code/pyt/sample.txt /Users/krunal/desktop/code/pyt/app.cpp /Users/krunal/desktop/code/pyt/__pycache__/help_examples.cpython—36.pyc /Users/krunal/desktop/code/pyt/__pycache__/mod.cpython—36.pyc /Users/krunal/desktop/code/pyt/.ipynb_checkpoints/NumPy—checkpoint.ipynb /Users/krunal/desktop/code/pyt/.ipynb_checkpoints/SciKit Learn—checkpoint.ipynb /Users/krunal/desktop/code/pyt/.ipynb_checkpoints/DataScience—checkpoint.ipynb /Users/krunal/desktop/code/pyt/.ipynb_checkpoints/TensorFlow—checkpoint.ipynb /Users/krunal/desktop/code/pyt/.vscode/settings.json |
Перечисление всех файлов txt в указанном каталоге с Glob в Python
См. следующий код.
|
# app.py import glob dirName = ‘/Users/krunal/desktop/code/pyt’ files = [f for f in glob.glob(dirName + «**/*.txt», recursive=True)] for f in files: print(f) |
Вывод:
|
python3 app.py /Users/krunal/desktop/code/pyt/demo.txt /Users/krunal/desktop/code/pyt/person.txt /Users/krunal/desktop/code/pyt/ads.txt /Users/krunal/desktop/code/pyt/app.txt /Users/krunal/desktop/code/pyt/output.txt /Users/krunal/desktop/code/pyt/data.txt /Users/krunal/desktop/code/pyt/sample.txt |
В приведенном выше примере мы использовали понимание списка, чтобы получить список всех файлов с расширением .txt.
Итак, в этом примере мы выводим только текстовые файлы, а не все файлы.
Список всех каталогов в указанном каталоге + подкаталоги(**)
См. следующий код.
|
# app.py import glob dirName = ‘/Users/krunal/desktop/code/pyt’ folders = [f for f in glob.glob(dirName + «**/», recursive=True)] for f in folders: print(f) |
Выход:
|
python3 app.py /Users/krunal/desktop/code/pythonenv/ /Users/krunal/desktop/code/pyt/ |
Заключение

Чтобы вывести каталоги, подкаталоги и файлы, Python имеет отличную встроенную поддержку, которая делает всю работу за вас. Управление файлами и работа с ними — повседневная работа любого программиста.
В этой статье мы увидели, как перечислить все каталоги, подкаталоги и файлы, используя методы Python os.walk(), blob.blob() и Python os.listdir(). Наконец, Python перечисляет все файлы в каталоге, и пример с подкаталогами заканчивается.