-
In this article we describe how to import flight plans into X-Plane 11 and then import them into GPS 530, for example.
Overview of further details
- Initial Release
- Nov 30th -0001
1 Import a flight plan into X-Plane 11
That’s easy as can be. It is important that you have created a flight plan in .fms format beforehand. This can be done for example with onlineflightplanner.org. But also extensive tools like simBrief allow an export in .fms format. As soon as you have downloaded the .fms file, you have to move it to the directory X-Plane 11 → Output → FMS plans. Tip: To make the list as clear as possible, it is worth renaming the file as follows: ICAO-ICAO.fms. For example: EDDF-EDDM.fms.
2 Load flight plan in XP11
Now we have imported the flight plan into X-Plane 11. It should be available in the simulator immediately, a restart of the program is not necessary. So let’s go to the import.
2.1 GPS 530
Here the import is very easy. In addition, most add-on aircraft also rely on the X-Plane 530 GPS. Therefore, this description should work for quite a lot of planes. To import the flight plan you first have to click on the button FPL for Flight Plan.
Now you get to the list of all waypoints which the currently loaded flight plan (still) has. If no flight plan is loaded, the ICAO code of the starting airport can be entered here. Now you just have to turn the outermost wheel (arrow with small bow).
Now you get a list of all flight plans that are currently in the FMS Plans directory. Just select the corresponding flightplan and confirm with the button ENT for Enter. To choose between the different flightplans you have to use the right hand dial as well. Important: If none of the flightplans is highlighted in green, simply press the outer dial to PUSH CRSR for Push Cursor.
This user manual provides detailed information on installing and using XPFlightPlanner, the X-Plane flight planner and generator.
Table of content
- 1 Introduction
- 2 Initial setup
- 2.1 Installation on Windows
- 2.2 Installation on Mac
- 2.3 Activate with your serial number
- 2.4 Select the navigation database
- 3 Using XPFlightPlanner
- 3.1 User interface overview
- 3.2 Generate a new flight plan
- 3.2.1 Generate flight plan automatically
- 3.2.1.1 Routing options
- 3.2.1.2 Route generation
- 3.2.2 Edit or create a flight plan manually
- 3.2.1 Generate flight plan automatically
- 3.3 Open and save flight plan
- 3.4 Print a flight plan log
- 4 Load a flight plan into X-Plane
Introduction
XPFlightplanner is a sim flight plan generator application compatible with X-Plane. It has been carefully designed to be intuitive, allowing flightsim enthusiasts to easily create flight plans from one airport to another with just a few simple clicks.
XPFlightPlanner uses X-Plane’s native file format *.fms to store and load flight plans.
Remember, this tool must not be used for real world aviation but for simulation purpose only!
Initial setup
XPFlightPlanner can be installed on Windows and Mac OS X, it requires either:
- Microsoft Windows (10+) on an Intel 64 bit computer
- or Apple Mac OS X (10.12+) on an Apple Silicon (M1, M2) or Intel Mac.
Installer files can be downloaded from our download page.
Installation on Windows
To install XPFlightPlanner on Microsoft Windows, simply follow these steps:
- Download the installer
- Execute the installer and follow instructions
- Launch XPFlightPlanner from the Start menu
By default XPFlightPlanner is installed in C:Program FilesXPFlightPlanner.
Installation on Mac
To install XPFlightPlanner on Apple Mac OS X, simply follow these steps:
- Download the image file (dmg)
- Open the image file and copy XPFlightPlanner to /Applications folder
- Eject the disk image and launch XPFlightPlanner by double clicking on it
Activate with your serial number
To register your copy of XPFlightPlanner, follow these simple steps:
- Go to the “Help” menu, then select “Register your license”
- Copy and paste your email and serial number from the order email into the registration dialog to ensure accuracy and prevent any typos
- Click on the “Activate” button
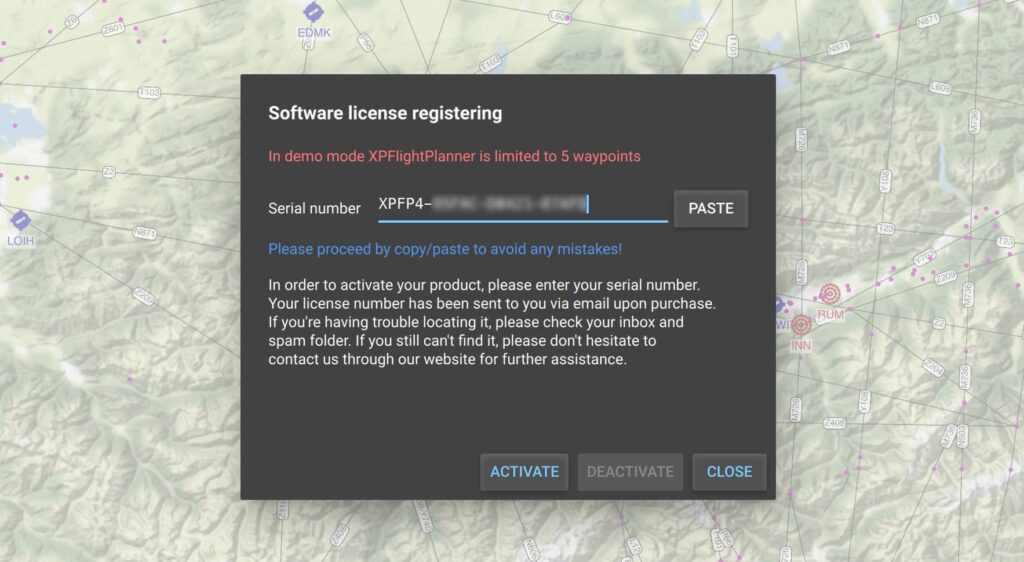
If you didn’t receive your serial number, please check your email inbox and spam folder. The email is sent automatically after the purchase is completed.
By default, you can activate XPFlightPlanner on up to 5 computers that you own. If you need more activation slots for your personal use, please contact us.
Once the activation is complete, XPFlightPlanner will unlock the limitation of 5 waypoints, allowing you to fully experience the full capabilities of the software.
Select the navigation database
To use XPFlightPlanner, you’ll need access to X-Plane’s world navigation database. You have two options for the database source: either downloading the database from the internet (which is stored on GitHub servers), or importing the navigation database from your local X-Plane installation.
Upon first launch, the “Navigation database” dialog will appear, allowing you to choose between downloading the database from the internet (which is hosted on GitHub servers), or loading the database from your local X-Plane installation. You can also access this dialog at any time by selecting “Select navigation database” from the “Edit” menu.
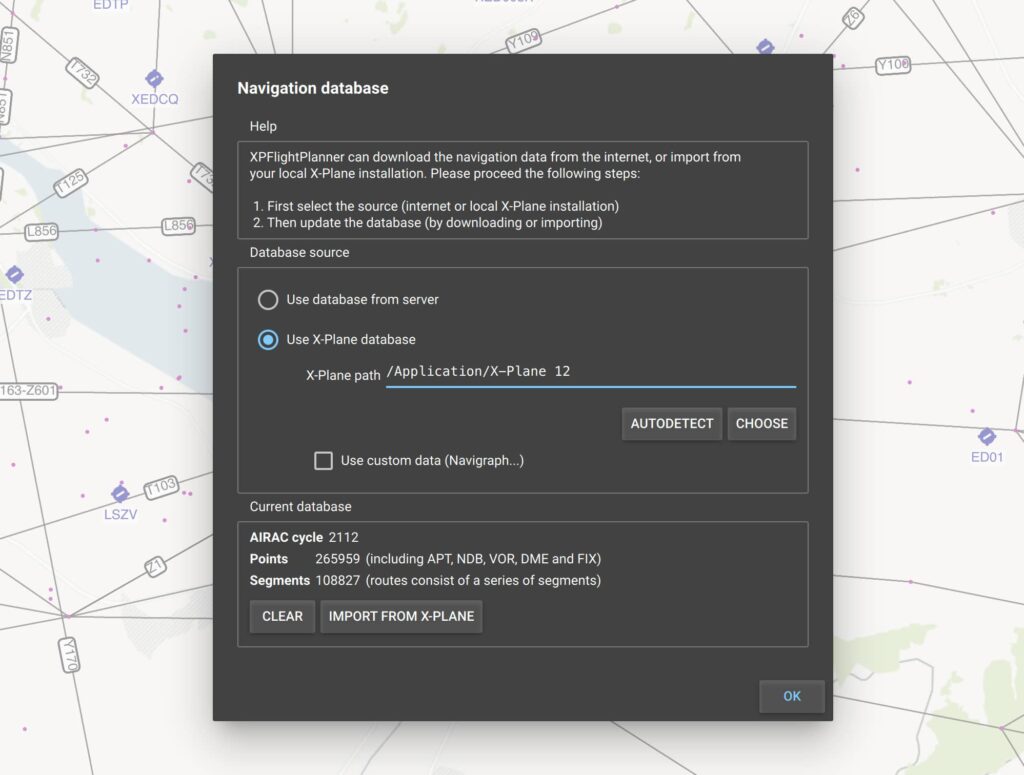
- If you choose to download the database from the internet, select the “Use database from server” option and click the “Download” button. The download process can take up to a minute, depending on your network speed and the server’s conditions. Once the database has been successfully downloaded, it will be stored on your computer in an optimized binary format. XPFlightPlanner will use this same database each time it is started, unless you update and download a new version.
- Alternatively, you can choose to import the database from your X-Plane installation by selecting “Use X-Plane database” and then clicking “Import from X-Plane.” This process may take up to 1 minute, depending on the speed of your computer. After complete, the binary optimized database will be loaded every time you start XPFlightPlanner.
In order to ensure that XPFlightPlanner is using the most up-to-date navigation database, you’ll need to either download or import the database again whenever the X-Plane data cycle is updated.
To use a custom navigation database in XPFlightPlanner, such as one provided by Navigraph, simply select the option “Use custom data” in the “Navigation database” dialog, and then load the data by clicking the “Import from X-Plane” button. This will import the custom database into XPFlightPlanner’s binary optimized format. Note that you will need to re-import the custom database each time your provider updates the data cycle.
To load a custom navigation database, ensure that the custom data is located in the <X-Plane>/Custom Data directory and contains the following files:
- earth_awy.dat,
- earth_fix.dat,
- earth_nav.dat,
- CIFP directory.
Note: X-Plane distributes its database under the GPL license. In our GitHub repository which is also made available to the public under the GPL license, you will find the source code for the command line tool that converts the X-Plane database into the binary optimized format used by XPFlightPlanner and the corresponding binary file.
Using XPFlightPlanner
User interface overview
When you launch XPFlightPlanner the main window will appear, displaying an empty flight plan document. This window consists of four main sections: a map, a flight plan table, a list of available points (corresponding to the navigation database), and a panel that displays details of the selected item (point or route).
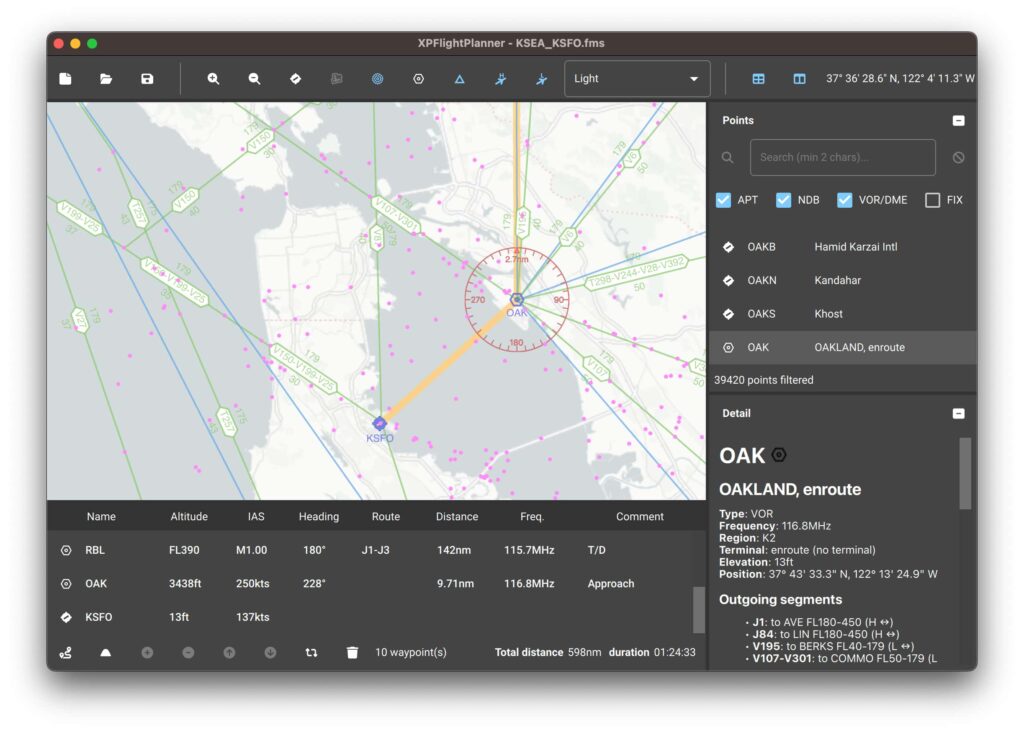
The main window also features a toolbar at the top of the screen, which provides quick access to frequently used actions. All actions can also be found in the top menu. If you wish to hide either the map or the flight plan table, you can use the relevant buttons on the right toolbar or choose the appropriate option in the “View” menu.
Generate a new flight plan
XPFlightPlanner allows you to create flight plans either automatically with the flight plan generator or manually. You can also modify an automatically generated flight plan as needed.
Generate flight plan automatically
XPFlightPlanner has a route finder that can generate the best route from an airport to another.
To generate a flight plan in XPFlightPlanner, you need to have at least two waypoints in your flight plan. The first waypoint should represent your departure point and the second your arrival.
Once you have added these two waypoints, you can either click on the generator button or go to the “Flight plan” menu and select “Generator”. The application will then open the route finder dialog which gives a general overview of the flight: departure, arrival and approximate distance.
In dialog, you can configure the performance parameters for your aircraft. To do this, select your desired climb performance, including the climb speed (knots) and rate (feet/min). Next, specify the cruise altitude (feet or Flight Level) and speed (knots or Mach). Finally, choose your preferred descent speed and rate. These performance settings are saved and will be remembered for future use.
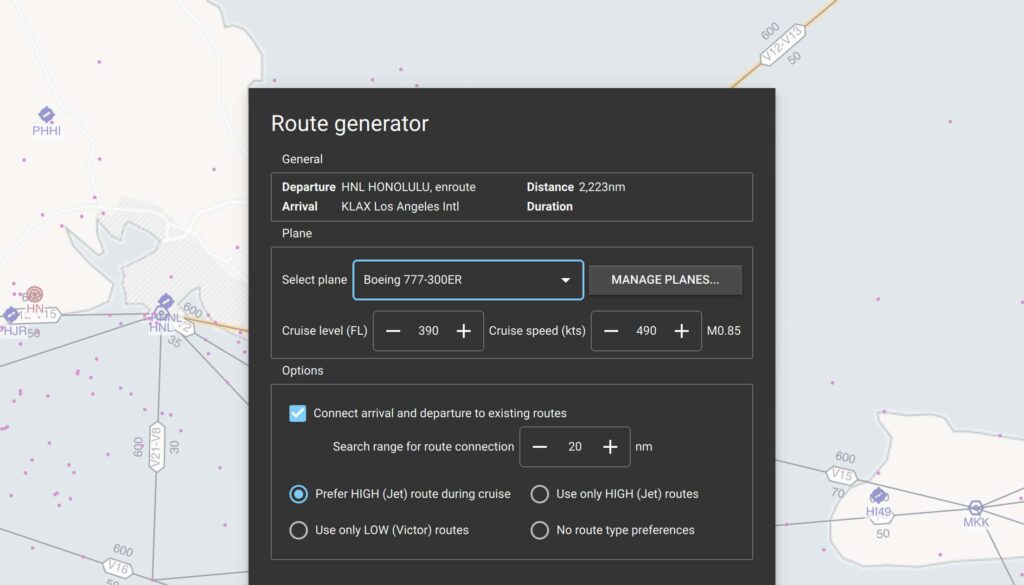
Routing options
In the routing options, you have the choice to connect your departure and arrival with the option “Connect departure and arrival to existing routes”. The flight plan generator finds routes based on existing database segment only. In the case this option is not selected and neither departure nor arrival is connected to an existing segment, the generator may not be able to find a suitable route. In the field “Search range” you may specify the range in nautical miles for connecting departure and arrival to existing database routes.
Then, you can choose the type of route to use. You have the option to prioritize High (JET) routes, use only high routes, use only Low (Viktor) routes, or have no preferences.
Route generation
Click the “Start” button to initiate the route generation process. Upon completion, the flight plan generator window can be closed and the resulting flight plan will be displayed in the main window.
In the event that the flight plan generator is unable to find a route, you have options to try again with modified settings such as connecting the departure and arrival to existing routes or increasing the search range for connections. You can also experiment with different route type preferences to expand the routing options.
Edit or create a flight plan manually
Flight plans can be created or modified either automatically or manually. The manual editing option also provides the ability to fine-tune an automatically generated flight plan, if you need to modifying the departure procedure as instance.
You can add waypoints to your flight plan in multiple ways, either by double-clicking a point on the map or a point in the navigation database list. To remove a waypoint, simply double-click it on the map. Right-clicking on a point opens a contextual menu with options to add the point to the beginning, middle, or end of the flight plan, or to remove it.
Below the flight plan table, there is a compact toolbar that provides editing options for the flight plan. The options include the route generator (available when the flight plan has at least two waypoints), a button to add the currently selected point to the flight plan, a button to remove the selected waypoint, and arrows to change the order of waypoints, a button to reverse the flight plan order, and a trash button to clear the entire flight plan.
Open and save flight plan
XPFlightPlanner supports opening and saving flight plans in X-Plane’s native *.fms format. To open a flight plan, you can either click the button on the toolbar or select “Open” from the “File” menu. To save a flight plan, use the button on the toolbar or select ” Save” or “Save as” from the “File” menu.
To ensure the flight plans are found by X-Plane’s FMS, they must be saved in the <X-Plane>/Output/FMS plans directory. In the XPFlightPlanner preferences, you have the option to always open or save flight plans from this directory or to remember the last directory used.
Print a flight plan log
XPFlightPlanner allows you to print your flight plan log on paper for sim brief. To do so, navigate to the “File” menu and use the following options:
- Page Setup: to choose the type of paper and orientation (Landscape or Portrait).
- Print Preview: to preview the flight plan and check the paper settings before printing.
- Print: to send the flight plan to your printer.
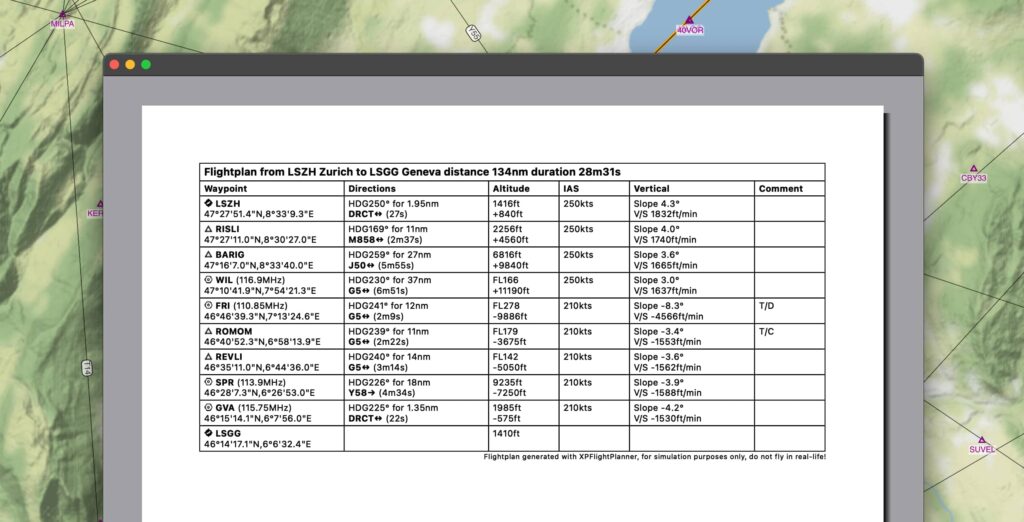
Note: For optimal readability, it’s recommended to set the paper orientation to Landscape rather than Portrait.
Load a flight plan into X-Plane
To load the flight plan into X-Plane’s FMS files must be saved in the <X-Plane 11>/Output/FMS plans directory.
To load a flight plan in X-Plane, follow these steps:
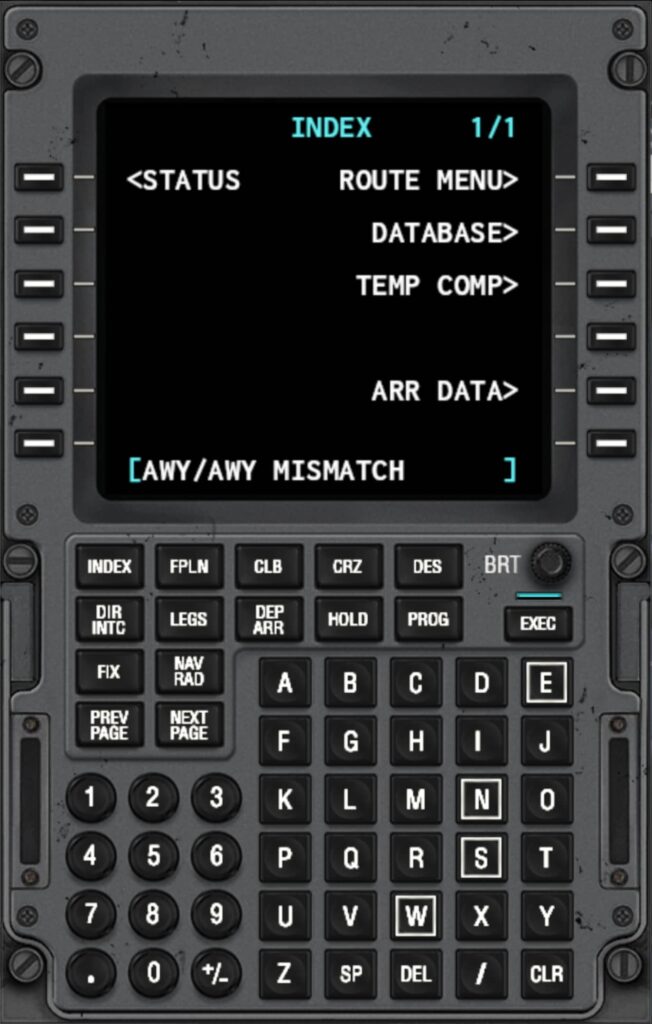
- Launch X-Plane and open the Flight Management System (FMS)
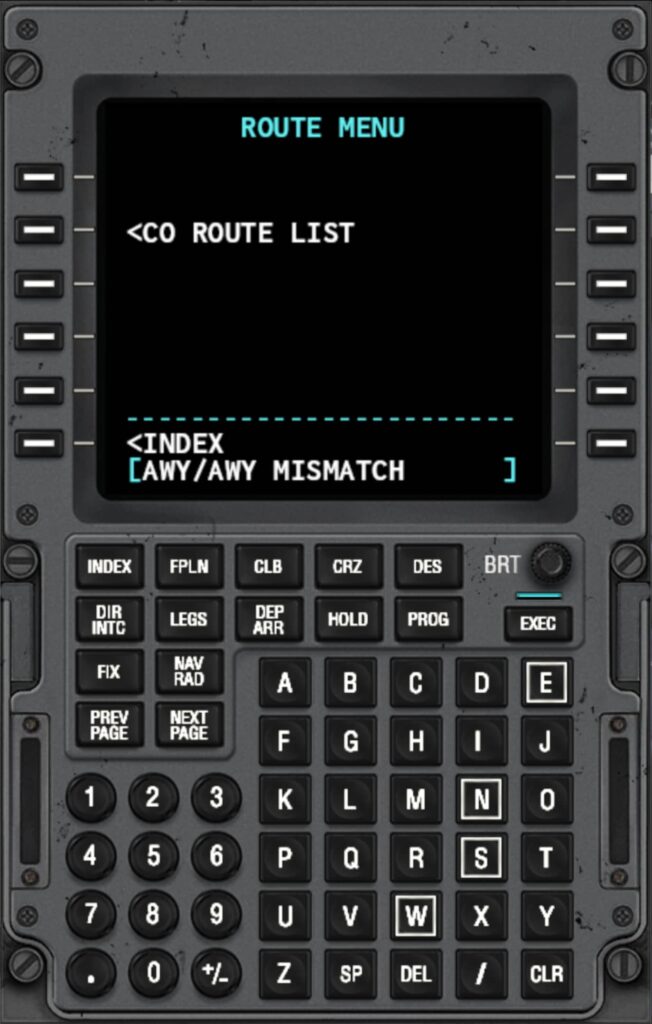
- In the FMS, click the ROUTE MENU button
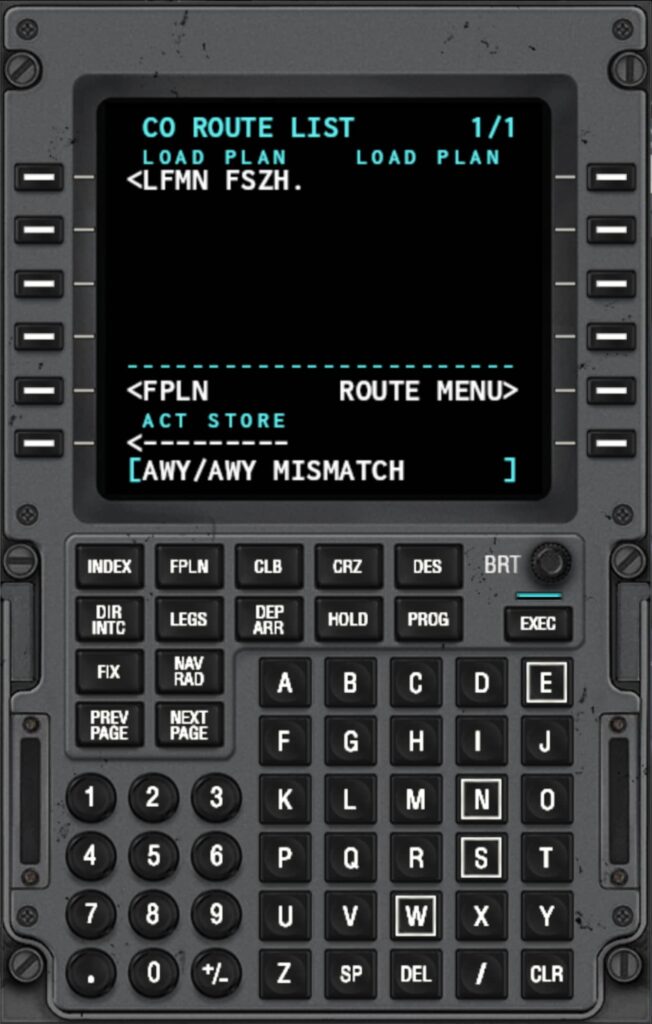
- From the route menu, click the CO ROUTE LIST button
- The list of all saved flight plans will be displayed.
- Select the desired flight plan by clicking on its corresponding button.
X-Plane 11 мой разбор для начинающих игроков

X-Plane 11 наверное один из самых мною любимых авиасимуляторов. Разбираюсь в нем я самостоятельно, поэтому прошу не ругать, так сказать, все для новичков.
Начнем с улучшайзеров, а именно с плагинов которые сделают игру лучше:
Better Pushback — лучший буксировщик для X-Рlane.
Terrain radar + Vertical Situation Display — радар поверхности под летящим самолетом.
Ground Handling Deluxe — запускает обслуживающий транспорт.
X-Life Deluxe — добавляет воздушный трафик
Advanced Rendering Options plugin for X-Plane — улучшайзер графики
Airport Navigator Plugin — навигатор по аэропортам
X-RAAS: Runway Awareness and Advisory System — голосовой помощник
Плагины устанавливаются путем их распаковки в папку с игрой X-Plane 11Resourcesplugins
Полезная ссылка с плагинами.
Еще нам понадобится навигационная база данных AIRAC. Найти ее можно вбив в поисковик Navigraph, AIRAC navigation data, скачать, найти в скаченном архив или папку xplane11_native_1803 или более позднюю, найти в ней файлы и папку CIFP и скопировать их в папку X-Plane 11Custom Data.
Теперь об управлении:
Flight Controls
|
Pitch Trim Up |
] |
|
Pitch Trim Down |
[ |
|
Flaps Up (Закрылки вверх) |
1 |
|
Flaps Down (Закрылки вниз) |
2 |
|
Speed Brakes Up One (Воздушный тормоз) |
3 |
|
Speed Brakes Down One (Воздушный тормоз) |
4 |
|
Rudder Trim Left |
5 |
|
Rudder Trim Center |
6 |
|
Rudder Trim Right |
7 |
|
Aileron Trim Left |
8 |
|
Aileron Trim Center |
9 |
|
Aileron Trim Right |
0 |
|
Landing Gear Down (Шасси убрать) |
CTRL + D |
|
Landing Gear Up (Шасси выпустить) |
CTRL + U |
|
Landing Gear Toggle (Шасси) |
G |
|
Brakes Toggle Regular (Тормоз) |
B |
|
Brakes Toggle Max (Стояночный тормоз) |
V |
|
Tailhook Down |
ALT + Q |
|
Tailhook Up |
ALT + W |
|
Smoke Toggle |
X |
|
Canopy Open |
ALT + E |
|
Canopy Close |
ALT + R |
Engines
|
Throttle Down (Уменьшить тягу) |
F1 |
|
Throttle Up (Увеличить тягу) |
F2 |
|
Prop Down |
F3 |
|
Prop Up |
F4 |
|
Mixture Down |
F5 |
|
Mixture Up |
F6 |
|
Mixture Minimum |
F7 |
|
Mixture Maximum |
F8 |
|
Carb Heat On |
F9 |
|
Carb Heat Off |
F10 |
|
Carb Heat Toggle |
F11 |
|
Idle High/Low Toggle |
F12 |
|
TOGA Power |
F13 |
|
Beta Toggle |
/ |
|
Thrust Reverse Toggle |
SHIFT + / |
Starters
|
Engage Starter 1 |
CTRL + 1 |
|
Engage Starter 2 |
CTRL + 2 |
|
Engage Starter 3 |
CTRL + 3 |
|
Engage Starter 4 |
CTRL + 4 |
|
Engage Starter 5 |
CTRL + 5 |
|
Engage Starter 6 |
CTRL + 6 |
|
Engage Starter 7 |
CTRL + 7 |
|
Engage Starter 8 |
CTRL + 8 |
Weapons
|
Weapon Target Down |
SHIFT + [ |
|
Weapon Target Up |
SHIFT + ] |
Instruments
|
Panel Brightness Down |
SHIFT + CTRL + , |
|
Panel Brightness Up |
SHIFT + CTRL + . |
|
HUD Brightness Toggle |
` |
Radios
|
NAV1 Standby Flip |
CTRL + 9 |
|
NAV2 Stanby Flip |
CTRL + 0 |
|
COM1 Standby Flip |
CTRL + — |
|
COM2 Standby Flip |
CTRL + = |
Operation
|
Screenshot |
SHIFT + SPACE |
|
Quicktime Record |
CTRL + SPACE |
|
Pause |
P |
|
Ground Speed Change |
ALT + T |
|
Flight-model Speed Change (Ускорить время) |
CTRL + T |
|
Time Down |
K |
|
Time Up |
L |
|
Time Down Lots |
SHIFT + K |
|
Time Up Lots |
SHIFT + L |
|
Contact ATC |
RETURN |
|
Fail System |
CTRL + F |
|
Cycle Dump |
SHIFT + M |
|
Make Panel Previews |
SHIFT + ALT + CTRL + SPACE |
|
Create Snap Marker |
CTRL + X |
|
Test Data Ref |
CTRL + . |
|
Slider 01-16 |
SHIFT + F1-F16 |
|
Replay Toggle |
ALT + R |
View Commands
|
Free Camera |
C |
|
Forward With Panel (Камера из кабины) |
W |
|
Forward With HUD |
SHIFT + W |
|
Forward With Nothing |
CTRL + W |
|
Linear Spot |
SHIFT + 1 |
|
Still Spot |
SHIFT + 2 |
|
Runway |
SHIFT + 3 |
|
Circle |
SHIFT + 4 |
|
Tower |
SHIFT + 5 |
|
Ridealong |
SHIFT + 6 |
|
Track Weapon |
SHIFT + 7 |
|
Chase |
SHIFT + 8 |
|
Cockpit Command Look |
SHIFT + 9 |
|
Cinema Verite |
SHIFT + C |
|
Sunglasses |
SHIFT + S |
|
Night Vision |
SHIFT + N |
|
3D Path Toggle |
CTRL + P |
|
3D Path Reset |
SHIFT + P |
|
Show Physics Model |
CTRL + M |
|
Quick Look 0-9 |
NUMPAD 0-9 |
|
Quick Look Mem 0-9 |
CTRL + NUMPAD 0-9 |
General
|
Left |
LEFT ARROW |
|
Right |
RIGHT ARROW |
|
Up |
UP ARROW |
|
Down |
DOWN ARROW |
|
Forward |
. |
|
Backwards |
, |
|
Zoom-in |
= |
|
Zoom-out |
— |
|
Left Fast |
SHIFT + LEFT ARROW |
|
Right Fast |
SHIFT + RIGHT ARROW |
|
Up Fast |
SHIFT + UP ARROW |
|
Down Fast |
SHIFT + DOWN ARROW |
|
Forward Fast |
SHIFT + . |
|
Backwards Fast |
SHIFT + , |
|
Zoom-in Fast |
SHIFT + = |
|
Zoom-out Fast |
SHIFT + — |
|
Left Slow |
CTRL + LEFT ARROW |
|
Right Slow |
CTRL + RIGHT ARROW |
|
Up Slow |
CTRL + UP ARROW |
|
Down Slow |
CTRL + DOWN ARROW |
|
Forward Slow |
CTRL + . |
|
Backwards Slow |
CTRL + , |
|
Zoom-in Slow |
CTRL + = |
|
Zoom-out Slow |
CTRL + — |
|
Rot Up |
R |
|
Rot Down |
F |
|
Rot Left |
Q |
|
Rot Right |
E |
|
Rot Up Fast |
SHIFT + R |
|
Rot Down Fast |
SHIFT + F |
|
Rot Left Fast |
SHIFT + Q |
|
Rot Right Fast |
SHIFT + E |
|
Rot Up Slow |
CTRL + R |
|
Rot Down Slow |
CTRL + F |
|
Rot Left Slow |
CTRL + Q |
|
Rot Right Slow |
CTRL + E |
|
Action |
SPACE |
Лично я меняю реверс на клавишу ` (~) которая находится перед клавишей 1. Для этого открываем настройки управления, и ищем Thrust Reverse Toggle.
Еще управление: < > приблизить или отдалить камеру.
Не забудьте переключить клавиатуру на раскладку EN
Теперь построим наш маршрут полета, X-Plane не умеет автоматически их строить как это делает FlightGear, для этого необходимо воспользоваться, сервисами http://onlineflightplanner.org/ или https://flightplandatabase.com/, маршруты мы строим для X-Plane 11. По аналогии с FlightGear я построил прямой маршрут из EDDT в EDDV и сохранил его в папку X-Plane 11OutputFMS plans строил сервисом который указан первым.
Теперь все готово, запускаем игру. Начинаем новый полет, выбираем доступный Boeing 737-800, указываем аэропорт EDDT, можем сразу стать на полосу 26L, или не становиться. И начинаем полет.
После загрузки, откройте меню Plugins, переместив мышку вверх или нажав ESC и убедитесь, что все нужные вам плагины включены в Plugin Admin — Enable/Disable. Если вы находитесь не на полосе, воспользуйтесь плагином Better Pushback что бы отбуксировать самолет в сторону рулежки, Airport Navigator Plugin поможет найти полосу 26L, ее можно так же определить меняя вид камеры Shift + 1..9 смотрите таблицу управление.
Подготовка к полёту. Считаем, что двигатели у нас запущены и все проверки пройдены. На панели перед собой, включаем F/D ON, устанавливаем скорость IAS/MACH на 200, и правее высоту ALTITUDE 10000. Опускаем взгляд вниз находим табло NAV и в поле STAND BY устанавливаем частоту маяка 108,9.
Загружаем карту полета. Ранее мы ее создали и загрузили в X-Plane 11OutputFMS plans На панели FMS жмем кнопку INIT REF, затем на табло ищем ROUTE MENU, затем выбираем CO ROUTE LIST в нем откроются все наши сохраненные в папке планы полета, переключать листы можно кнопками PREV PAGE и NEXT PAGE. Находим наш план и выбираем его, он автоматически отобразится на табло навигации.
Снимаемся со стояночного тормоза «b», немного добавляем тяги клавиша F2 и катимся к полосе, если мы не на ней. Я не спец и не знаю норм, по этому выставляю положение закрылок на взлет в положение 1 (клавиши 1 и 2)
Начинаем взлет. Добавляем тягу F2, и на скорости 160 тянем штурвал на себя, взлетаем, убираем шасси. На 500ft можно включить автопилот, и автомат тяги. На панели жмем LNAV и кнопку CMD, самолет ложится на план полета. Жмем A/T и SPEED включается автомат тяги. Продолжаем набирать высоту, нажимаем V/S теперь устанавливаем 2500 и видим как наш самолет набирает нужную высоту. Убираем закрылки.
Для того, что бы полет приходил быстрее жмем CTRL+T.
После прохождения последней точки начинаем снижение. Переключаемся на 108,9. Выставляем 4200ft жмем V/S устанавливаем -2500 снижаемся, где то за 20NM жмем VOR LOC когда мы попадем в зону маяка самолет начнет выравниваться на полосу при этом на табло отображается 2 розовых ромба, ромб на горизонтальной плоскости выравнивается по центру шкалы, это означает, что самолет находится перед полосой, продолжаем снижение до 2000 — 2200ft одновременно сбрасываем скорость до 140 — 160, на 190 выпускам закрылки в первое положение на 160 во второе на 140 в третье. Можно использовать воздушный тормоз (клавиши 3 и 4 чтобы сбросить скорость). И наблюдаем за ромбом в вертикальной плоскости, когда ромб начнет приближаться к центру шкалы жмем APP, в правом верхнем углу автопилота будет гореть G/S, теперь мы снижаемся по глиссаде на полосу. Выпускаем шасси. В принципе все, самолет может сам сеть. Включаем автоматическое торможение «b» при необходимости запустить реверс. Выключаем автомат тяги, на отметке 40-30 можно чуть приподнять нос, уменьшаем тягу F1. Садимся, когда почти остановились отключаем тормоза. Рулим на рулёжку к аэропорту.
Introduction: How to Program X-Plane11 Default 737 FMC
One day I was flying in the x-plane 11 default 737, and I wanted to know how to put waypoints in the FMC. I searched online, and the only tutorials I could find were for the Zibo 737. Eventually I figured out how to program the FMC so now I am making a tutorial for less experienced players.
In this scenario, I will be going from KSAC to KSFO and my waypoints will be ALWYS->CEDES->ARCHI. My cruising altitude will be 5000ft, I will be going at 250 knots and my callsign will be AAL1738.
Step 1: Flight Plan
Before you can program your FMC you need to have waypoints. I recommend SkyVector It is a free website you can use to find waypoints and flight routes.
Step 2: Press FPLN on the FMC
Step 3: Press CLR to Clear the Scratchpad
Step 4: Enter Your Origin Airport’s ICAO Code on the Scratchpad
Step 5: Press the Button Next to the Boxes for the Origin Airport
Step 6: Enter Your Destination Airport’s ICAO Code on the Scratchpad
Step 7: Press the Button Next to the Boxes for the Destination Airport
Step 8: Enter Your Flight Number in the Scratchpad
Step 9: Press the Button Next to the Spaces for FLT NO
If you do this correctly, the blue light above EXEC should light up, do not press EXEC yet. There is an option for CO ROUTE next to the FLT NO but ignore that. The CO ROUTE is for company routes.
Step 10: Enter Your First Waypoint in the Scratchpad
Step 11: Press the Button Next to the TO Designation
If you do this correctly then the space under VIA should automatically fill in with the word DIRECT.
Step 12: Press EXEC
After you press it, the blue light should go off.
Step 13: Press the LEGS Button
This should take you to a screen like the one above.
Step 14: Enter Your Second Waypoint in the Scratchpad
Step 15: Press the Button for the Empty Space Under Your Last Waypoint
If you do this correctly there will be an option to CANCEL MOD and EXEC will light up again.
Step 16: Press EXEC
Each time after modifying your legs, you will need to press EXEC.
Step 17: Repeat the Last Three Steps As Many Times As Needed, If Necessary Press NEXT PAGE to Add More Waypoints.
Step 18: If Something Like the Below Happens to You, Choose the Option That Matches Your Waypoint’s Location.
Step 19: Press the Button DEP/ARR
It should take you to a page like the one above.
Step 20: Click on the DEP Option
Step 21: Choose Which Runway You Will Be Taking Off From
If necessary click on NEXT PAGE to get more runway options.
Step 22: Press EXEC
Step 23: Press the Button for DEP/ARR INDEX
This will take you back to the DEP/ARR page.
Step 24: Press the ARR Button for Your Destination Airport
Step 25: Choose Which Runway You Want to Land On
If necessary press NEXT PAGE to look at more options.
Step 26: Press EXEC
Step 27: Press the LEGS Button
There will be a space that has boxes and says DISCONTINUITY, that is fine.
Step 28: Go to the Next Page and Press on the Button That Is Right After DISCONTINUITY
If there is an option under DISCONTINUITY then press that. Doing this will make that option go into your scratchpad.
Step 29: Go Back to the DISCONTINUITY Page and Press the Button Next to It
This will replace the DISCONTINUITY with the waypoint.
Step 30: Press EXEC
Now your NAV flight plan is complete, but you still need to configure the climb cruise and descent.
Step 31: Press CLB
Step 32: Modify the SPD/ALT Limit to Your Suit.
Since my cruising altitude is 5000 I will leave the CLB page as it is.
Step 33: Press Either CRZ or NEXT PAGE They Both Go to the Same Page
Step 34: Modify This Page to Suit Your Needs
I am cruising at 5000ft and my target speed will be 250kts.
Step 35: Press DES or NEXT PAGE
Step 36: Modify This Page to Suit Your Needs
Step 37: Taxi and Takeoff
Step 38: Flip F/D From Off to On
Step 39: Press CMD
Step 40: Press LNAV
Step 41: Press VNAV
Step 42: Flip A/T From Off to ON
Step 43: Relax While the Plane Flies Itself.
Здравствуйте, дорогие товарищи любители и профессионалы воздухоплавания!
Я тут новенький, прошу любить и жаловать.
Позже, как-нибудь, напишу свою историю мытарств – сагу о том, как я бодался с авиасимуляторами, пытаясь постичь их «дао». О, это будет история не на одну страницу, полная попыток вырвать себе волосы, поубивать разработчиков, разбить монитор и выпрыгнуть (вылететь) в окно…
Ну а пока, скажу кратко. Я начинал с F-19 (игра под Norton Commander из девяностых, где вы управляете одноимённым истребителем), потом долго не играл, и вот 3 года назад решил вернуться к этой теме. Купил себе РУС, РУД, педали, а позже – радиопанель и панель с переключателями. За эти годы я так и не совершил ни одного полёта, выполненного по всем правилам. Порог вхождения в авиасимуляторы оказался не просто самым высоким среди игр и симуляторов, а раз в 20 выше, чем я ожидал.
Постепенно, попытки вырвать волосы поутихли, я понял, что нахрапом эту тему не возьмёшь, и стал изучать её постепенно. Но даже скурпулёзное изучение интернета и чтение нескольких сотен страниц инструкций (в т. ч. на английском языке) не дали мне всех ответов. И вот я здесь. Очередная глава моей саги – попытка получить инфу на форуме единомышленников.
Насколько я понял, любители авиации – люди доброжелательные, тут не встретишь бешеных школьников, пытающихся что-либо доказать всему миру, а потом успеть спасти мир и сделать домашку. Так ведь?
Ну так вот. До чего я дошёл на данный момент. Перешёл с DCS World на X—Plane 11. Настроил под себя управление. Составил таблицу (план действий как взлетать и садиться) под Cessna 172 Skyhawk G1000 (прилагаю). Изучил аэродинамику и принципы навигации. Более-менее разобрался, что такое план полёта и как его составлять. Т. е. я практически в нескольких шагах от совершения первого полёта по всем правилам. Но некоторые моменты остаются для мня загадкой. Я приложил свою табличку, посмотрите. Там есть красные знаки вопроса. Вот что мне не понятно:
1. Я решил составить свой первый простейший маршрут (план полёта) – из Шереметьево (UUEE) в Домодедово (UUDD) по восточному краю Москвы. Выбрал ВПП (06L/24R14R/32L). Посмотрел по схемам коды маршрутов и путевых точек. Они на разных схемах разные, вот какие нашёл: для Шер. – BESTA 07D, EE701, EE709, BESTA, BST 3G; для Дом. – ABMAS, GELKA, AO14M, DR14M, LO14M, DD144. Думал, что-нибудь да подойдёт. А ни фига. Захожу в X—Plane, там departure для Шер. такие – BST06E, BST24E, BST5G, BST6G (привожу в пример только те, что начинаются на BST, т.к. они очевидно ведут к точке BESTA, а значит по восточному краю Москвы, куда мне и надо). Ни одна не подходит. И непонятно, почему они имеют разное количество знаков. Как я выяснил, путевые точки имеют 5-значный код, маршруты вылета и прилёта – 6-значный, а маршруты (воздушные пути) между аэропортами – 4-значный. Но тут ничего не сходится. И там ещё надо указать transition (видимо, какая-то промежуточная точка, через которую надо обязательно пролететь), он там такой: ADT1E, FV3E, NGT1E, RLN1E, SDR1E. Т. е. опять ничего не подходит. И я опять в тупике. Может, я не те схемы смотрю? Хотя, просмотрел все что есть. И где бы мне найти такой сайт, чтобы точно показывал ровно те коды, которые я потом смогу выбрать в X—Plane (я не имею в виду автоматическое создание плана полёта, мне интересно понять, как его делать самому, глядя в схемы и карты)?
2. Решил зайти с другой стороны. Вбил в план полёта рейс из Москвы в Ярославль. Данные вбил такие. UUEEUUDL, 06L/24R05/23, Departure: KN06E, runway: RW06L, transition: RLP1E. Arrival: BADAK2, transition: BADAK, runway: RW05. Approach: ILS23, transition: VECTORS, minimums: OFF. Ну и соответственно, стал искать потом в интернете эти данные на схемах аэропортов. Не нашёл. Так что с другой стороны зайти тоже не получилось.
3. И в ту же тему, про навигацию – когда подлетаю к аэропорту прилёта, по радио ни гу-гу. Никаких указаний, на какой скорости идти, на какой высоте. Разные частоты пробовал. Кнопка прослушивания NAV активна.
4. По таблице вопросы. По правилам, после открытия топливного крана (который, кстати, почему-то уже открыт, когда стартуешь новый полёт…) нужно проверить резервную батарею (тумблер STBY BATT в положение TEST на 10 секунд). Так вот, я не могу найти в X—Plane команды, которая за это отвечает. Т. е. курсором мышки могу переключатель передвинуть, а вот команды на это никак не могу найти. Всё меню уже облазил. А раз нет команды, не могу назначить кнопку на это действие. Могу только включить резервную батарею, а протестировать никак. Кстати, сама резервная батарея при старте нового полёта уже включена (разве так должно быть?).
5. Не могу найти команду, отвечающую за включение освещения панели. Я включаю его со своего блока Logitech Switch Panel, но саму команду не нашёл.
6. Настройка ADF. Если я правильно понимаю, ADF – это прибор, который ловит сигналы с маяков NDB. У всех маяков NDB разная частота, так? Значит, как мне перед полётом настроить ADF? Там две частоты – active и standby. Допустим, я ставлю частоту active на ближайший маяк NDB, а standby – на следующий ближайший по пути. Но что будет потом, когда я вылечу из области действия обоих? Мне надо будет прямо в полёте перенастраивать частоты на следующие два ближайших маяка?
7. Я так и не разобрался, как мне слушать инфу о погоде. Допустим, в Шер. частота ATIS – 125,125, а VOLMET – 127,875. Я ввожу эти частоты допустим в COM2. Кнопка прослушивания COM2 активна. Меняю с active на standby и обратно – и ничего, тишина. Может, эта инфа не автоматически передаётся, а её надо как-то самому запрашивать? Что я упускаю?
8. В самом конце таблице, я не уверен, правильно ли у меня записан порядок действий. Мы сначала выключаем авионику, а потом двигатель, или наоборот.
9. И в целом, прошу кому не лень, пробежаться по моей таблице, проверить её на наличие грубых ошибок.
X-Plane 11. Cessna 172 SIMPLE.pdf