В этом руководстве мы покажем вам шаги по извлечению файла boot.img непосредственно с вашего устройства, даже без необходимости загрузки прошивки. Чтобы полностью раскрыть потенциал своего устройства, первый шаг требует разблокировки загрузчика устройства. Как только вы это сделаете, вы сможете опробовать множество модов и настроек. Но для большинства этих настроек требуются права администратора. Другими словами, ваше устройство должно быть рутировано через Magisk.
Теперь есть два разных метода, с помощью которых вы можете выполнить указанную задачу. Первый — напрямую прошить приложение Magisk через TWRP. Тогда второй способ заключается в извлечении файла boot.img из стоковой прошивки, прошивке через Magisk и прошивке через Fastboot. Однако у этого метода есть две основные проблемы. Во-первых, это требует загрузки всей прошивки, что не только истощает ваши данные, но и приводит к ненужной трате времени.
Затем вторая и более важная проблема заключается в том, что вам необходимо получить ту же самую версию прошивки, которая в настоящее время установлена на вашем устройстве. Если вы в конечном итоге прошьете boot.img с неправильным номером сборки, это сразу приведет к зацикливанию загрузки или заблокированному устройству. Следовательно, как вы могли заметить, обе эти проблемы возникают из-за прошивки, так или иначе. А что если взять из этой картинки стоковую прошивку? Что ж, как бы странно это ни звучало, такое вполне возможно.
Вместо загрузки файла прошивки мы извлекли бы файл boot.img напрямую из прошивки, которая уже установлена на вашем устройстве. Таким образом, вы можете быть абсолютно уверены, что стандартный файл boot.img имеет ту же версию, что и установленная на вашем устройстве. Итак, теперь, когда вы знаете о преимуществах этого метода, давайте начнем с инструкций по извлечению файла boot.img непосредственно с вашего устройства без загрузки прошивки.
Приведенные ниже инструкции перечислены в отдельных разделах для простоты понимания. Обязательно следуйте в той же последовательности, как указано. Droidwin и его участники не будут нести ответственность в случае термоядерной войны, если ваш будильник не разбудит вас, или если что-то случится с вашим устройством и данными, выполнив следующие шаги.
Установите пакет SDK для Android
Прежде всего, вам нужно будет установить Android SDK Platform Tools на свой компьютер. Это официальный бинарный файл ADB и Fastboot, предоставленный Google, и единственный рекомендуемый. Поэтому загрузите его, а затем распакуйте в любое удобное место на вашем ПК. Это даст вам папку инструментов платформы, которая будет использоваться в этом руководстве.
Включить отладку по USB
Далее вам нужно будет включить отладку по USB на вашем устройстве. Это сделает ваше устройство узнаваемым ПК в режиме ADB. Итак, перейдите в «Настройки»> «О телефоне»> «Семь раз нажмите на номер сборки»> «Вернитесь в «Настройки»> «Система»> «Дополнительно»> «Параметры разработчика»> «Включить отладку по USB и разблокировку OEM».
Установить TWRP рекавери
Для этого процесса вам необходимо установить TWRP Recovery. Если это не так, обратитесь к нашему подробному руководству по установке TWRP Recovery на Android. В руководстве также перечислены инструкции по временной загрузке устройства в TWRP. Вы также можете попробовать это, если хотите установить TWRP для одноразового использования.
Загрузите устройство в TWRP Recovery
- Подключите ваше устройство к ПК через USB-кабель. Убедитесь, что отладка по USB включена.
- Затем перейдите в папку инструментов платформы, введите CMD в адресной строке и нажмите Enter. Это запустит командную строку.
- Введите следующую команду в окне CMD, чтобы загрузить ваше устройство в TWRP Recoveryadb reboot recovery
Извлеките Boot.img через TWRP
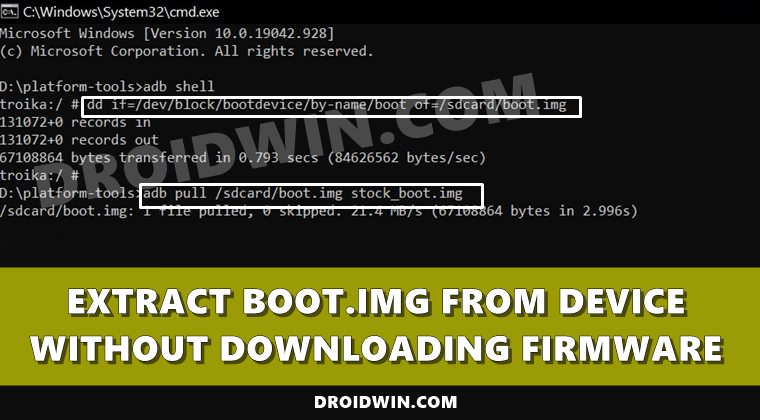
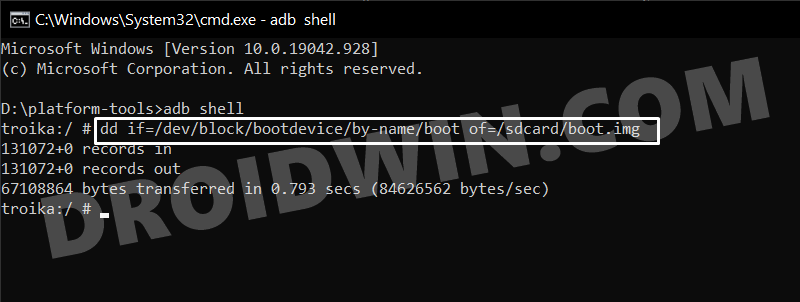
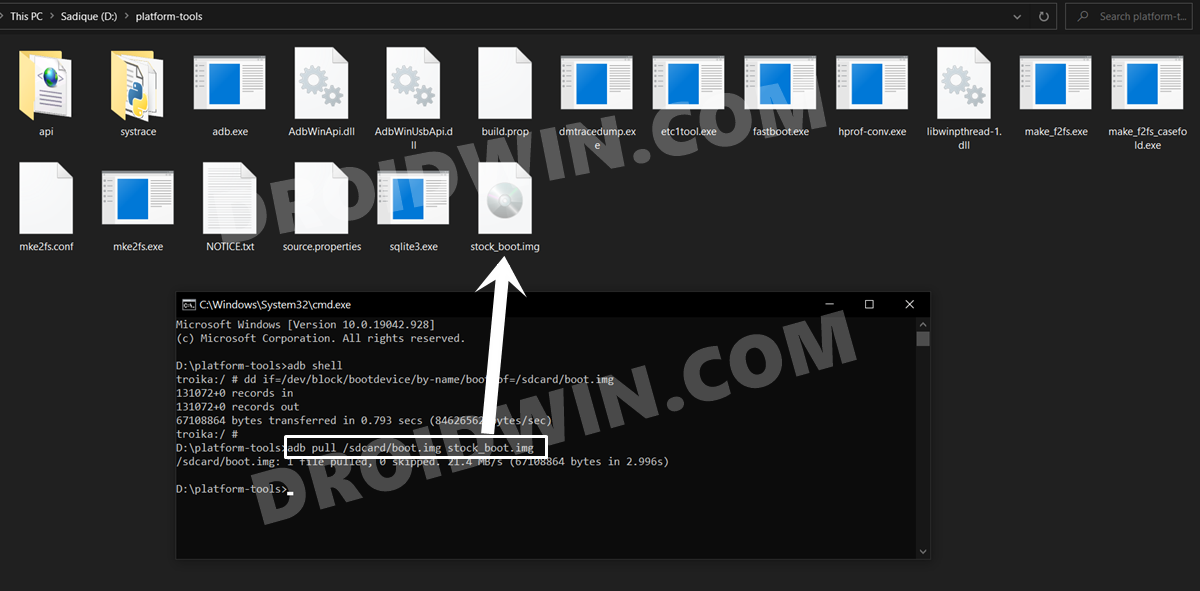
- Когда ваше устройство загружено в TWRP и подключено к ПК, введите приведенную ниже команду в окне CMD, которое открывается в папке инструментов платформы: dd if=/dev/block/bootdevice/by-name/boot of=/sdcard/ boot.img
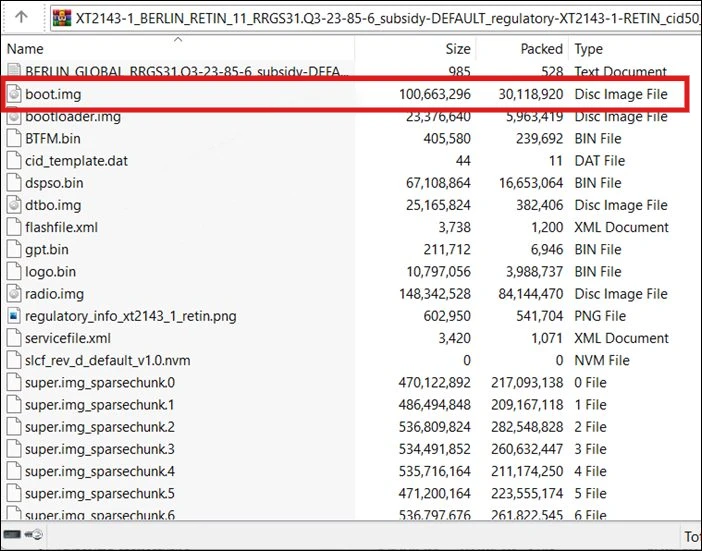
- Как только вы выполните указанную выше команду, ваше устройство извлечет стоковый boot.img из установленной прошивки. Затем он поместит этот файл boot.img во внутреннее хранилище (а не в какую-либо папку).
- Хотя это необязательно, но я настоятельно рекомендую вам также сделать резервную копию этого файла на свой компьютер. Для этого используйте следующую команду: adb pull /sdcard/boot.img stock_boot.img
- Как только вы это сделаете, копия boot.img будет помещена в папку platform-tools. он будет называться stock_boot.img.
- В любом случае, теперь, когда процесс завершен, вы можете перезагрузить устройство в ОС. Для этого перейдите в «Перезагрузить» и выберите «Система».
- Как только ваше устройство загрузится, установите приложение Magisk и исправьте через него этот файл boot.img. Это даст вам файл magisk_patched.img, который вы затем сможете прошить с помощью команд Fastboot и, следовательно, получить root права на свое устройство!
Итак, это все было из этого руководства о том, как вы можете извлечь файл boot.img прямо с вашего устройства, не загружая прошивку. Если у вас есть какие-либо вопросы относительно вышеупомянутых шагов, сообщите нам об этом в комментариях. Мы вернемся к вам с решением в ближайшее время.
Извлеките Boot.img через файл сценария
Если вы не хотите вручную выполнять команды в CMD внутри, о которых мы упоминали выше, то есть альтернативный выход. Член XDA КиошиДев создал файл сценария, который делает то же самое. Вам нужно только запустить файл, а всю остальную работу сделает скрипт.
Если у вас есть какие-либо сомнения относительно этого файла, вы можете получить доступ к его коду на GitHub и проверить его самостоятельно. Или даже отредактируйте пакетный файл с помощью расширенного текстового редактора и повторно проверьте содержимое этого файла (см. изображение выше). Что касается предварительных условий, они точно такие же, как и раньше: инструменты платформы Android SDK, разблокированный загрузчик и восстановление TWRP, установленные на вашем устройстве.
После того, как вы загрузили его, распакуйте его в папку с инструментами платформы, загрузите свое устройство в Fastboot, подключите его к ПК через USB и, наконец, запустите файл сценария.
Вывод: действительно ли нам нужен этот метод?
У этого процесса определенно есть контраргумент. Самым большим из них является тот факт, что, поскольку для этого процесса требуется TWRP, не лучше ли было бы напрямую прошить ZIP-файл Magisk через TWRP вместо выполнения вышеупомянутых шагов? Что ж, это действительно искреннее сомнение.
И нет лучшего способа ответить на этот вопрос, чем поделиться тем же самым примером из реальной жизни. Итак, недавно возникли некоторые проблемы с загрузочным разделом, которые привели к зацикливанию загрузки устройства. Исправление было довольно простым — прошить стандартный файл boot.img. И чтобы заполучить этот файл, мне уже не нужно было качать всю прошивку, скорее пригодился сделанный мной бэкап.
Что ж, это лишь одно из многих преимуществ этого метода, других может быть бесчисленное множество. Поделитесь с нами своим мнением в комментариях о том, что вы думаете об этом руководстве, чтобы извлечь файл boot.img непосредственно с вашего устройства, не загружая прошивку.
If you’re using the Android device with stock firmware and facing some issues with the bootloader or boot loop issues, Or Want to Root with Magisk TWRP Recovery Then this guide will help you. check out this guide completely. Here is the guide on How to Extract the Boot image file easily. Whenever we download any stock firmware for any smartphone, it comes with a zip file extension and we have to flash it. That stock firmware file has a system, vendor, cache, boot image, and so many files to facilitate the device smoothly. And if you want only the boot image file, you need to download the stock ROM first.
After downloading the stock firmware zip file on your computer, you have to extract it and search for the boot image file. But extracting the stock boot. img from an All Android firmware file is no easy task. Moreover, since Some of the Firmwares are encrypted, it isn’t possible to access the files present in it. But there does exist a handy way out to decrypt it and hence access the various partition IMG files. And this guide shall make you aware of just that.
What is Boot Image?
A boot image is a type of system image (for computer or mobile) that contains the system framework and structure of various files. When it’s transferred to a boot device, usually it permits the associated hardware to initiate the boot process.
This usually comprises the OS (operating system), system utilities, diagnostics, boot, and data recovery structures. It also includes stock applications like preloaded Google apps and services and default apps like phones, messages, cameras, etc.
Here in this guide, we will share the steps on it. As some of you may be aware, the steps to extracting the boot image are not the same always. That is because the decrypting process varies with the device model. So we prepared separate guides for each model. So that you can follow the relevant guide for you.
Read More: Extract Boot.img Directly from Device without Downloading Firmware
Extract Boot.img from Non-Decrypted Firmware
We can directly extract the boot.img from firmware in some devices. As there is no encrypt is done. Usually, these models are launched before 2019. So, if your device has non-encrypted firmware you will be able to extract the boot.img directly from the downloaded zip file.
Extract Boot.img from OnePlus OxygensOS Stock ROM
Extracting the stock boot.img from a OnePlus firmware file is not an easy task. Moreover, since Oneplus’s firmware is encrypted, it isn’t possible to access the files present in it. But there does exist a handy way out to decrypt it. Read More: Extract Stock Boot.img from OnePlus OxygensOS Stock ROM
Extract Boot.img from Samsung Galaxy Firmware
Extracting the stock boot.img from a Samsung firmware file is again not the same as the usual extraction. Check out the instructions and you will find an easy way. Read More: How to Extract Boot.img from boot.img.Iz4
Extract Boot.img from HTC RUU Firmware
This is way more different than other extractions. You can read the instructions and try them yourself. As the instructions are detailed and separated into sections, it will be easier for you to understand. Read More: How to Extract Boot.img from HTC RUU Firmware
Extract Sony Boot.sin and get the Stock Boot.img File
Now we are here to extract the stock boot.img from a Sony firmware file. You can learn all the essentials with the detailed steps next. Read More: How to Extract Sony Boot.sin and get the Stock Boot.img File
Extract OZIP Realme Stock ROM (Firmware)
Extracting the stock boot.img from an OZIP firmware file is not simple as extracting from a zip file. You need to decrypt it beforehand. Read More: How to Extract OZIP Realme Stock ROM (Firmware)
Extract Boot.img from LG KDZ or DZ Firmware
Extracting the stock boot.img from an LG firmware file is a bit complex. But, don’t worry. I have provided the link to the complete guide in this article. Read More: How to Extract Boot.img from LG KDZ or DZ Firmware
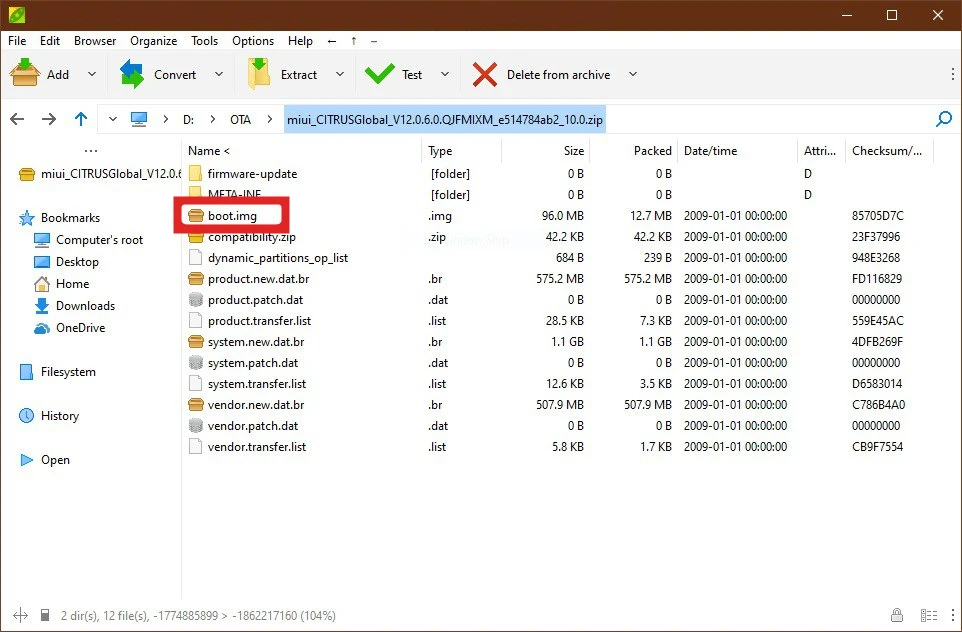
Extract payload.bin and get the stock boot image file
If you got a payload.bin file once you extract the downloaded firmware zip, just follow this guide. As prerequisites, you will be using Payload Dumper Tool and Python. Read More: How to Extract payload.bin and get the stock boot image file
Extract Boot.img Directly from Device without Downloading Firmware
If you cannot find the compatible firmware to your device or lease you have another problem, you can extract the existing firmware’s boot.img file. Just read this guide for detailed instructions. Extract Boot.img Directly from Device without Downloading Firmware

Android gives you the freedom to customise your device the way you want to, whether it be by installing mods, changing the launcher, flashing third-party firmware, or gaining root access to become a superuser. But to seamlessly root an Android phone, you must install Magisk. Magisk may be installed using a number different techniques, such as TWRP recovery. If you choose not to install TWRP Recovery, you must extract boot.img from stock firmware and use Magisk to patch it.
Extracting the Boot.img file is time-consuming and requires some effort. Every smartphone brand has a unique firmware format, and the boot.img location on a firmware might also change. Many OEMs, like as Google and Motorola, enable users to extract boot.img files straight from their firmware. However, manufacturers such as Realme and Oppo keep the Boot.img file within the OZIP file, whereas OnePlus stores the image file within payload.bin.
What is Boot Image?
A boot image is a system image file that is responsible for the device’s booting. During a regular boot, the bootloader loads the first partition image. It generally includes a kernel image, ramdisk, and a few valuable files that must be loaded before the filesystem can be mounted. It will not only allow you to root your device, but it will also allow you to fix issues if your device is stuck in the bootloop or does not boot at all.
Why do we need a boot image?
The stock boot image is required not just for rooting and unrooting, but also for fixing boot loops. The Stock Boot Image file is a required component of the firmware file that contains a set of codes that must be executed on the device every time you switch it on. Therefore, it always comes with the stock firmware file from the manufacturer in a compressed file.
The stock boot image is typically required by users who want to root their phones without TWRP recovery. It must be patched using the Magisk Manager app on your Android smartphone. You may then root your device by flashing the modified boot image file with the Fastboot command.
How to Extract boot.img from Stock Firmware
The majority of smartphone OEMs supply a straightforward compressed firmware file that is simple to extract from your system, but lately OEMs also offer OZIP, bin, img, and other formats. Here, we list every possible way to get boot.img for magisk.
How to get boot.img from Pixel Factory image
- Download the Factory image zip for your Pixel phone.
- Extract the factory image zip file using any file extractor like Winrar.
- Open the extracted folder and you will find one more zip file inside.
- Extract this folder again and you will find the boot.img file.

How to get boot.img on Motorola Phones
- Download the Factory image zip for your Motorola device.
- Extract the factory image zip file using any file extractor like Winrar.
- Inside the extracted folder, you will find the boot.img file.

How to get boot.img from Xiaomi Recovery ROM
- Download the Recovery ROM zip for your Xiaomi device.
- Extract the zip file using any file extractor like Winrar.
- Inside the extracted folder, you will find the boot.img file along with other system files.

How to Extract Boot.img from OnePlus Stock Firmware
Boot.img files on Oneplus OxygenOS firmware is packed inside the playload.bin file. Use the well-known payload dumper tool to extract Boot.img from the OnePlus Firmware.
- Make sure you have Python installed on your PC – Download Python’s latest version
- Download and extract the payload dumper zip file.
- Download the latest OxygenOS firmware and extract it.
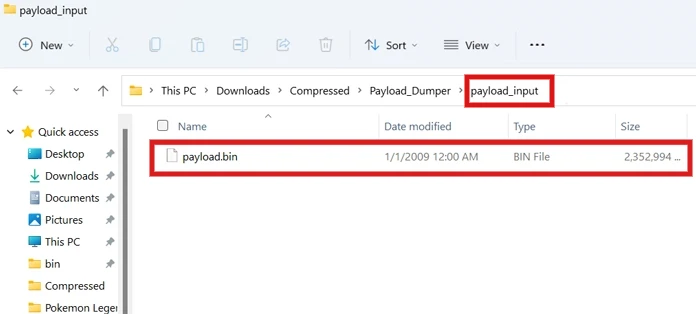
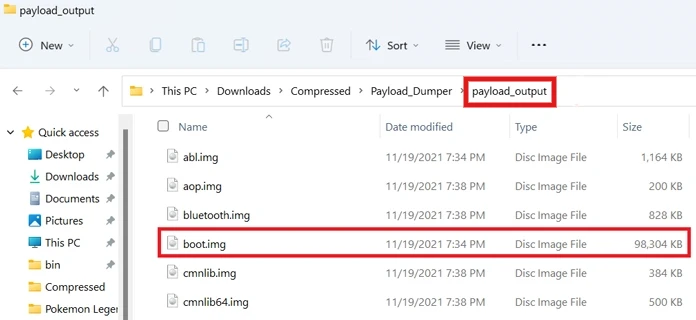
- Open the extracted folder and copy the payload.bin file from the OxygenOS firmware folder to the payload_input folder.

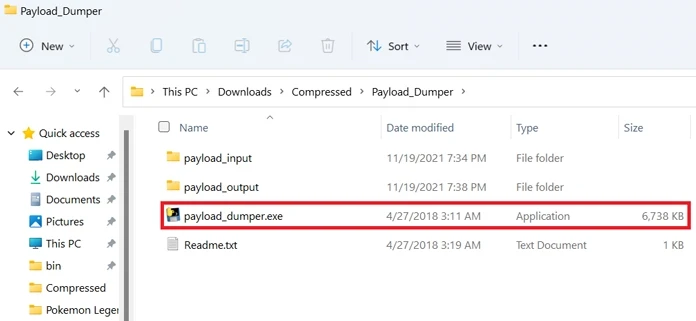
- Now run the payload_dumper.exe to extract the boot.img.

- It will take some time, depending on the size of the package.
- Once the process is complete, the output will be saved in the payload_output folder.
- Open the payload_output folder and you will see the boot.img inside the folder.

How to Extract Boot Image From Realme/Oppo OZIP Firmware
The OZip file contains the Boot.img files for the Realme/Oppo firmware. To obtain the stock boot.img file, vendor patch, etc., you must extract the stock ROM file in OZIP format. See the instructions below to extract the boot.img file from the Realme/Oppo OZIP firmware.
- Make sure you have Python and pip installed on your PC – Download Python latest version
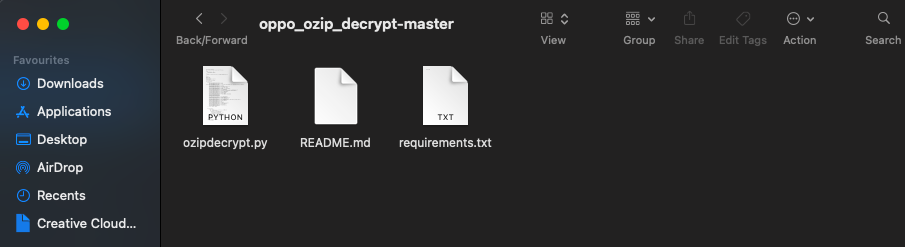
- Download OZip Decrypt Tool and extract it on your PC.

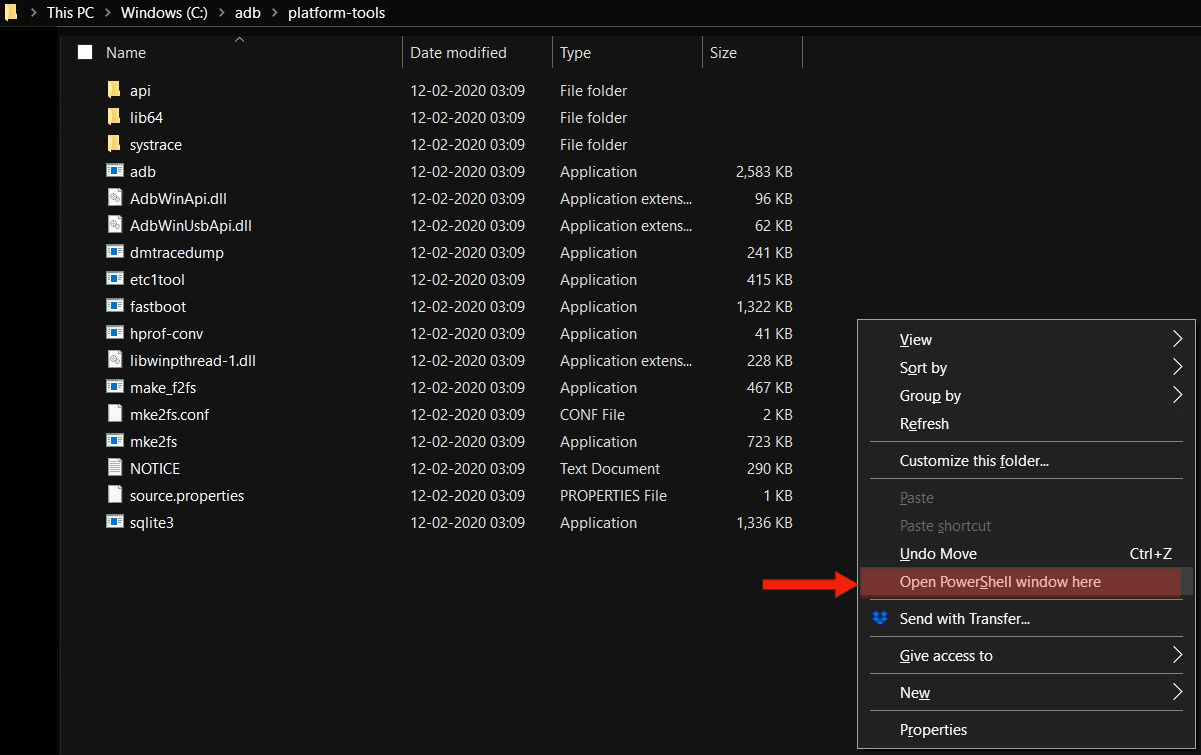
- Press Shift + Right Click on the blank space inside the folder and select the option Open command window here or Open PowerShell window here.

- In the Command Prompt window, enter the following command to install pycryptodome.
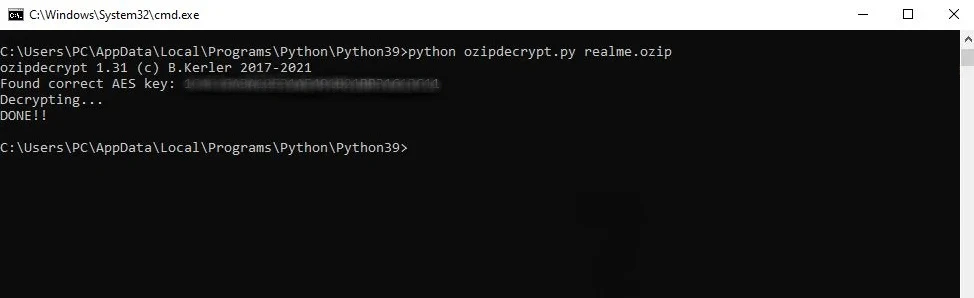
pip3 install -r requirements.txt - Now download the Realme OZIP Stock firmware and copy the .ozip file to the OZip Decrypt Tool folder.
- Execute the below command to extract the Realme OZIP firmware package.
python ozipdecrypt.py file_name.ozip

- Now decryption process start and when completes, you will see the Realme/Oppo stock firmware file in the ZIP format placed inside the same Python folder.
- Once you get the zip file, extract it and you will find the firmware files like boot.img, vendor file, and more.
How to Extract Boot Image From Samsung Firmware
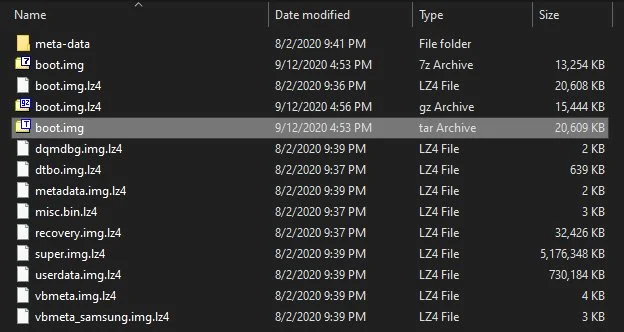
The Boot.img file on Samsung Firmware is packed inside the tar file. To obtain the stock boot.img file, you must extract the Samsung stock ROM file.
- Download Samsung Stock Firmware and extract it on your PC.
- In the extracted folder, you will these AP, BL, CP, CSC, and Home CSC files.
- Extract the AP file (AP_xxxxxxxxxxx.tar.md5) using 7zip.
- Open the extracted folder, you will find boot.img.lz4 inside.

- Now extract the boot.img.lz4 with the 7-Zip ZS tool to get the boot.img file.
- To extract boot.img.lz4 file, just right-click the file and choose extract with 7-Zip ZS.
Although you can grab the boot.img with above steps but this file maybe of no use. Because Samsung use Odin to flash firmware or recover and Odin only accept .md5 format. Even to root your Galaxy device with Magisk, you need to patch “AP_xxx.tar” via Magisk.
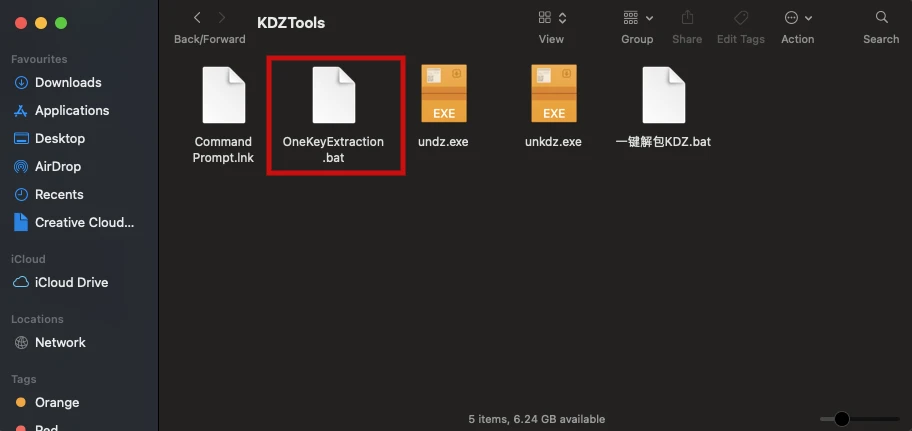
How to Extract Boot Image From LG KDZ or DZ Firmware
The DZ file, which is likewise packaged inside the KDZ file, contains the Boot.img files for the LG Firmware. To obtain the stock boot.img file for your LG smartphone, first extract the KDZ file to obtain the DZ file, and then extract the DZ file.
- Download the KDZ Extractor tool and extract it.
- Copy the Downloaded KDZ into the KDZ Extractor folder.
- Run the OneKeyExtraction.bat file.

- It will start to extract the file for you and you will now find the file with .DZ extension.
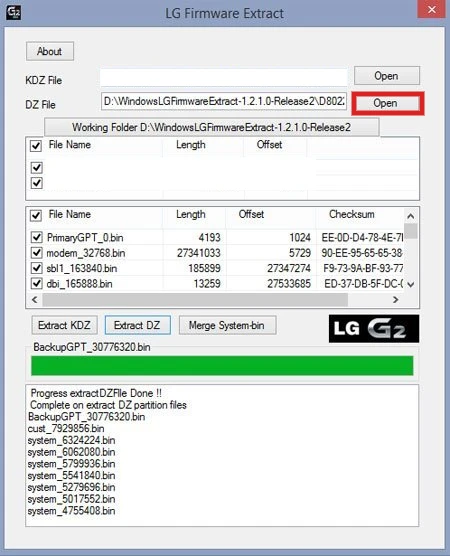
- Now to extract boot.img from DZ firmware, we will use the LG Extractor Tool.
- Download LG Extractor Tool and extract it.
- Run the WindowsLGFirmwareExtracxt.exe file to launch the Tool.

- Click on the Open button next to the DZ file and select the DZ file.
- Click OK, it will show all the files present inside this DZ file.
- Select the boot.img and click on the Extract DZ button.

- You will now get the boot.img file in the LG Firmware Extract Tool folder.

How to get boot.img from Asus Phones
The Boot.img files on the Asus Firmware may either be extracted directly or they are contained inside the payload.bin file. To obtain the stock boot.img file, you must first extract the Asus stock ROM file.
- Download the full firmware.zip for your Asus device.
- Extract the firmware zip file using any file extractor like 7zip or Winrar.
- Inside the extracted folder, you will find the boot.img file.
- In some Asus devices, you can get the payload.bin instead of boot.img.
- To extract payload.bin for the Asus device, you can check the above method (that was shared for the OnePlus device) to extract payload.bin using the Payload Dumper.
How to get the stock boot.img from Sony Stock Firmware
The sin file contains the Boot.img files for Sony Firmware. To obtain the stock Boot.img file for Sony devices, you must extract the Sony Boot.sin file.
- First, download the stock firmware for your Sony phone and extract the zip file, you may find the .sin files inside the folder.
- Download the Sony Dump Tool and extract it on your device.
- Copy the boot.sin file to the Sony Dump Tool folder.
- Create a folder named output inside the Sony Dump Tool folder.
- Now go to the address bar of the Sony Dump Tool folder and type CMD and press Enter to launch the Command Prompt.
- In the Command Prompt window, enter the following command to extract the boot.img from the Sony firmware.
sony-dump output file_name.sin
- Once the process is complete, the output will be saved in the output folder.
- Open the output folder and you will see the boot.img inside the folder.
How to Extract boot.img from Huawei UPDATE.APP file
On Huawei/Honor Firmware, the Boot.img files are included within the update.app file. To obtain the stock Boot.img file for Huawei smartphones, extract the update.app file.
- Download the Full firmware for Huawei/Honor device (FullOTA-MF).
- Extract the firmware file to get the UPDATE.APP file.
- Download the Huawei Update Extractor tool.
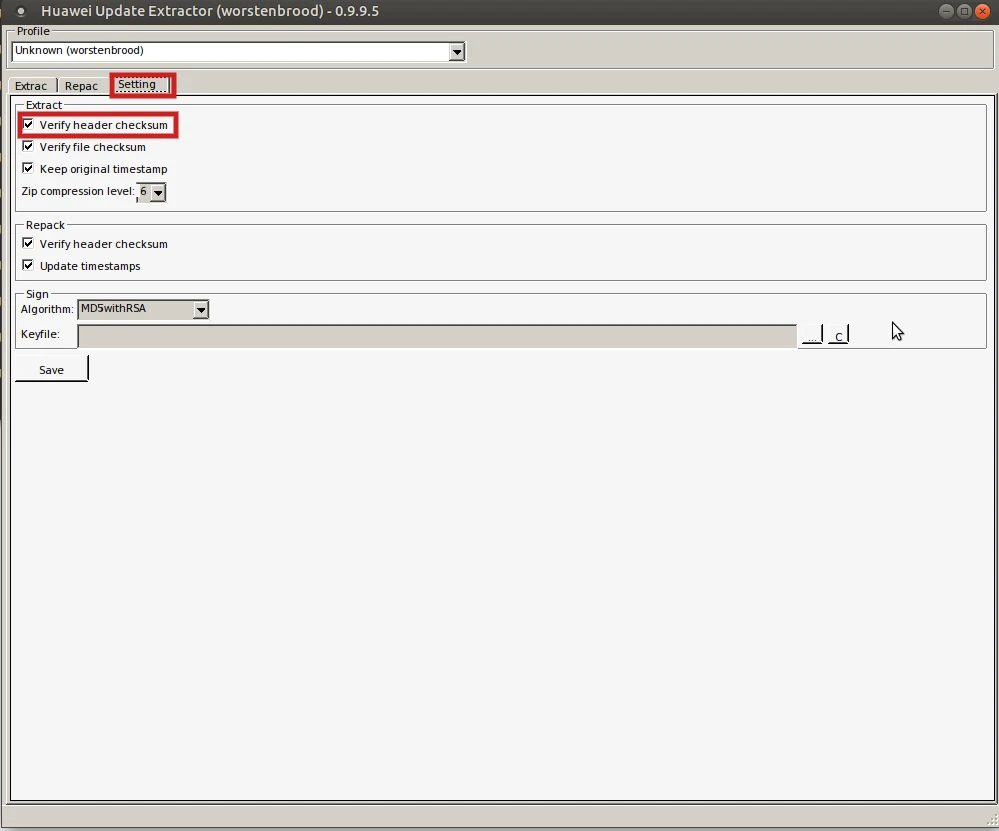
- Extract the zip file, open the folder and run HuaweiUpdateExtractor.exe.
- Go to the Settings tab and uncheck Verify header checksum.

- Now go back to the Extract tab and tap the “…” button and select the UPDATE.APP file.
- You will now see all the files present inside the UPDATE.APP file. Right-click the boot.img file and click on Extract Selected and select the destination of where you want to save the extracted file.


How to Extract Boot.img via TWRP (All devices)
If you are a rooted user, you can easily extract Boot.img directly from device without downloading full firmware. Users who have TWRP installed will not need to download the complete firmware. They may easily obtain the boot.img file from their device’s firmware. This approach is also not device-specific; you can use it on any device that has TWRP installed.
- To use this method make sure you have ADB and Fastboot installed on your PC. (We have already written a detailed guide to set up ADB and fastboot on Windows and Mac).
- Make sure USB Debugging is enabled on your phone.
- Connect your device to the PC via USB cable.
- Now boot your device into the TWRP recovery mode by using the hardware button or by using the below command.
adb reboot recovery
- Type in the following command in the CMD window to extract the boot.img from the firmware installed.
dd if=/dev/block/bootdevice/by-name/boot of=/sdcard/boot.img
- Your device will extract the stock boot.img from the currently installed firmware and save the file in your phone’s internal storage.
Wrapping Up: Extract Stock Boot.img on Android devices
So that’s how to extract stock boot.img file from stock firmware. You may now use this file to root your smartphone. If you run across any problems, please let us know in the comments.
In this guide, we will show you the steps to extract the boot.img file directly from your device, without even the need to download the firmware. In order to extract the full potentiality of their device, the first step calls for unlocking the device’s bootloader. Once you do so, you stand in a position to try out a plethora of mods and tweaks. But most of these customizations require you to get administrative privileges. In other words, your device needs to be rooted via Magisk.
Now there are two different methods through which you could carry out the said task. The first one is by directly flashing the Magisk App via TWRP. Then the second method involves extracting the boot.img file from the stock firmware, patching it via Magisk and flashing it via Fastboot. However, there are two major issues with this method. First off, it requires you to download the entire firmware, which not only exhausts your data but also leads to unnecessary time wastage.
Then the second and more concerning issue is the fact that you need to get hold of the exact same firmware version that is currently installed on your device. If you end up flashing an incorrect build number’s boot.img then it would straightaway lead to a boot looped or bricked device. Hence as you might have noticed, both these issue arises from the firmware, one way or the other. But what if we take the stock firmware out of this picture? Well, as strange as it may sound, this is very much possible.
Rather than downloading the firmware file, we would directly extract the boot.img file from the firmware that is already installed on your device. This way, you could be absolutely sure that the stock boot.img file is of the same version that is currently installed on your device. So now that you are aware of the benefits of this method, let’s start off with the instructions to extract the boot.img file directly from your device without downloading the firmware.
The below instructions are listed under separate sections for ease of understanding. Make sure to follow in the exact same sequence as mentioned. Droidwin and its members wouldn’t be held responsible in case of a thermonuclear war, your alarm doesn’t wake you up, or if anything happens to your device and data by performing the below steps.
Heads Up: This is the best method to get this job done as it will give you the boot.img depending on your current device status. If your device is non-rooted, then it’ll give you a stock boot.img. On the other hand, if your device is rooted, then it will give you the patched boot.img!
Install Android SDK
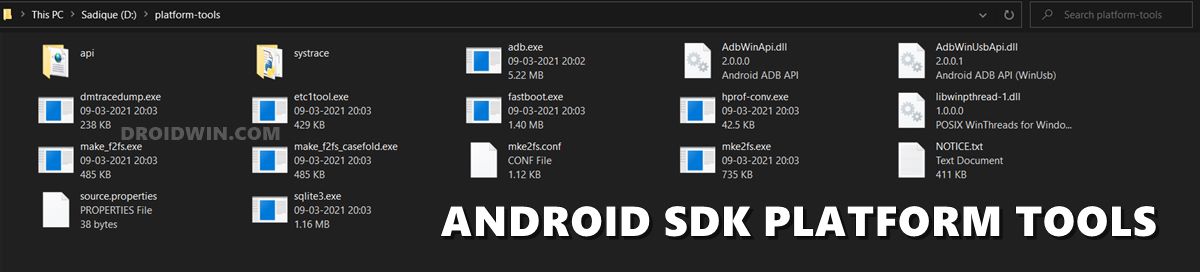
First and foremost, you will have to install the Android SDK Platform Tools on your PC. This is the official ADB and Fastboot binary provided by Google and is the only recommended one. So download it and then extract it to any convenient location on your PC. Doing so will give you the platform tools folder, which will be used throughout this guide.
Enable USB Debugging
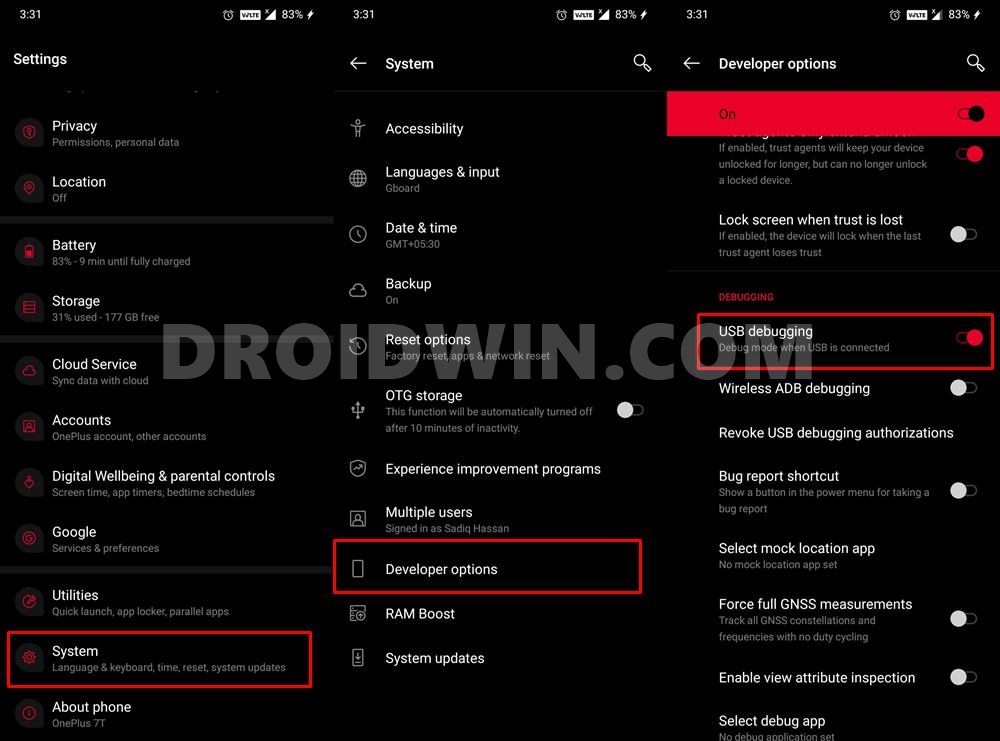
Next up, you will have to enable USB Debugging on your device. It will make your device recognizable by the PC in ADB mode. So head over to Settings > About Phone > Tap on Build Number 7 times > Go back to Settings > System > Advanced > Developer Options > Enable USB Debugging and OEM Unlocking.
Install TWRP Recovery
For this process, you would need to have the TWRP Recovery installed. If that is not the case, then please refer to our comprehensive tutorial on How to Install TWRP Recovery on Android. The guide also lists out the instructions to temporarily boot the device to TWRP. You may try that out as well if you are just looking to install TWRP for one-time usage.
Boot Device to TWRP Recovery
- Connect your device to the PC via USB cable. Make sure USB Debugging is enabled.
- Then head over to the platform-tools folder, type in CMD in the address bar, and hit Enter. This will launch the Command Prompt.

- Type in the following command in the CMD window to boot your device to TWRP Recovery
adb reboot recovery

Extract Boot.img via TWRP
- With your device booted to TWRP and connected to PC, type in the below command in the CMD window that is opened inside the platform-tools folder:
adb shell
dd if=/dev/block/bootdevice/by-name/boot of=/sdcard/boot.img

- As soon as you execute the above command, your device will extract the stock boot.img from the currently installed firmware. It will then place this boot.img file in the Internal Storage (not inside any folder).
- While it is optional, but I highly recommend that you take a backup of this file onto your PC as well. For that, use the following command:
adb pull /sdcard/boot.img stock_boot.img

- As soon as you do so, a copy of boot.img will be placed inside the platform-tools folder. it will be named stock_boot.img.
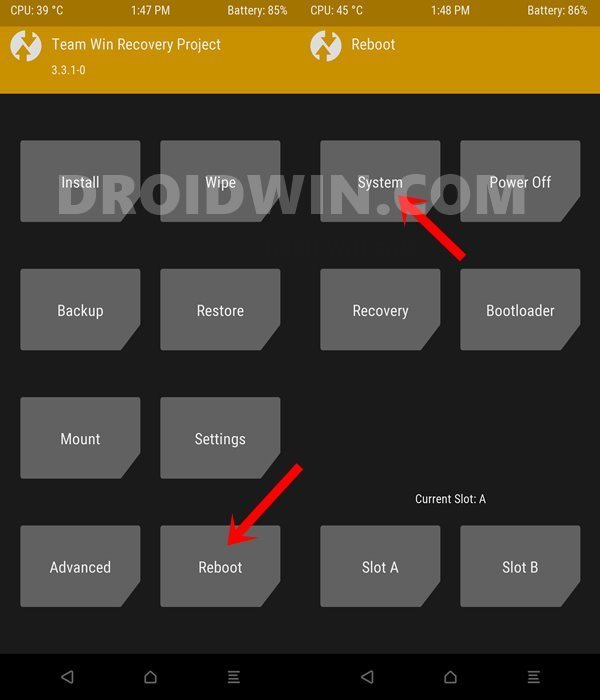
- Anyways, now that the process is complete, you may reboot the device to the OS. For that, go to Reboot and select System.

- Once your device boots up, install the Magisk App and patch this boot.img file via it. Doing so shall give you the magisk_patched.img file, which you could then flash via Fastboot Commands and hence root your device!
So this was all from this guide on how you could extract the boot.img file directly from your device without downloading the firmware. If you have any queries concerning the aforementioned steps, do let us know in the comments. We will get back to you with a solution at the earliest.
Extract Boot.img Directly from Device via Root
You could also extract the boot.img file if your device is rooted via Magisk, however, these methods will only give you the patched boot.img. But having root as a prerequisite might sound as counterintuitive as we are looking for the stock boot.img to root the device in the first place. Well, that’s true up to an extent and hence this method is usually preferred if you have done a factory reset and want to re-root your device, then you could directly use this patched boot.img and quickly obtain root.
Extract Ptched Boot.img via DD Command
- Enable USB Debugging and connect your device to your PC via a USB cable.
- After that, download and extract Android SDK Platform Tools on your PC.
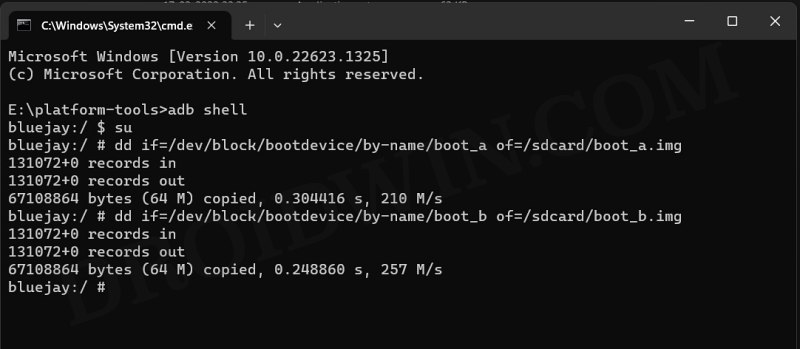
- Now open Command Prompt inside platform tools and type in the below command:
adb shell
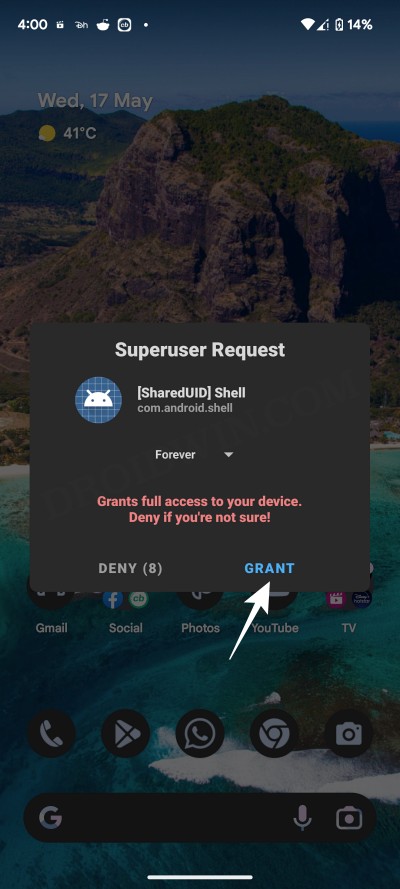
- You might get a prompt on your device, tap OK. Now type in the below command:
su

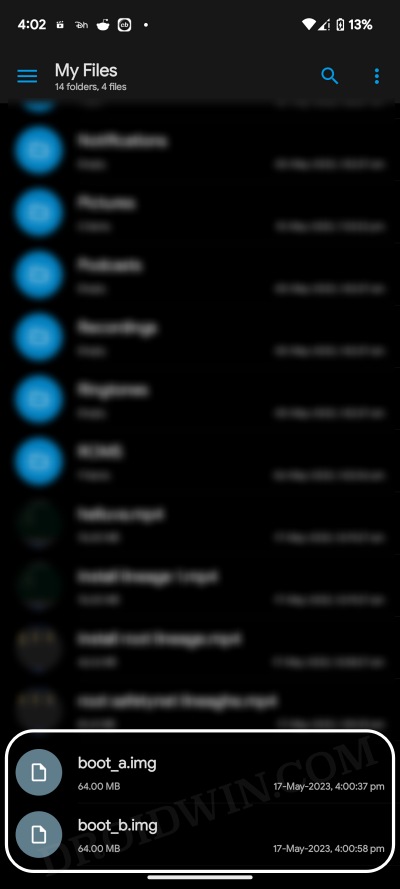
- You’ll get a Magisk prompt, tap OK. Finally, execute the below two commands:
dd if=/dev/block/bootdevice/by-name/boot_a of=/sdcard/boot_a.img
dd if=/dev/block/bootdevice/by-name/boot_b of=/sdcard/boot_b.img

- The boot_a.img and boot_b.img will now be placed in the platform-tools folder.
Extract “Patched” Boot.img via Termux
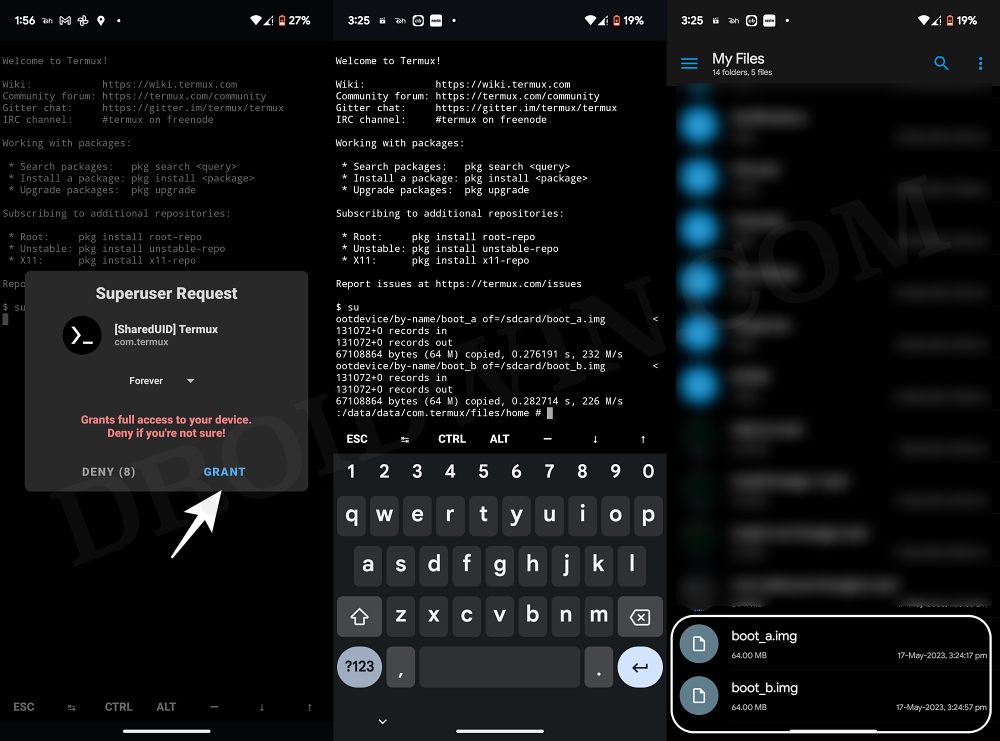
- Download and install Termux from Play Store. Then launch it, type in su, and hit Enter.
- You’ll get a Magisk prompt, tap OK/Grant. Now type in the below two commands:
dd if=/dev/block/bootdevice/by-name/boot_a of=/sdcard/boot_a.img
dd if=/dev/block/bootdevice/by-name/boot_b of=/sdcard/boot_b.img

- The backup of patched boot_a.img and boot_b.img will be created on your device.
- You could now easily access them from Internal Storage and transfer it to the desired location.
Extract Stock Boot.img via Magisk? No please!
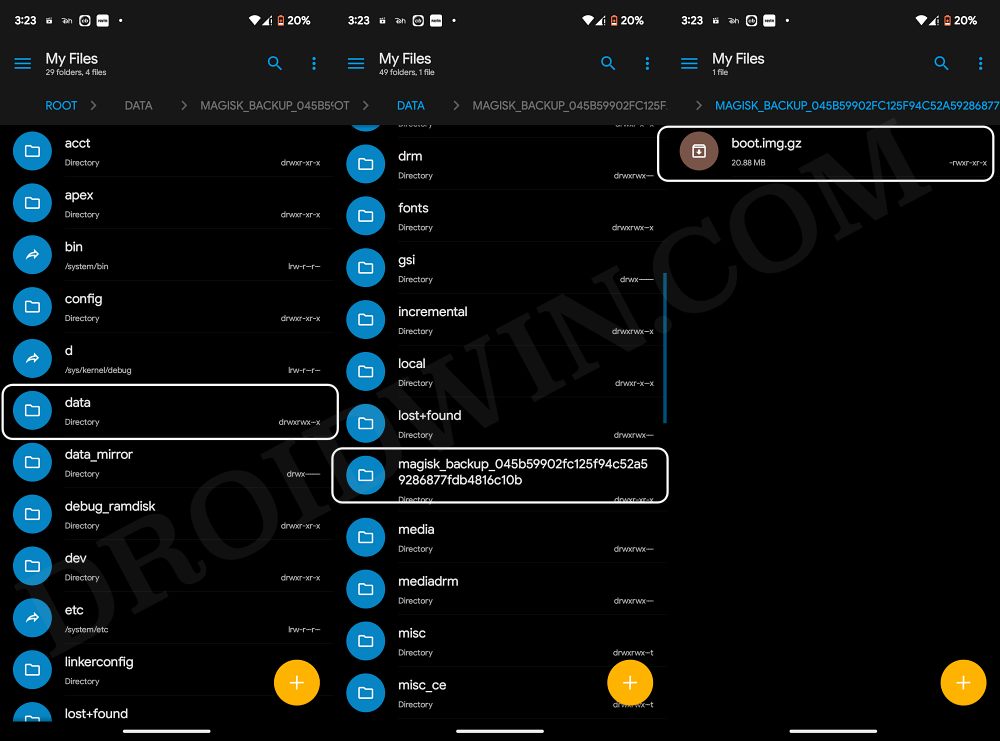
Even though Magisk creates a backup of stock boot.img, but it compresses it in its own format and only it could use this format. So while you could flash its backed-up boot.img.gz, but your device will end up in a bootloop. So it’s best to skip this method.
- Download and install a root-supported File Manager.
- Then launch it, go to the menu, and select Root directory.
- You’ll get a Magisk prompt, tap OK. Then go to /data.
- You should see the magisk_backup_<random> folder.
- Go there and the stock boot.img will be present in that folder.
- You could transfer it to the desired location via the dd command.
Extract Boot.img via DSU Sideloader
How to Extract Boot.img for Root via DSU Sideloader
Extract Boot.img Directly from Device via a Script File
If you don’t wish to manually execute the commands in the CMD inside that we have mentioned above, then there’s an alternate way out. XDA Member KyoshiDev has created a script file that does exactly the same thing. You only need to launch the file and the script will do the rest of the work.
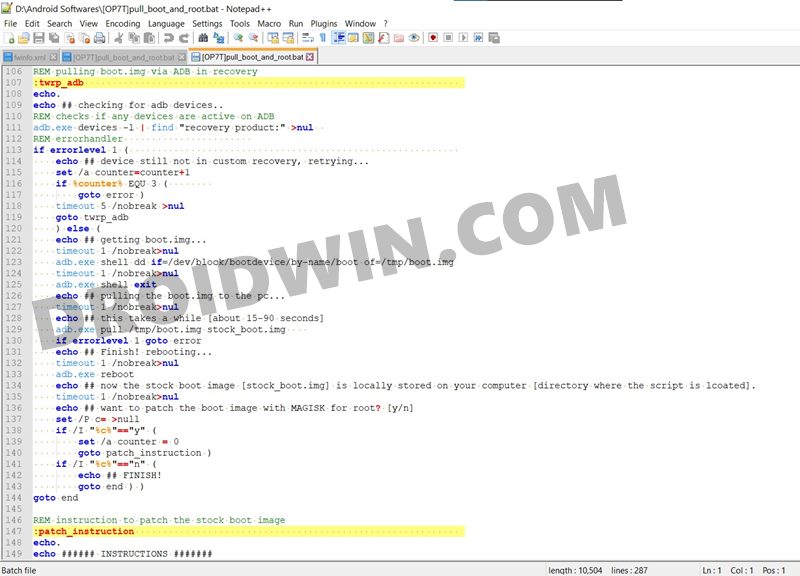
If you have any concerns regarding this file, then you may access its code over at GitHub and verify it yourself. Or even edit the Batch file via an advanced text editor and re-verify the contents of that file (see above image). As far as the prerequisite are concerned, they are exactly the same as before: Android SDK Platform Tools, Unlocked Bootloader, and TWRP Recovery installed on your device.
- Download the Script from GitHub: OP7T-boot-patch-tool
Once you have downloaded it, extract it inside the platform-tools folder, boot your device to Fastboot, connect it to PC via USB, and finally launch the script file.
Conclusion: Do we Really Need this Method?
There is definitely a counter-argument with this process. The biggest of which is the fact that since this process requires TWRP, wouldn’t it be better to directly flash the Magisk ZIP via TWRP instead of carrying out the aforementioned steps? Well, this is indeed a genuine doubt.
And there is no better way to answer this question than by sharing a real-life example of the same. So recently there were some issues with the boot partition which resulted in a boot looped device. The fix was fairly simple- to flash the stock boot.img file. And to get hold of this file, I no longer needed to download the entire firmware, rather the backup that I had made came in useful.
Well, this is just one of the many perks of this method, there could be countless others. Do share your opinions with us in the comments about what you think of this guide to extract the boot.img file directly from your device without downloading the firmware.
About Chief Editor

Sadique Hassan
administrator
A technical geek by birth, he always has a keen interest in the Android platform right since the birth of the HTC Dream. The open-source environment always seems to intrigue him with the plethora of options available at his fingertips. “MBA by profession, blogger by choice!”
Время на прочтение
2 мин
Количество просмотров 28K
Задача
Все началось с того, что я захотел установить на планшет Digma Optima 7.61 игру GTA San Andreas. К сожалению, виртуальная SD-карта планшета имеет объем менее 1 Гб, а кэш игры весит порядка 2-3 Гб. На планшете установлен Android 4.4.2 и возможность просто взять и сменить память по умолчанию в нем отсутствует. Так же в нем отсутствует файл /etc/vold.fstab (он есть на более старых версиях андроида, и изменив данный файл с root-правами, можно поменять местами виртуальную и реальную карты памяти).
Необходимые инструменты
1. Компьютер или ноутбук с ОС Linux.
2. Утилиты adb и fastboot (входят в состав Android SDK, так же, как заметил tmnhy, входят в репозитории как отдельные пакеты).
3. Набор утилит bootimg_tools (нашел здесь).
Решение
1. Извлекаем с устройства загрузочный образ
— Подключаем устройство к компьютеру через usb-кабель и заходим в shell устройства:
adb shell
— Где-то в папке /dev/block на устройстве нужно найти файл с именем boot. У меня он находился по пути /dev/block/by-name/boot, но данный путь может различаться на разных устройствах.
— Извлекаем загрузочный образ:
dd if=/dev/block/path/to/boot of=/mnt/sdcard/boot-from-device.img
— Выходим из shell’а (exit) и извлекаем образ:
adb pull /mnt/sdcard/boot-from-device.img
2. Затем загрузочный образ нужно разобрать
— Скачиваем и распаковываем bootimg_tools.
— Добавляем bootimg_tools в PATH:
export PATH=$PATH:/path/to/bootimg_tools
— Распаковываем образ:
unpack boot-from-device.img
— Если все предыдущие шаги сделаны верно, то должна появиться папка boot-from-device. Внутри нее должны лежать файлы zImage и ramdisk.cpio.gz, а так же папка ramdisk. Как раз внутри последней лежит содержимое загрузочного образа, которое мы будем патчить.
3. Патчим
Для решения своей задачи я нашел строчку, которую нужно заменить, в файле init.sun8i.rc. Я просто заменил export EXTERNAL_STORAGE /mnt/sdcard на export EXTERNAL_STORAGE /mnt/extsd. Как я понимаю, это как раз и есть то значение, которое возвращает метод Environment.getExternalStorageDirectory() в Android API. В пользу этого предположения говорит тот факт, что после применения патча приложения начали использовать аппаратную карту памяти вместо виртуальной для хранения своих данных.
4. Заменяем загрузочный образ на устройстве
Я написал для этих целей небольшой скрипт:
repack_ramdisk boot-from-device/ramdisk
mkbootimg --kernel boot-from-device/zImage --ramdisk boot-from-device/new-ramdisk.cpio.gz --base 0x40000000 --cmdline 'console=ttyS0,115200 rw init=/init loglevel=4' -o new_boot.img
sudo adb reboot-bootloader
sudo fastboot flash boot new_boot.img
sudo fastboot reboot
Итоги
После проделанных манипуляций игра на планшете успешно заработала.
P.S.
Все вышеописанное вы проделываете со своим устройством только на свой страх и риск. За превращение вашего девайса в кирпич автор ответственности не несет.