OBS Studio – это программа для стримеров, но иногда у нее возникают проблемы с подключением к интернету

OBS Studio – отличный выбор, если вы ищете приложение для записи или стриминга вашего экрана. Это бесплатное приложение с открытым исходным кодом имеет множество опций настройки, которые дают вам больше контроля, чем другие подобные приложения
Однако неправильная настройка параметров приложения, устаревшая ОС и брандмауэр Windows – вот несколько причин, по которым OBS Studio выдает ошибку ‘Failed to connect to server’. Если вы столкнулись с такой же проблемой, ознакомьтесь с перечисленными решениями, чтобы быстро ее устранить
Что вызывает ошибку ‘Failed to Connect to Server’ в OBS Studio?
Ошибка ‘Failed to connect to server’ является одной из самых распространенных ошибок, с которыми вы можете столкнуться во время стриминга или записи в OBS studio. Одними из распространенных виновников этой ошибки являются:
- Вы используете неправильную версию программного обеспечения.
- Брандмауэр Windows вмешивается и блокирует важные службы OBS Studio.
- Вы запускаете OBS Studio без административных привилегий.
- Настройки приложения не совместимы с настройками вашей сети.
Определив причины проблемы, перейдем к исправлениям, которые помогли другим пользователям устранить проблему
1. Попробуйте выполнить основные ремонтные работы
Первое, что вы должны сделать для устранения неполадок, это перезапустить OBS Studio. Лучший способ – закрыть все процессы, связанные с OBS Studio, в диспетчере задач. Затем снова запустите OBS Studio и проверьте, продолжается ли проблема
OBS Studio доступна как для 32-, так и для 64-битных компьютеров. Хотя вы можете установить 64-битную версию на 32-битный компьютер, при попытке ее запуска возникнут различные проблемы
Поэтому необходимо проверить версию Windows на вашем компьютере и установить OBS Studio соответствующим образом. Чтобы проверить версию Windows, следуйте приведенным ниже инструкциям:
- Откройте меню Настройки, нажав горячие клавиши Win + I.
- Направляйтесь к системе > О.


В разделе Характеристики устройства проверьте значение рядом с Типом системы
Сообщение об ошибке также может появиться, если вы пытаетесь запустить OBS Studio без прав администратора. Чтобы исправить это, щелкните правой кнопкой мыши исполняемый файл OBS Studio и выберите опцию Запуск от имени администратора
Отсутствие административных привилегий время от времени приводит к различным проблемам. Чтобы избежать этого, необходимо настроить OBS Studio так, чтобы она всегда запускалась от имени администратора. Вот как это сделать:
- Щелкните правой кнопкой мыши на исполняемом файле OBS Studio и выберите Свойства.
- Перейдите на вкладку Совместимость и отметьте опцию Запускать эту программу от имени администратора.
- Нажмите кнопку Применить > OK, чтобы сохранить изменения.
Вот и все. Запустите OBS Studio и проверьте, сохраняется ли проблема
Если на вашем компьютере также запущена одна из лучших альтернатив OBS Studio, это может привести к конфликту программного обеспечения. Чтобы этого не произошло, закройте все эти приложения и их фоновые процессы. Вы также можете удалить их, если используете их редко
2. Измените параметр ‘Привязка к IP’
Ошибка ‘Failed to connect to server’, скорее всего, появится, если опция Bind to IP неправильно настроена в OBS Studio. Чтобы исправить это, вам нужно изменить эту опцию на имя сетевого подключения с IP-адресом. Вот как это сделать:
- Запустите OBS Studio и выберите Settings в разделе Controls.
- Выберите опцию Advanced в левой панели.
- Нажмите на раскрывающийся значок рядом с опцией Привязка к IP. Он будет находиться в разделе ‘Сеть’.
- По умолчанию этот параметр установлен в значение По умолчанию. Вам нужно выбрать вариант, который показывает имя вашего подключения вместе с IP-адресом.
- Установите флажок Динамически изменять битрейт для управления перегрузкой.
- Нажмите Применить > OK, чтобы сохранить изменения.

Перезапустите OBS Studio и проверьте наличие проблемы
3. Переключитесь на другой сервер потоков
Ошибка может появиться, если ваш текущий потоковый сервер перегружен. Решением в этом случае является переключение на другой сервер потоковой передачи. Это можно сделать, выполнив следующие действия:
- Откройте Настройки в OBS Studio.
- Выберите опцию Stream в левой панели.
- Щелкните на раскрывающемся значке рядом с Server и выберите другой сервер в появившемся меню.
- Нажмите кнопку Применить > OK.

Файлы OBS Studio могут быть повреждены по разным причинам, что может вызвать проблемы, подобные этой. В этой ситуации вы можете выполнить проверку целостности, чтобы просканировать вашу установку OBS на наличие повреждений и заново загрузить поврежденные и отсутствующие файлы
- Откройте OBS Studio и нажмите на опцию Help в верхней части.
- В появившемся меню выберите опцию Проверить целостность файла.
- Нажмите Да, чтобы подтвердить свой выбор, а затем снова нажмите Да в появившемся UAC.

Дождитесь завершения процесса. После этого перезапустите OBS Studio и проверьте, продолжается ли проблема
5. Обновите OBS Studio
Вы также можете попробовать обновить OBS Studio, чтобы исправить ошибку. Для этого запустите OBS Studio, нажмите Help, а затем выберите Check for updates. Если обновления доступны, они будут загружены автоматически
6. Разрешите OBS Studio через брандмауэр Windows
Если OBS Studio заблокирована в настройках брандмауэра Windows, вы, скорее всего, увидите ошибку ‘Не удалось подключиться к серверу’. В качестве решения вам придется разрешить OBS Studio в настройках брандмауэра Windows. Вот как это сделать:
- Запустите меню Пуск; введите Разрешить приложение через брандмауэр Windows и нажмите Enter.
- Нажмите кнопку Изменить настройки.
- В разделе Разрешенные приложения и функции прокрутите вниз и найдите OBS Studio.
- Установите флажки в полях Private и Public.
- Нажмите OK.
Вот и все. Чтобы изменения вступили в силу, необходимо перезагрузить компьютер (см. различные способы перезагрузки компьютера Windows)
7. Измените размер MTU
Если вы все еще сталкиваетесь с проблемой, вы можете попробовать уменьшить размер MTU (Maximum Transmission Unit). Это можно сделать, следуя приведенным ниже инструкциям:
- Откройте PowerShell от имени администратора, нажав Win + S, набрав ‘PowerShell’, затем щелкнув правой кнопкой мыши по результату поиска и выбрав Запуск от имени администратора.
- Введите следующую команду и нажмите Enter:
netsh int ipv4 show subinterface - Обратите внимание на имя вашего соединения в столбце интерфейса.
- Введите следующую команду и нажмите Enter.
netsh inteface ipv4 set subinterface <Your connection name> mtu=1400 store=persistent

Теперь размер MTU изменен. Запустите OBS Studio и проверьте наличие проблемы снова
Ошибка OBS Studio ‘Failed to Connect to Server’ исправлена
OBS Studio – это первый выбор каждого для потокового онлайн вещания, и на это есть веские причины. Но иногда неправильные настройки приложения могут вызвать различные проблемы, включая ошибку ‘Failed to connect to server’. К счастью, вы можете быстро устранить эту ошибку, следуя приведенным выше инструкциям
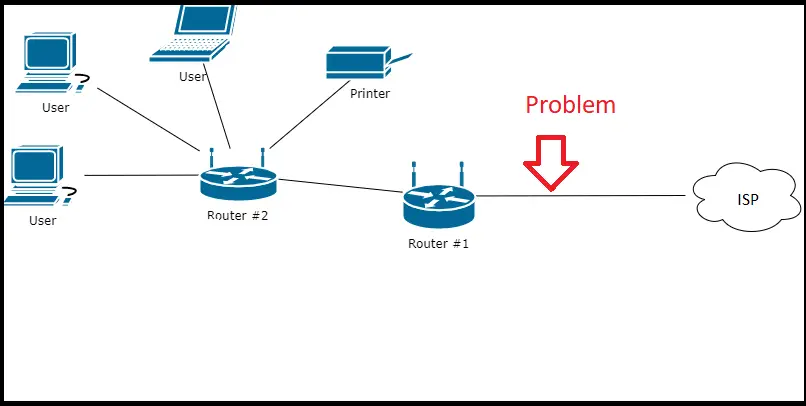
Before we get into the solution to the «Cannot connect to server» problem. Let’s look at some of the underlying causes of this scenario.
To begin, you must understand that when you use the internet, you are a part of a Client and Server Network. You, as a client, request the resource, and the server responds with the requested result.
Let’s say you want to open a web app or a website. This request is routed to the backend web server via a router and an ISP, and the server responds with all of the content you requested.
When there is a connectivity issue between the client and the server, you may receive an error message such as «Cannot connect to Server.»Actually, this appears to be a generic error message, and there could be many causes of the problem which makes troubleshooting difficult because you may need to know your computer, network card, local network, router, ISP, and the entire internet, status code, web server issue, client to server connections, server software, firewall, and many more. There is no such thing as a one-to-one problem and a solution to a problem. You must have a strong technical background in order to identify and solve the problem.
This error is similar to the generic error: Unable to Start Laptop. There could be several reasons for this, and determining the root cause of the problem can be difficult, necessitating the assistance of an IT expert. The same thing happens when the error message «Cannot connect to server» is displayed. We don’t know what’s causing the problem here. So let’s take a look at the various causes of them which might help you to solve the problem.
Table of Contents
- 1 Client Firewall Blocking
- 2 Malware and Virus in your Computer and Server
- 3 Antivirus programs, anti-spyware programs
- 4 Router Firewall Blocking
- 5 Check third-party firewall
- 6Connection Problems between Your Router and ISP
- 7 Client Cache
- 8 Server Configuration and Fault // Main Cause of the Problem
- 9 High Load to Server
- 10 DNS servers misconfigured
- 11 Software Issue
- 12 Games File Issue
- 13 Incorrect Database and Website/Software Login Credential
This issue applies to any website, app, game, mobile (android, ios), or browser (safari, chrome, etc)So, let’s look at the hit and trial method of the cause and solutions to it.
1 Client Firewall Blocking
Your computer firewall may prevent you from accessing a specific website in order to get the required results, and you may receive the error message «Cannot Connect to Server.»
Solution 1: You can try disabling all firewalls at once and attempting to access the same website. You might be able to access the site if you’re lucky.
Here are steps for disabling the firewall in Windows OS
- Goto Run and type: firewall.cpl
- Click on Turn Windows Defender Firewall On or Off

-
Check the following two radio buttons:
Under Private network settings: Turn off Windows Defender Firewall (not recommended)Under Public network settings: Turn off Windows Defender Firewall( not recommended)

- Next, try connecting to the website.

Note: You have to turn on your defender firewall to protect your computer.
Solution 2: You can try another website, and if you are able to access another site, it is possible that the web server, routers, or ISP is blocking that particular site.
2 Malware and Virus in your Computer and Server
Sometimes malware and Virus may block to access the website.
Solution: You can try performing scanning on your computer against viruses and malware.
3 Antivirus programs, anti-spyware programs
Sometimes antivirus programs and anti-spyware programs might be blocking connections to the Internet.
Solution: Simply try disabling antivirus programs and anti-spyware programs and try again.
4 Router Firewall Blocking
It’s possible that your modem or router has its own firewall. They may prevent access to the remote web server.
5 Check third-party firewall
If you are running any third-party firewall applications such as Anti NetCut3, Tinywall, ZoneAlarm Free Firewall 2017, PeerBlock or any other, then simply check the settings on those applications as well and make sure Games and Application is allowed through those programs, or disable the firewall program and check again to see if the issue with connectivity has been resolved.
6Connection Problems between Your Router and ISP
There could be a problem with connectivity between your router and ISP. You send the request, it reaches the router, and the router sends it, but your ISP blocks it, or something similar happens.
From your side, just restart your router. To restart your router, all you need to do is disconnect it from power for 30 seconds. After that, reconnect it to its power source and wait one minute for it to finish starting up. This resolves a significant number of connectivity problems.
Also, you can seek help from ISP for identifying the problem.
Also, you can try connecting to another network(if available).
7 Client Cache
The cache cannot be the source of these problems, but clearing the browser cache and cookies can sometimes resolve the issue.
In google chrome, you can apply the following steps to clear caches and cookies.
1 Launch Chrome on your computer.
2 Click 3 horizontal dots in the upper right corner.
3 Click More tools, followed by Clear browsing data.
4 Select All time if you want to delete everything.
5 Check the boxes next to «Cookies and other site data» and «Cached images and files.«
6 Click the Clear data button.
7 Now it’s better to restart your browser.
8 Server Configuration and Fault // Main Cause of the Problem
The server configuration is the root cause of these errors. Server A firewall may be preventing access to the website.There could be a disk failure, a RAM failure, a software problem, and so on in the server.
You might have server errors like:
- Internal Server Error 500
- Not Implemented 501
- Bad Gateway 502
- Gateway Timeout 503
- HTTP Version Not Supported 504
- Variant Also Negotiates 505
- Insufficient Storage 507
- Loop Detected 508
- Not Extended 509
- Network Authentication Required 511
These are general issues, and if a client starts receiving these errors, they may become frustrated, so you simply receive Internal Server Error or an «Unable to connect to server» error.

9 High Load to Server
When there is a high load on the server due to too many requests then you might get an «Unable to connect to server» generic error.
Solution: You cannot do anything. Simply try connecting to the server later.
10 Ports and Socket Blocking
It is possible that the port used for the server connection has been banned by the administrator of your network or by the internet service provider (ISP).
Solution: Contact the administrator or ISP about the problem.
11 Invalid Credentials
When the server prompts you to provide your login credentials, it is possible that you are using an incorrect set of credentials (username and password or token)
Solution: Enter credentials correctly.
12 Network Congestion
There is a possibility that the network you are using is overloaded, making it challenging for you to establish a connection with the serve
13 DNS servers misconfigured
Sometimes misconfigured DNS server can cause the problem.
The solution you can try is: Set up the right DNS server.
You can get Preferred DNS Server, to the number 8.8.4.4 and the Alternative DNS server to 8.8.8.8. These are Google Public DNS IP Addresses.
DNS stands for domain name system, and it is used to load web pages on the internet. When dealing with bad DNS, Google DNS returns accurate results. It also appears to be faster than the default DNS, which speeds up browsing. Google Public DNS is fast, dependable, and performs well.
14 Software Issue
Some software may have an issue with it, and when it requests a resource from the server, due to a software error, it simply displays «Unable to connect to server » with no reason or explanation.
It’s possible that the software you’re using to connect to the server is either out of date or not compatible with the server itself.
Solution: If you are using popular software then it will get fixed soon in the next update.
If you are using WordPress and get «Unable to connect to server» without any reason then try reinstalling WordPress Core. Also, check Your Plugins and Themes in WordPress which might cause this problem.
In the case of games and software that required a login, simply log out and log back in, this might fix the issue.
15 Games File Issue
Some of the game’s files may be corrupted and you may get unable to connect to the server issue because you are not able to connect to the server due to a file issue.
Solution: Try repairing the files and if possible try to download error games dependent files from the game’s official site.
16 Incorrect Database and Website/Software Login Credential
If your website provides a login page and you have to enter login credentials and when you mistyped username and login then you might get the «Username and password» incorrect or a generic error like «Cannot connect to server»
If you are using a database and you have used an incorrect userId and password then you might get a Cannot connect to a server error.
Solution: Try providing current credentials to log in.
FAQ:
Lost Ark Games Could Not Connect To Game error
Ans: If possible apply above mention fixes, if it does not then you can try the below ways to fix it.
- Reboot your steaming and the game.
- Repair Lost Ark Steam game files
Reboot your steaming and the game. Repair Lost Ark Steam game files Check the following radio button: Under Private network settings: #1 Turn off Windows Defender Firewall (not recommended) Under Public network settings: #2 Turn off Windows Defender Firewall( not recommended)
Обновлено 26.12.2022
![]()
Добрый день! Уважаемые читатели и гости IT блога Pyatilistnik.org. В минувший раз я вам подробно описал, как я смог сохранить свои данные на IPad при неудачной попытке обновить его и ошибках 4013, 2009 и 5. Сегодня я хочу вам показать интересную ошибку которую вы можете встретить на NLB участнике при попытке обратиться к его партнеру, ошибка звучит так «Access denied. Error connecting to server». Давайте смотреть в чем дело и как поправить.
Описание ошибки доступа на NLB
И так у меня есть кластер NLB на базе Windows Server 2016. Мне потребовалось провести обслуживание данных хостов, я по очереди перевел их в состояние «Suspend» и перезагрузил. После перезагрузки первого он получил статус «Enable» и вступил в работу, далее я провел то же самое и со вторым участником. Зайдя на первой ноде NLB кластера в оснастку «Network Load Balancing Cluster» я обнаружил ошибку:
Access denied. Error connecting to «FQDN имя сервера» при загрузке информации о конфигурации с 2 хоста
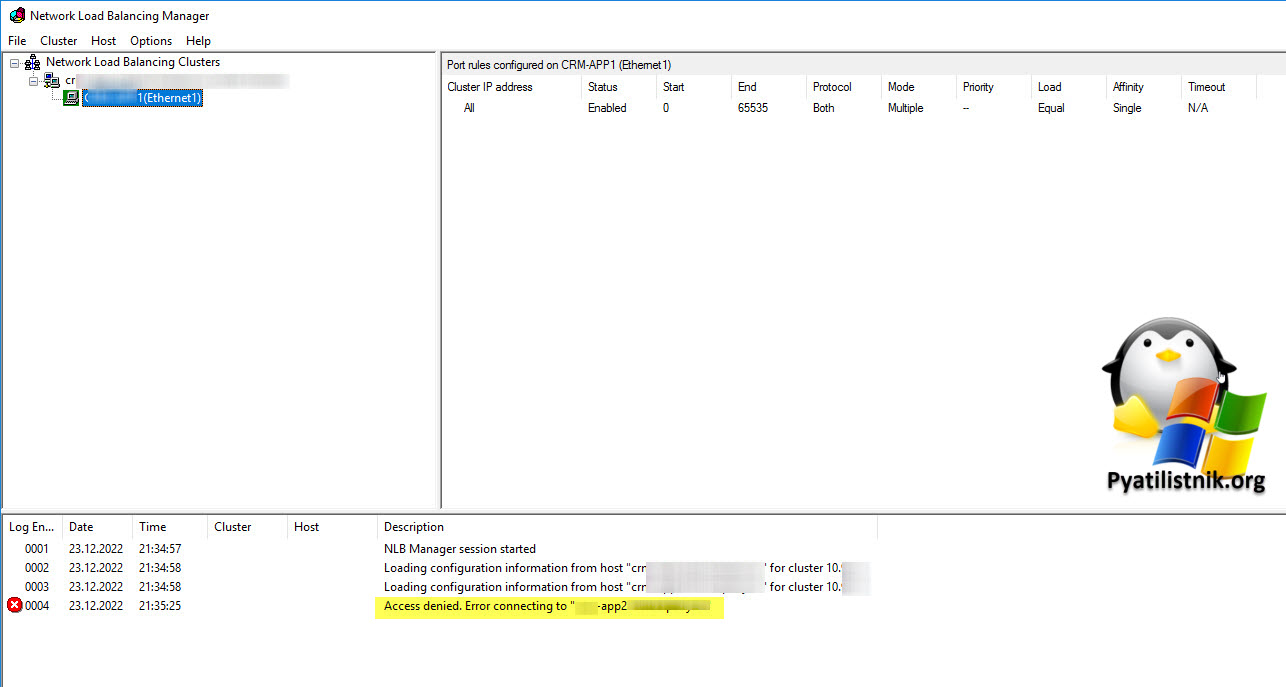
Сразу хочу отметить, что я запускал оснастку Network Load Balancing Cluster от имени доменной учетной записи администратора домена, у которого есть все права на оба сервера NLB
Если локально на данном сервере запустить оболочку PowerShell в режиме администратора и выполнить команду:
То у меня выскочила ошибка:
Get-NlbClusterNode : Access is denied. (Exception from HRESULT: 0x80070005 (E_ACCESSDENIED))
At line:1 char:1
+ Get-NlbClusterNode
+ ~~~~~~~~~~~~~~~~~~
+ CategoryInfo : PermissionDenied: (Microsoft.Netwo…tNlbClusterNode:GetNlbClusterNode) [Get-NlbClusterN
ode], UnauthorizedAccessException
+ FullyQualifiedErrorId : Access denied.,Microsoft.NetworkLoadBalancingClusters.PowerShell.GetNlbClusterNode

Как устранить ошибку Access denied на NLB
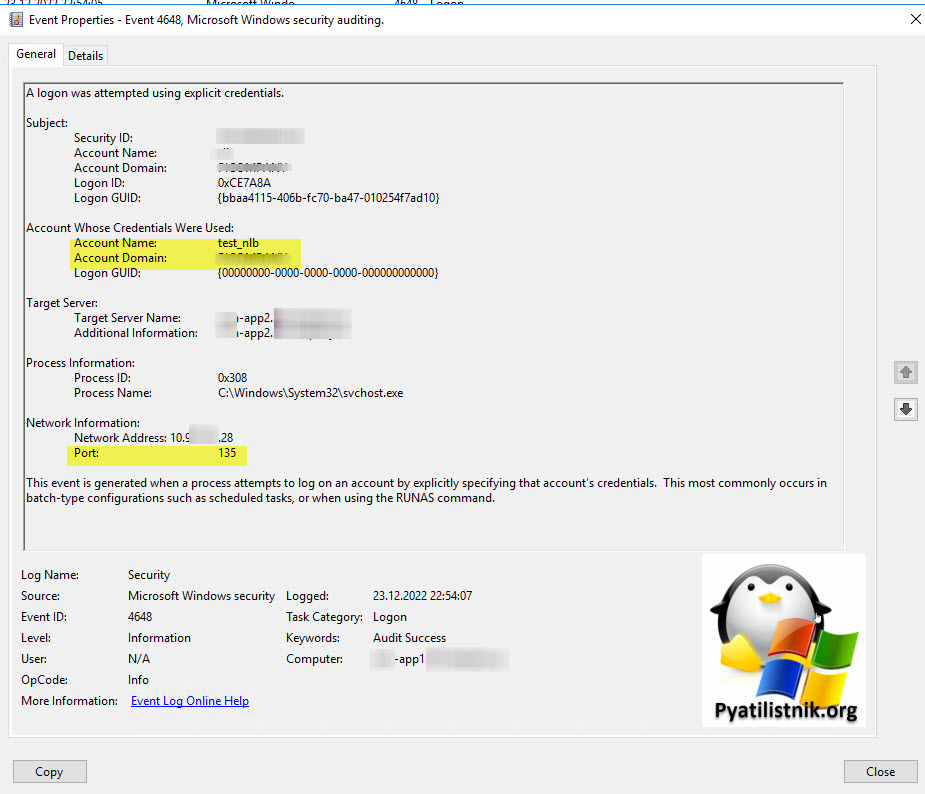
- 1️⃣Первое, что вы должны сделать, это посмотреть журналы безопасности на обоих нодах NLB. На сервере, где я получал ошибку доступа, я в журнале безопасности (security) нашел событие ID4648:
A logon was attempted using explicit credentials.
Subject:
Security ID: PYATILISTNIKsema
Account Name: sema
Account Domain: PYATILISTNIK
Logon ID: 0xCE7A8A
Logon GUID: {bbaa4115-406b-fc70-ba47-010254f7ad10}
Account Whose Credentials Were Used:
Account Name: test_nlb
Account Domain: PYATILISTNIK
Logon GUID: {00000000-0000-0000-0000-000000000000}
Target Server:
Target Server Name: app2.PYATILISTNIK.org
Additional Information: app2.PYATILISTNIK.org
Process Information:
Process ID: 0x308
Process Name: C:WindowsSystem32svchost.exe
Network Information:
Network Address: 10.xx.xxx.28
Port: 135
This event is generated when a process attempts to log on an account by explicitly specifying that account’s credentials. This most commonly occurs in batch-type configurations such as scheduled tasks, or when using the RUNAS command.
В событии я вижу, что была предпринята попытка входа с текущего сервера на удаленный сервер NLB по протоколу epmap по 135 порту, который обязательно должен быть открыт. Проверить порт можно по инструкции.
Еще очень важное поле, это используемые учетные данные, у меня тут откуда-то используется непонятная учетная запись test_nlb, которой уже даже в домене я не нашел. ЭТО уже есть понимание, что я оказывается делаю попытку подключения не от учетной записи администратора домена, а из под некой тестовой.
Перейдем на сервер, к которому не удается получить доступ и посмотрим логи журнала безопасности там, единственное сделайте фильтр по «audit failure«
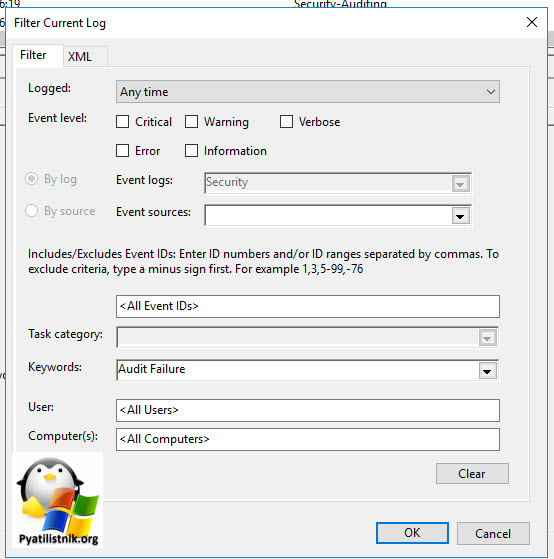
В результате чего я отфильтровал события, среди которых я обнаружил ID 4625:
An account failed to log on.
Subject:
Security ID: NULL SID
Account Name: —
Account Domain: —
Logon ID: 0x0
Logon Type: 3
Account For Which Logon Failed:
Security ID: NULL SID
Account Name: test_nlb
Account Domain: PYATILISTNIK
Failure Information:
Failure Reason: Unknown user name or bad password.
Status: 0xC000006D
Sub Status: 0xC0000064
Detailed Authentication Information:
Logon Process: NtLmSsp
Authentication Package: NTLM
Transited Services: —
Package Name (NTLM only): —
Key Length: 0
Из полезного тут:
- Logon Type: 3 — Тип входа сетевой (Пользователь или компьютер вошли в систему на данном компьютере через сеть.)
- Account Name: test_nlb — Учетная запись от которой была попытка входа
- Status: 0xC000006D — Статус, что не так (Причиной является неправильное имя пользователя или сведения о проверке подлинности.) Учетку я не нашел в домене, вот и причина.
- Authentication Package: NTLM
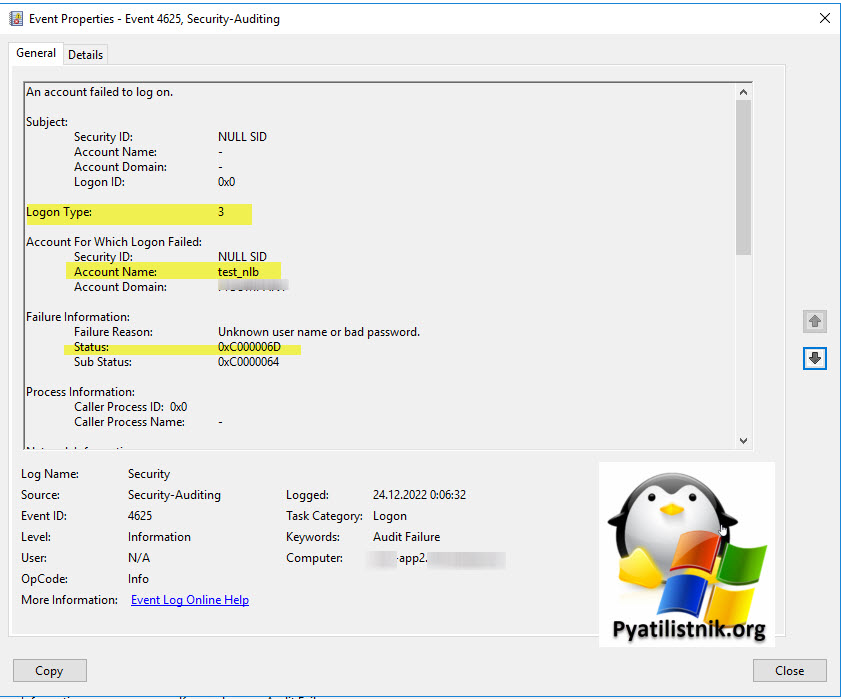
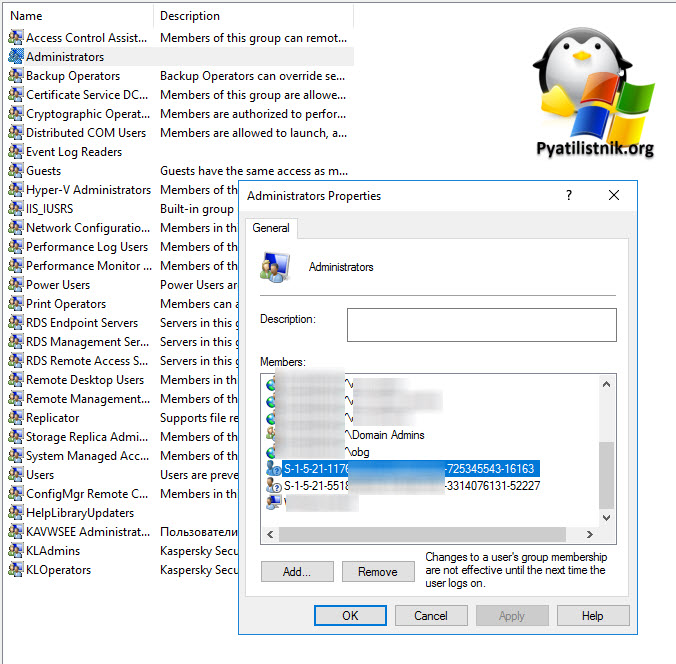
Еще зайдя в группу локальных администраторов, я обнаружил две учетные записи в виде SID, что говорит нам, о том, что их уже нет в Active Directory или текущий сервер их не может прочитать.
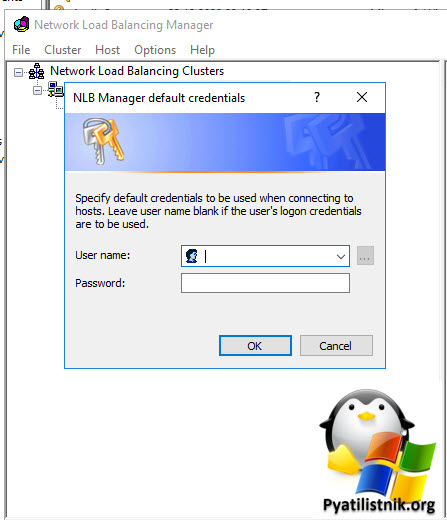
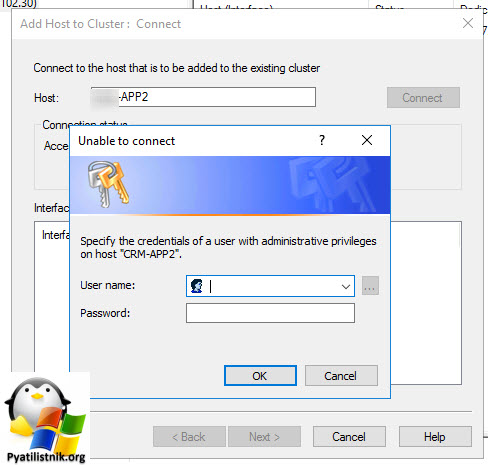
- 2️⃣Найдя виновника, вам нужно указать актуальные данные для доступа к другому участнику NLB, это должна быть учетная запись обладающая административными правами на всех участниках NLB кластера. Запустите оснастку «Network Load Balancing Cluster» и найдите меню «Options — Credentials«.
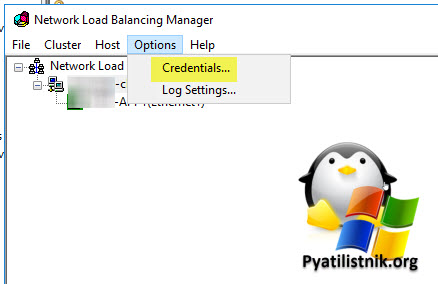
Указываем тут учетную запись имеющую доступ.
С высокой долей вероятности вам придется перезагрузить данную ноду NLB
Независимо от инструмента, который вы будете использовать для управления кластером, вам необходимо запускать его в контексте безопасности учетной записи с правами администратора на каждый узел кластера. Это можно сделать, войдя в систему с этой учетной записью, запустив утилиту вторичного входа в систему (RunAs) или, в случае диспетчера NLB, установив учетные данные по умолчанию (из пункта меню «Параметры — Учетные данные»). NLB Manager попытается подключиться к удаленным узлам, используя эти учетные данные.
Так же вы можете добавить нужный хост через контекстное меню, выбрав пункт «Add Host to Cluster«
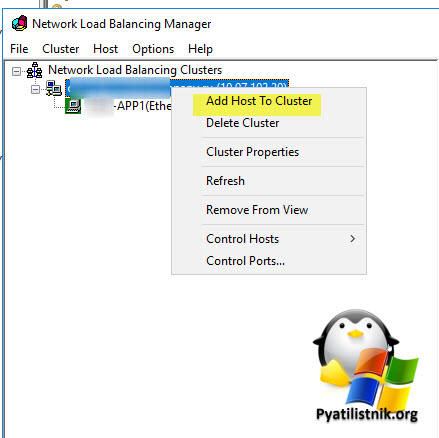
После чего укажите его DNS-имя и попытайтесь подключиться, у вас будет так же запрошены учетные данные для этого.
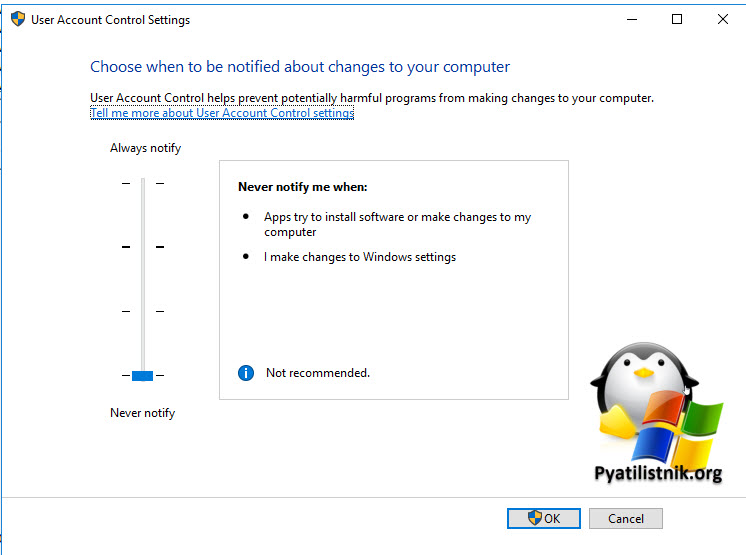
- 3️⃣Попробуйте отключить на недоступном Windows Server функцию UAC. Для этого вызовите в пуске «UserAccountControlSettings.exe»
- 4️⃣На время выключите антивирусные решения и брандмауэр, если соединения до сих пор нет.
- 5️⃣Убедитесь, что есть сетевая связанность. например через утилиту PING и то, что DNS имя разрешается.
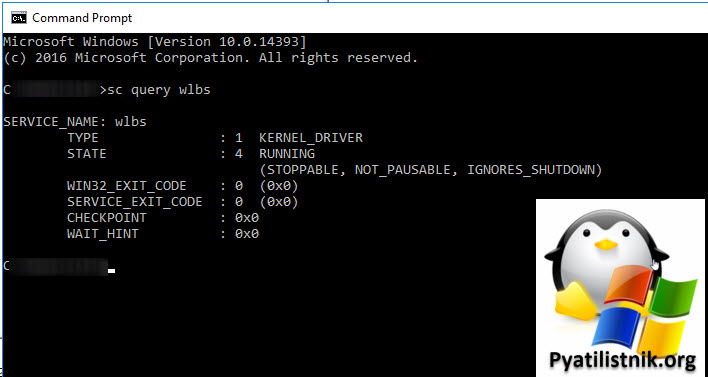
Как посмотреть статус NLB службы
NLB — это драйвер, поэтому вы не увидите его с помощью оснастки службы mmc. Вы можете использовать командную строку «sc query wlbs» для проверки состояния драйвера. Я
считаю, что служба должна иметь возможность зависеть от драйвера. Вы можете попробовать
Куст реестра NLB
Когда вы включаете NLB на сервере, записи реестра по умолчанию создаются в разделе:
HKLMSystemCurrentControlSetServicesWLBS

На этом у меня все, с вами был Иван Сёмин, автор и создатель IT портала Pyatilistnik.org.
Дополнительные ссылки
- https://learn.microsoft.com/ru-ru/windows/security/threat-protection/auditing/event-4625
- https://www.serverbrain.org/administration-practice-2003/nlb-cluster-management.html
- https://learn.microsoft.com/en-us/troubleshoot/windows-server/networking/network-load-balancing-concept-notes

Итак, ошибка error connecting mysql server означает, что у приложения, или сайта не получилось установить соединение с MySQL сервером. Приводим возможные варианты действий, которые можно предпринять:
Если вы наткнулись на эту ошибку на одном из страниц в интернете:
- Вероятно, это временная, техническа проблема на сайте, которую решат через какое-то время. Зайдите на сайт позже.
- Если ошибка на сайте возникла после каких-то ваших действий, к примеру после заполнения формы на сайте, вы можете сообщить об этом администратору сайта. На многих сайтах есть e-mail для связи. Соообщите на какой странице наблюдается ошибка и какие действия приводят к ней.
Если вы разработчик или администратор сайта.
- Проверьте, запущен ли у вас mysql сервер
- Смотрите в логах код ошибки.
- Если вы пользуетесь услугами хостинга, пишите в поддержку.
- Если сервер mysql запущен, а ошибка все равно появляется, попробуйте перезагрузить весь сервер. Как это сделать:
Если у вас есть SSH доступ, авторизуйтесь в системе с правами администратора и выполните команду
# service mysqld restart
Если MySQL сервер на Debian или Ubuntu Linux, то команда будет
/etc/init.d/mysql restart
или же
systemctl restart mysqld.service
Узнать состояние mysql — вместо команды restart выполните команду status.
Если у вас нашлось другое решение проблемы, сообщите нам об этом в комментариях
Registering your DNS could help solve this annoying problem for good
by Madalina Dinita
Madalina has been a Windows fan ever since she got her hands on her first Windows XP computer. She is interested in all things technology, especially emerging technologies… read more
Updated on March 20, 2023
Reviewed by
Alex Serban

After moving away from the corporate work-style, Alex has found rewards in a lifestyle of constant analysis, team coordination and pestering his colleagues. Holding an MCSA Windows Server… read more
- The World of Warships error connecting to the server error message might be due to problems with the game files.
- You can fix this issue by uninstalling and reinstalling the game.
- Another excellent solution is to repair the game files on Steam.

XINSTALL BY CLICKING THE DOWNLOAD FILE
This software will keep your drivers up and running, thus keeping you safe from common computer errors and hardware failure. Check all your drivers now in 3 easy steps:
- Download DriverFix (verified download file).
- Click Start Scan to find all problematic drivers.
- Click Update Drivers to get new versions and avoid system malfunctionings.
- DriverFix has been downloaded by 0 readers this month.
World of Warships has its dedicated fan base, with forums dedicated to the game, but some users have reported an Error connecting server message.
This error message ruins their gaming experience due to frequent stoppage. If you also face this problem, this guide will show you quick ways to resolve it.
Why does the World of Warships error connecting to the server appear?
Below are some of the causes of the World of Warships error connecting to the server message:
- Corrupt game files: Sometimes, World of Warships can’t connect to the server because your game file is corrupt. You need to verify the integrity of the files on Steam to solve this problem.
- Outdated network driver: If your network driver is outdated or faulty, you might experience this issue. You need to update your driver to the latest version to solve this problem.
- Issues with location server: In some cases, this issue might occur because the World of Warships server is temporarily unavailable in your region. This has happened to some EU servers and might be the case for you too. The solution to this is to try another game server.
How do you change servers in World of Warships?
Know that you can always change the region on the log-in screen. So, once you have logged out of your account, click the little arrow in the top left corner.
Next, click on the currently selected region, which will give you the option to switch from one server to another.
Creators have also recently offered India-based players on the Asia server an opportunity to transfer to the EU server, making the game even more diverse.
How can I fix the World of Warships Error connecting server message?
- Why does the World of Warships error connecting to the server appear?
- How do you change servers in World of Warships?
- How can I fix the World of Warships Error connecting server message?
- 1. Reinstall your game
- 2. Verify the integrity of the game files
- 3. Allow some apps through your firewall
- 4. Try another game server alternative
- 5. Register your DNS
- 6. Update or reinstall your network drivers
1. Reinstall your game
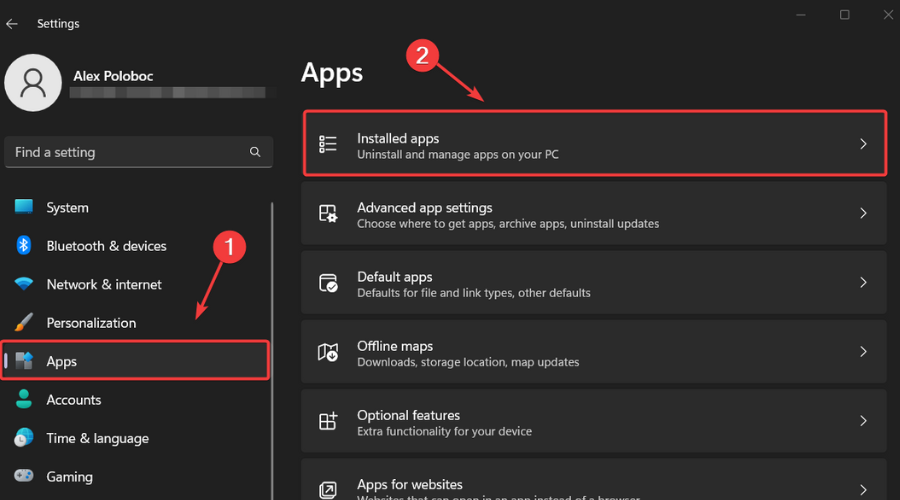
- Press Windows + I to access Settings.
- Select the Apps category, then Installed Apps.

- Locate World of Warships, click on the three dots next to it, and select Uninstall.
Now you have to download the game again, and the issue should be resolved.
2. Verify the integrity of the game files
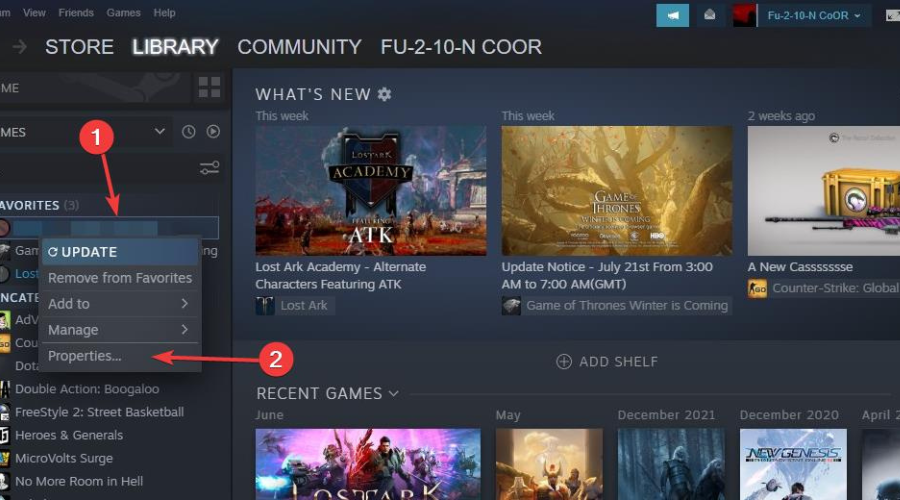
- Launch Steam.
- From your Library section, right-click on the game and select Properties from the menu.
- Select the Local files tab and click Verify integrity of game files.
- Steam will now verify your game’s files.
- Once it’s done, launch World of Warships.
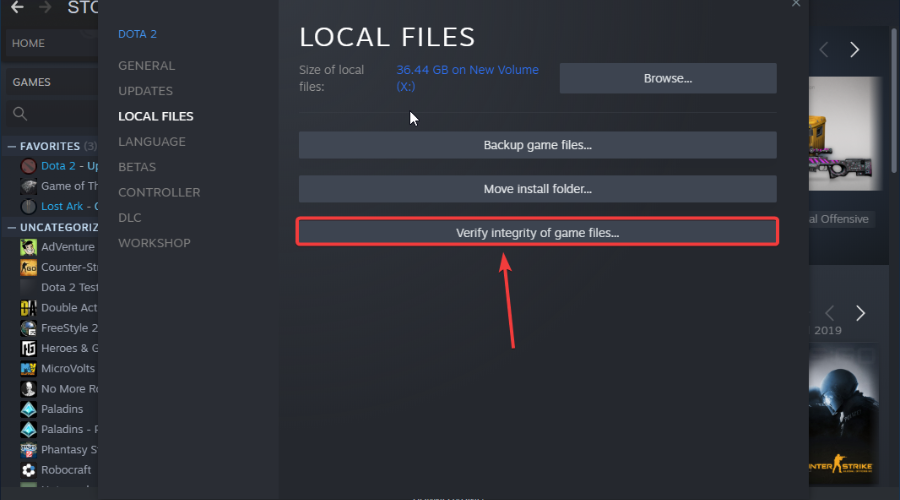
If you’re using the Steam client to access your game, this error might be related to corrupted files in your Steam library. To do the check-up, follow the above steps.
3. Allow some apps through your firewall
- Open your Start Menu.
- Now select Control Panel.
- Then click on Windows Defender Firewall.
- Now, click on Allow an app or feature through Windows Firewall.
- Click on the Change Settings.
- Check the boxes next to the applications you want to allow to access the Internet.
- Click OK to save your new settings.
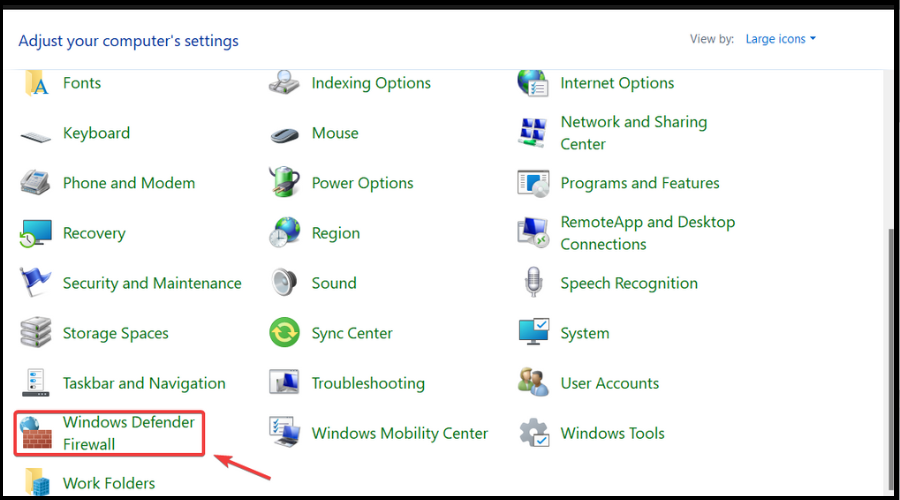
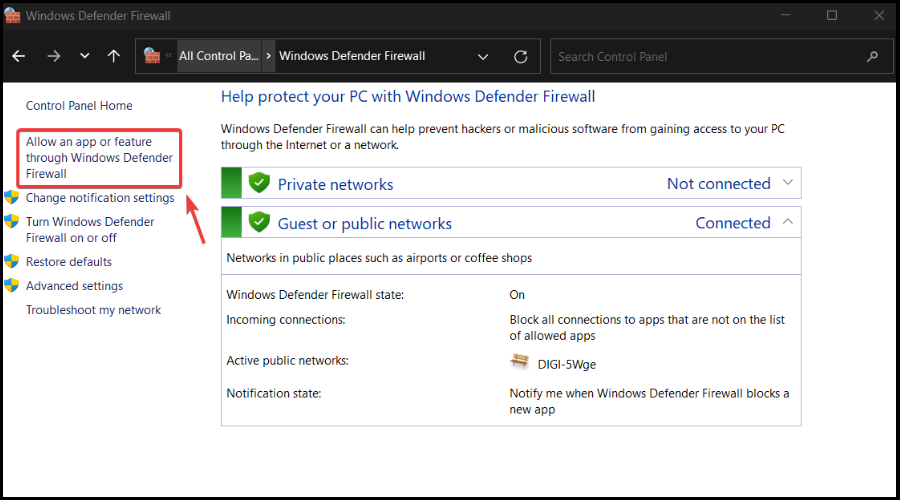
Error connecting server message can appear due to problems with your firewall. To fix it, add World of Warships to the list of exceptions.
4. Try another game server alternative
If World of Warships does not connect with the server, maybe you want to try another game server alternative that can help you provide the best game experience.
We suggest you try Host Havoc, a high-performance server with excellent 24/7 technical support that helps you fix the issues quickly and fast.
Outdated drivers are the main reason for errors & system issues. If some of your files are missing or crashing, an automated solution like DriverFix can solve these problems in just a couple of clicks. And it’s also lightweight on your system!
Host Havoc has a custom control panel that is very easy to use to change maps and install further modifications to your server.
Here are some of its main features:
- 24/7 Customer Support
- Daily Backups Available
- Complete Control of Your Server
- Full FTP Access
- Instant Server Setup
- Easy Configuration
- Switch Games Any Time
- Steam Workshop Availability
- Free DDoS Protection
With a powerful control suite and unique features and installers, this server hosting is quite simple for novice and advanced users.

Host Havoc
High-performance hosting services with DDoS-protected networks and 24/7 support.
5. Register your DNS
- Type cmd in your Start Menu to open Command Prompt.
- Type this command and then press Enter:
ipconfig /registerdns - After completing the operation, type in exit in Command Prompt, and then restart your machine.
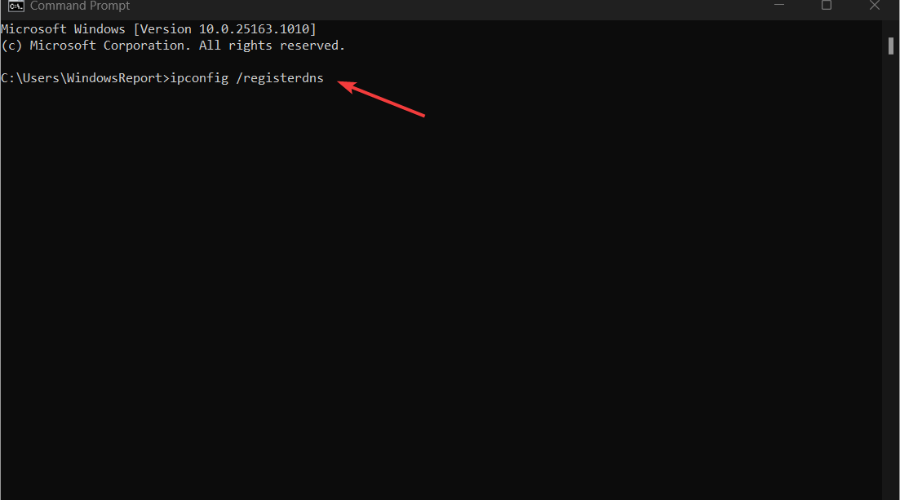
This is a simple solution to solve your network-related issues, including the Error connecting server messages.
- Discord Message Failed to Load? 5 Methods to Fix Them
- Minecraft Exit Code 6: How to Fix It in 4 Steps
- Here are the first 4 PC games going from Xbox to Boosteroid
- Roblox Configuring Stuck Loop: 4 Ways to Fix It
- 6 Ways to Fix ESO Launcher Stuck on Loading
6. Update or reinstall your network drivers
- In the search box on the taskbar, select Device Manager.
- Select a category to see the names of devices, then right-click on the one you’d like to update.
- Select Update driver.
- Now, click on Search automatically for drivers.
- Once it’s done updating, you’re all set.
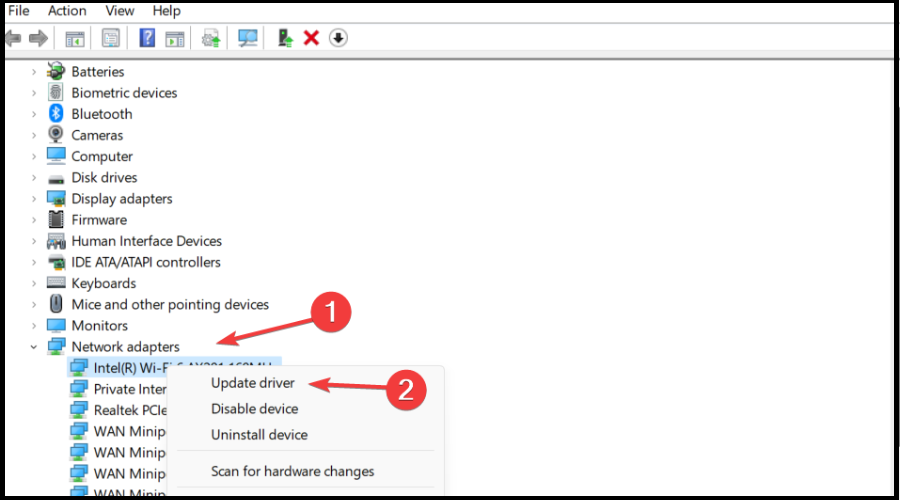
If all else failed and you’re still getting an Error connecting the server in World of Warships, you can try updating/reinstalling your network drivers.
To reinstall your network drivers, follow these steps:
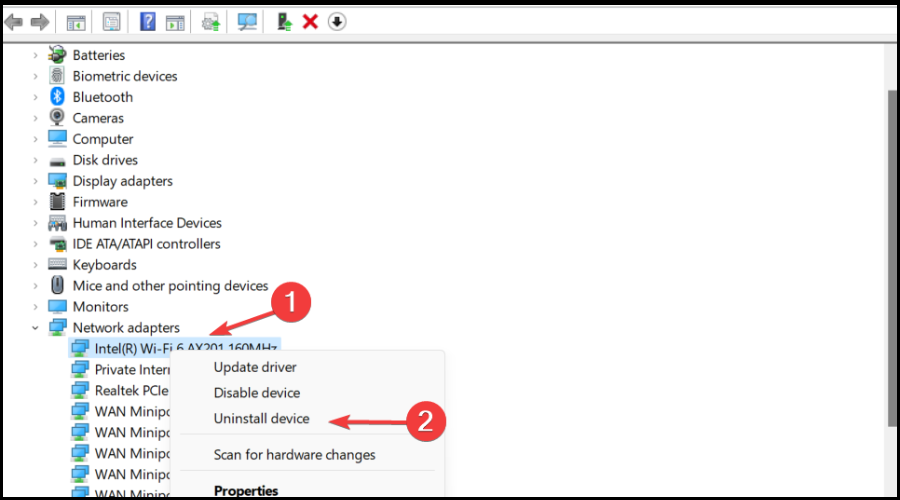
- Open the Device Manager.
- Right-click on the name of the device and select Uninstall.
- Now restart your machine.
- Windows will attempt to reinstall the driver at start-up.
This guide will help with issues such as World of Warships can’t connect to a server, Code 1021 World of Warships, or Wargaming being unable to connect to the content service.
It is also helpful in situations like World of Warships code 526 and other types of World of Warships connection issues.
Not only PC players have trouble playing this game, as World of Warships Legends errors connecting to a server on PS4 and World of Warships legends errors connecting to a server on Xbox One have also been reported.
That being said, the most common error code you could get for this title is a World of Warships error connecting server update client. But now you know how to deal with it, so it’s already looking better.
We hope you managed to fix the Error connecting server error using our solutions. If you found our solutions helpful, let us know in the comments section below.
Still having issues? Fix them with this tool:
SPONSORED
Some driver-related issues can be solved faster by using a dedicated tool. If you’re still having problems with your drivers, just download DriverFix and get it up and running in a few clicks. After that, let it take over and fix all of your errors in no time!
![]()